Showing posts with label Assigning Schedule. Show all posts

How to Customize User Duty Roster in TimeTec TA


Introduction
Each user has his/her own duty roster which contains his/her duty on the specific dates. Choose weekly, bi-weekly, or yearly calendar views and click at the table column to edit the Schedule or to add Leave or Holiday.

Process
1. Go to Schedule > Customize User Duty Roster

2. Click on the user roster 

3. Customise user Shift and Day Type > Choose effective date > Save & Generate

The Customize User Duty Roster allows you to change all listed information below:
Day Type
       - Schedule 

       - Leave

       - Holiday

Note: If some of the screenshots or steps viewed here are different from the ones in the current system, this is due to our continuous effort to improve our system from time to time. Please notify us at info@timeteccloud.com, we will update it as soon as possible.

Flexi Schedule Configuration for Federal Ministries and Departments of Malaysia 2019


Introduction
Recently, the Public Service Department (PSD) of Malaysia announced that civil servants could opt for flexible working hours.

Fortunately, in FingerTec software, Flexi Schedule is being offered as one of the schedule options for users, and they can configure it quickly based on the schedule assigned for the civil servants as shown below.


Process
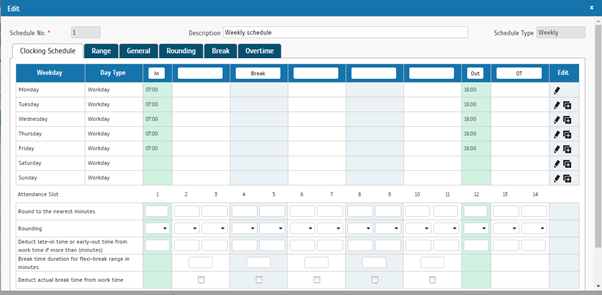
1. To add Flexi Schedule, go to Attendance tab > Clocking Schedule > Add Clocking Schedule > Select ‘Flexi’ for the Work Schedule field.


2. For civil servants working in Kuala Lumpur, Putrajaya, Selangor, Perak, Sabah, Sarawak and Perlis:

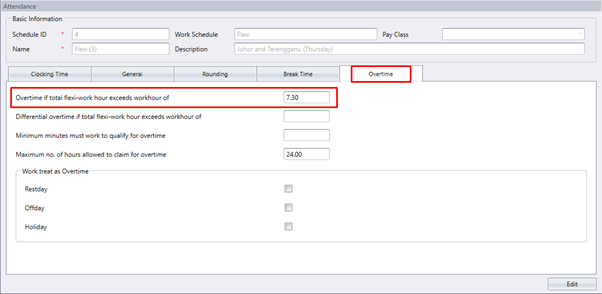
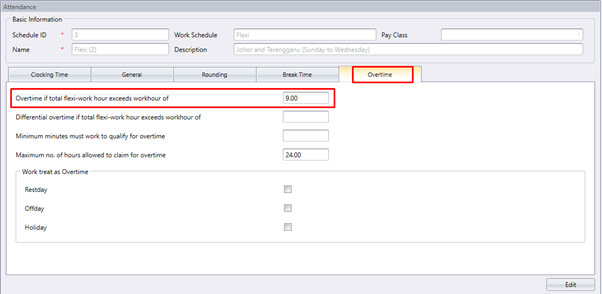
i) Insert the latest time allowed to start work, which at 08:30 AM into the IN column and set the total hours of work per day which is 9 hours in the ‘Overtime if total flexi-work hour exceeds workhour of option.


3. For civil servants working in Johor and Terengganu, you need to add two Flexi Schedules since the total hours of work per day for Sunday to Wednesday and Thursday are different.

i) Sunday to Wednesday: Set the clocking time only for Sunday to Wednesday and set the total hours of work per day same as above.
ii) Thursday: Set the clocking time only for Thursday and set the total hours of work per day to 07.30 hours.
4. To add Group Duty Roster, click on Group Duty Roster > Add Duty Roster > Select ‘Weekly’ for the Roster field.
i) For civil servants working in Kuala Lumpur, Putrajaya, Selangor, Perak, Sabah, Sarawak and Perlis:
Edit > Auto Schedule > Make sure the day type is correct and assign the same schedule for all days > OK & Save. Then, assign users for this roster.
ii) For civil servants working in Johor and Terengganu:
Edit > Auto Schedule > Make sure the day type is correct and assign the same schedule for all days except Thursday which you need to select the schedule created especially for Thursday > OK & Save. Then, assign users for this roster.
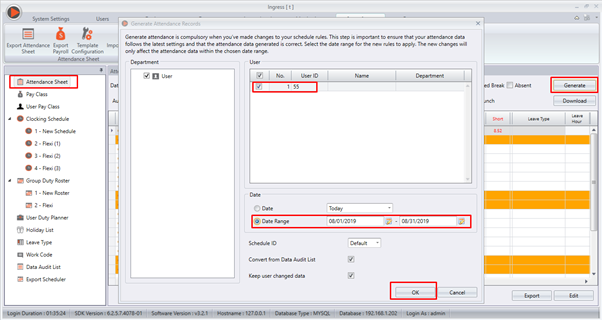
5. Finally, go to Attendance Sheet > Generate > Select users > Select the correct date range > OK in order for the data to display accordingly.
Note: If some of the screenshots or steps viewed here are different from the ones in the current system, this is due to our continuous effort to improve our system from time to time. Please notify us at info@timeteccloud.com, we updates it as soon as possible.

How To Configure ‘Overtime Only After’ Feature in TimeTec TA


Introduction:
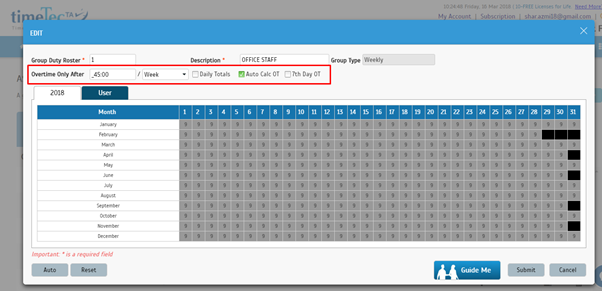
Overtime Only After is an option that is available on Group Duty Roster whereas it allows the system to treat extra working time as Overtime or OT whenever the predefined value is exceeded. Here we will be discussing on how to configure the Overtime Only After feature in our Smart Solution, TimeTec TA.

Benefits:
Depending on company policies regarding payroll calculation, by using Overtime Only After option, the HR administrator can choose to accumulate the extra working hour for their employees either by weekly or by monthly basis as the options are available in Weekly, Bi-Weekly, Semi-Monthly or Monthly setting. Below are the necessary steps needed to be taken in order to configure the Overtime Only After feature.

Process:
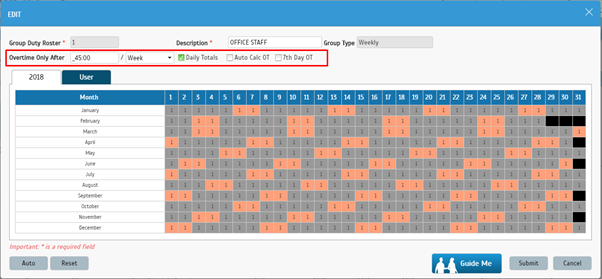
The OverTime Only After feature is available under Group Duty Roster setting (TimeTec TA > Schedule > Assign Schedule and Users into Roster > select Roster)


Case study 1:
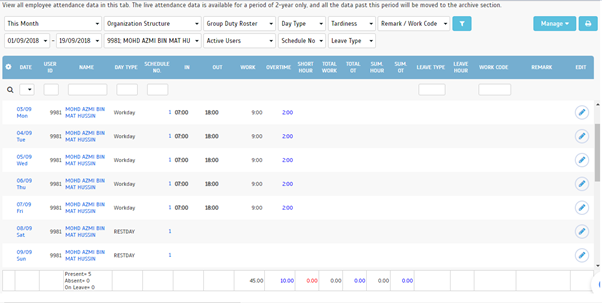
For example, if a predefined working hours in a week is set at 45 hours and an employee works a total of 50 hours for that particular week; 5 hours will thus be considered as OT for the employee. If the total working hours does not exceed 45 hours, TimeTec TA will in turn treat it as normal working time.
 

Step 1
Create the clocking schedule. E.g.: IN - 0700 / OUT – 1600 (Monday to Friday)
 

Step 2
Create the group duty roster and set Overtime Only After to 45.00 hours per week with Daily Total.
 

Step 3
Download and Generate the Attendance sheet based on the Check In and Check Out time as shown below, whereby if the total working hour exceeded 45 hours, the system will then calculate the extra working hour as Overtime.
 

Step 4
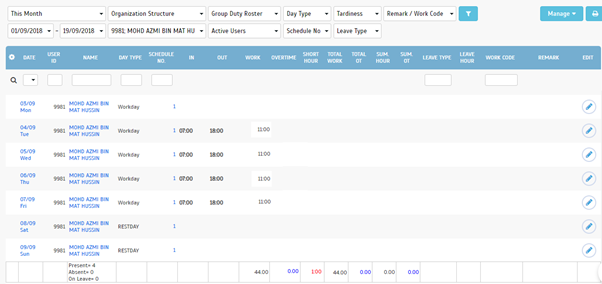
However, if the total working hour within the weekly basis does not exceed 45 hours, then the system will calculate it as short.
 

That’s it! You’re now all set to enjoy the convenient feature of Overtime Only After within TimeTec TA. Note that users can also check the reporting on Daily Totals, Auto Calculate OT and 7th Day OT if the rule applies.

Note: If some of the screenshots or steps viewed here are different from the ones in the current system, this is due to our continuous effort to improve our system from time to time. Please notify us at info@timeteccloud.com, we will update it as soon as possible.
How To Easily Assign Schedules And Users Into Rosters Within TimeTec TA


Introduction
Managing Users and Schedules in TimeTec TA is one of the crucial parts that Admins need to pay attention to in order to ensure that the users are assigned with the correct schedule and roster. Likewise, it is also important for the users to follow the assigned schedule and the admins to manage the users’ attendances appropriately.  This is a guide on how to easily assign schedules and users into rosters within TimeTec TA as shown below:

A : Assigning Schedule
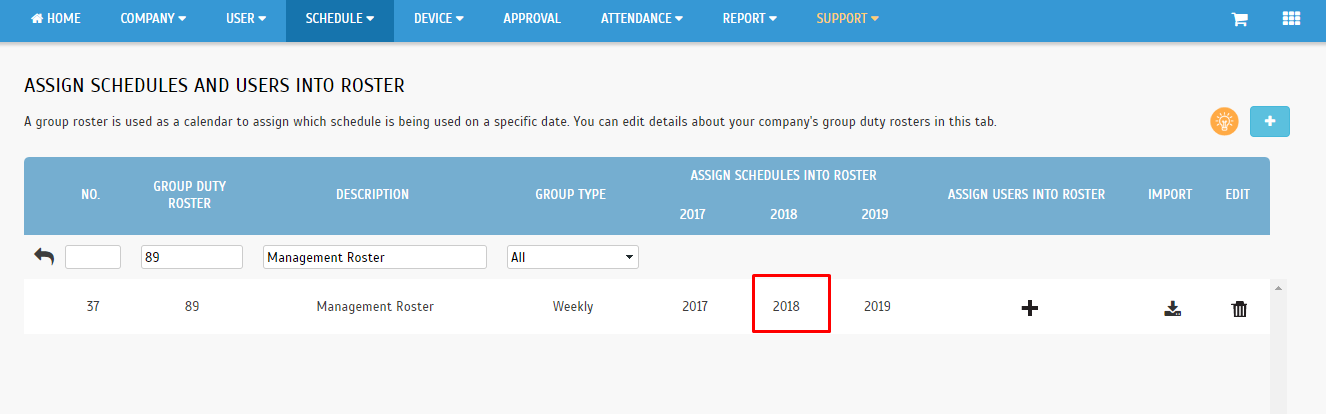
1) Login to your Administrator account and proceed to Schedule tab > Assign Schedules and Users into Roster


2)  Click “+” symbol to Add new Roster


3) Group Duty Roster allows users to assign Annual Schedule including Working Day, Holiday and Leave Schedule. Please fill in the compulsory fields such as Group Duty Roster ID, Description and Select Group Type based on your preferences.

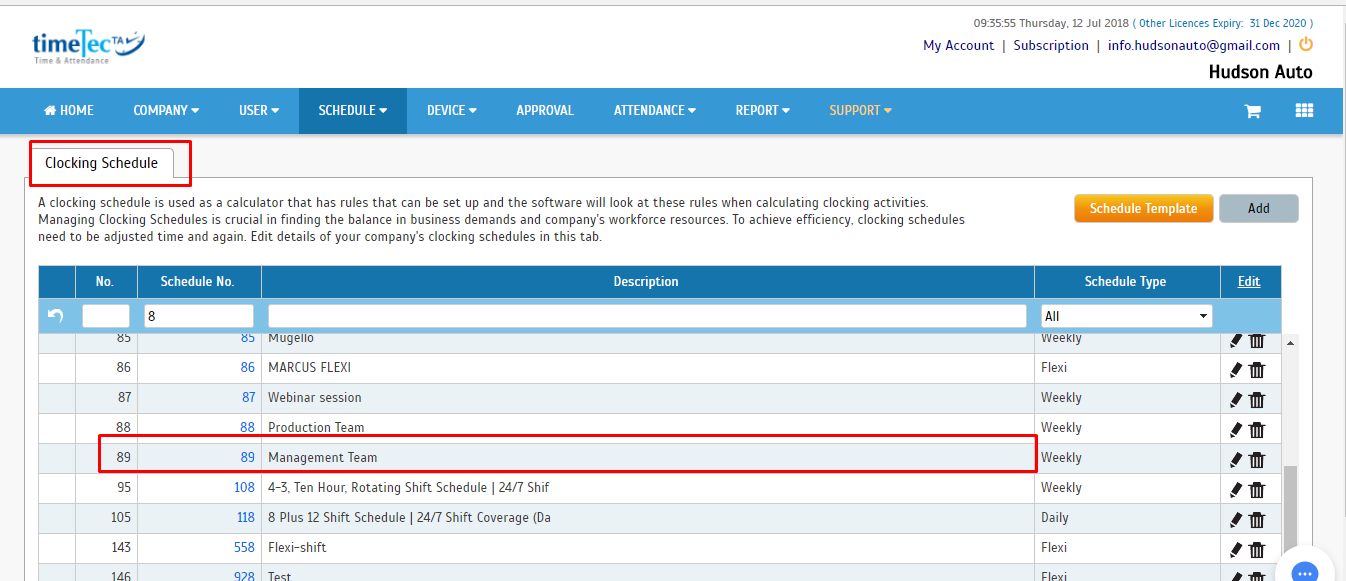
*Note : Group Duty Roster ID must match the schedule number in order for the data to be synchronized automatically.


Clocking Schedule

Once you’ve inserted the Group Duty Roster ID ( which is the same as the Clocking Schedule ID), the system will then automatically assigned the schedule into the roster.

*Note : Restday/Offday in Roster will follow Restday/Offday that has been configured in the Clocking Schedule setting.


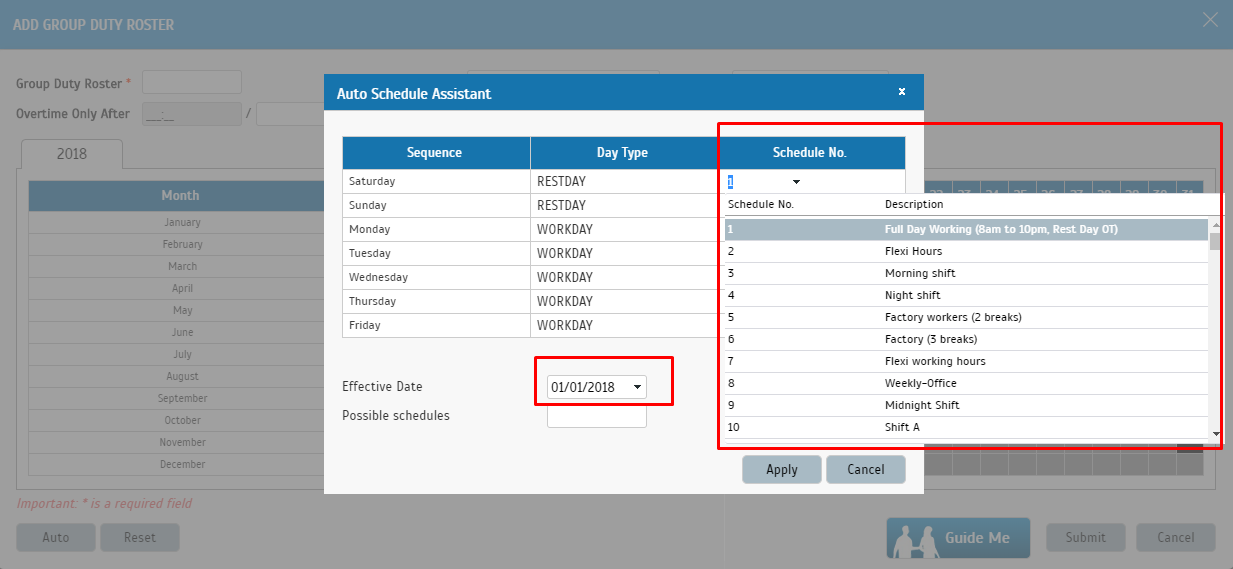
4) If you wish to carry out any changes to the Roster, please click on the Auto button and you may then change either Schedule Number or Effective Date.

Note : Effective date will determine the period whereby the schedule will start taking effect in this roster. Hence, choosing 01-01-2018 will thus assign this schedule for the whole year.


5) After the changes have been submitted, Admins may review or edit the roster by choosing the current year, if necessary.


B : Assigning Users
1) After having completed the assigning of Schedule into the Roster, please click on the “+” button to begin assigning the Users into the Roster.


2) Choose your preferred users by ticking on the box, and click Submit


3)Next click Submit and you will be prompted by a window asking you to choose the date for the purpose of generating the Attendance.


Once done, Admins can then start viewing the user’s attendance record in the Attendance sheet accordingly.

Additional Notes:
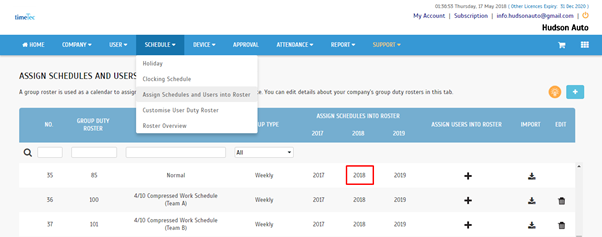
1) If you wish to edit a Group duty roster after you have already assigned schedules into the roster, you can do so by clicking on the relevant year displayed under the ‘Assign Schedules into Roster’ column.


2) If you need to customise duty roster for individual users, it can be done at Schedule > Customise User Duty Roster. For example, if there is an employee that share the common Group duty roster but has a temporary change of work schedule, you do not need to create an additional roster to accommodate this.  You can simply change the working calendar solely for this user at Customise User Duty Roster page.


Note: If some of the screenshots or steps viewed here are different from the ones in the current system, this is due to our continuous effort to improve our system from time to time. Please notify us at info@timeteccloud.com, we will update it as soon as possible.

Related Posts:
Notify Staffs on Roster Changes with TimeTec TA Roster Notification
Managing Holiday for Different Department/Branch in TimeTec TA & Leave
TimeTec TA Roster Overview

Configure Your Ramadan Schedule With TimeTec TA


Introduction:
TimeTec TA is a cloud-based solution that can manage different working schedule to accommodate seasonal needs or any situations that require the changing of work schedule. For example, during the Islamic month of Ramadan, Muslim employees will not be taking any lunch break and will in turn end their working period an hour earlier than the usual working hour. By using the group duty roster, you can configure the clocking schedule for Ramadan easily without having to take any additional steps.

Benefits:
The configuration is beneficial and vital to most departments especially the HR department since it can differentiate the differences in the roster observed during specific seasons such as Ramadhan without affecting the attendance records before and after the Ramadan period. After the configuration of the new roster is completed, users can switch the roster with just a single click, and TimeTec TA will record all of the employees’ clocking details during Ramadan or any specific times that require schedule changing. Note that users will need to switch back to normal mode once Ramadhan or other specific seasons have ended in order to revert to the normal schedule. That said, below is a short guide on how to configure your Ramadan schedule with TimeTec TA:

Process: 
Step 1 -
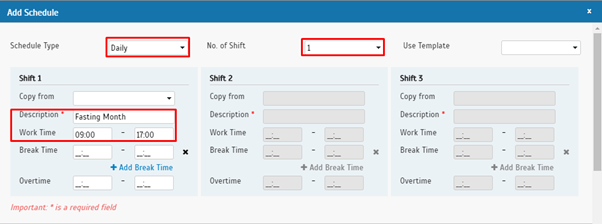
Create a daily schedule for Ramadan (go to Schedule tab > Clocking Schedule > Add). Configure the Work Time for the month. Example: IN = 0900 and OUT = 1700. You can also set the schedule rules according to your company policies for this clocking schedule. After finishing the configuration, click the Preview button and a preview of the clocking schedule will be displayed accordingly. If everything is correct, click Submit to save the clocking schedule into the system.


Step 2 -
Next, proceed to the group duty roster (go to Schedule tab > Assign Schedule and User into Roster > select the Roster that you want to change > click at the year that you want to change). For example, Ramadan in 2018 is from 17 May 2018 until 16 June 2018. Assign the group duty roster to the Fasting Month Schedule.


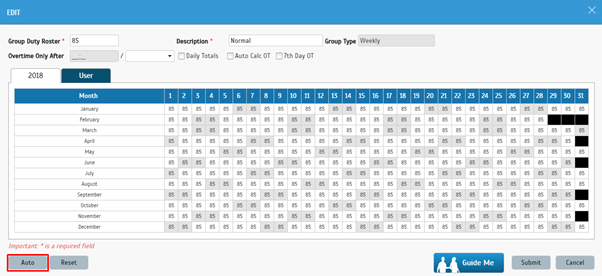
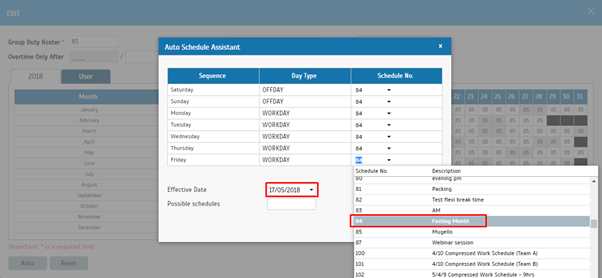
Click the Auto Button and change the schedule to Fasting Month Schedule as well as choose the Effective Date which is 17 May 2018. The Group Duty Roster will thus change the Clocking Schedule starting from the effective date.


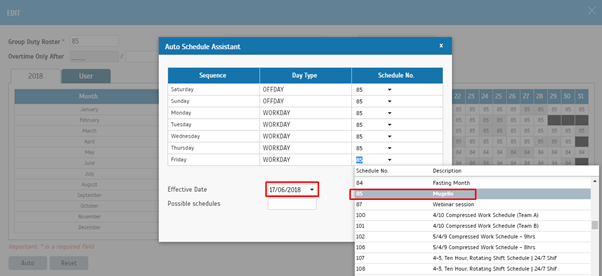
However, the fasting month is until 16 June 2018 only. Therefore, you need to click the Auto Button again and select the Normal Schedule in addition to choosing the Effective Date which is 16 June 2018.

Step 3 -
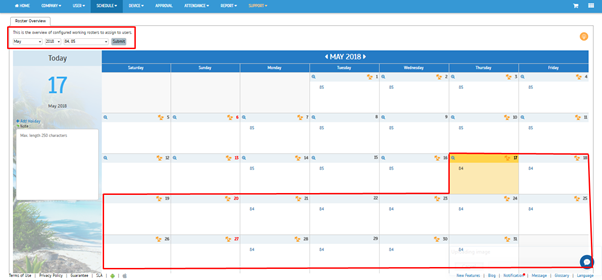
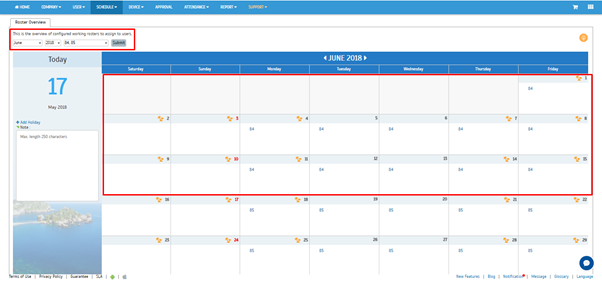
Once the group duty roster is updated with the Fasting Month Schedule, proceed to the Attendance Sheet > Generate for All User > from 1 January 2018 until 31 December 2018. Other dates will remain as in the default schedule except for 17 May 2018 until 16 June 2018, which will be changed to the Fasting Month schedule. Note that you can also check the Roster Overview for the Normal Schedule and Fasting Month Schedule (go to Schedule tab > Roster Overview > select Month, Year, Normal Schedule and Fasting Month Schedule ID > click Submit).


Note: If some of the screenshots or steps viewed here are different from the ones in the current system, this is due to our continuous effort to improve our system from time to time. Please notify us at info@timeteccloud.com, we will update it as soon as possible.