Import Roster Function from User Duty Planner to Assign Leave and Change Schedule Number for Specific User via Ingress / TCMS V3

Friday, May 17, 2019 TimeTec 2 Comments


Introduction
In the previous article, we have shared about how to import roster from Excel or text file for a group rosters. However, in this article, we will guide users on how to import roster data from a user duty planner.

The difference between Group Roster and User Duty Planner:

1) Group Roster refers to all users assigned in the roster. So, if you changed the Day Type from “Workday” to “Rest Day”, it will affect all users in the same roster.

2) User Duty Planner is an option to change the roster settings for selected users. So, if you want to change the “Day Type” and “Assign Leave” for the selected user, it will not affect other users on the same roster number.

Steps and Procedures:

1.    User must list down all the changes in the Excel data like in the following sample of the file.

2.    To assign leave for a user, insert a specific field exactly like in the picture above.

3.    To import the Excel data, click Attendance > User Duty Planner > Import roster file > Browse the file > Import
Note: Make sure to close the opened Excel file first before you browse another Excel file.

4. You need to generate the Attendance Sheet by clicking on the “Import” button in order to make sure that the changes made in the User Duty Planner take effect.

The following image shows the result of the process that has been completed.

Note: If any of the screenshots or steps in this manual are different from the current system, it is due to our continuous effort to improve our system from time to time. Please notify us at info@timeteccloud.com. We will update it as soon as possible.


2 comments:

Have any questions or inquiries about FingerTec? Drop your input here.

How To Invite Your Community Into i-Neighbour App and Activate An Account

Friday, May 17, 2019 TimeTec 65 Comments


In i-Neighbour App, a unit owner is a master owner who can invite his family members or tenants as residents in a neighborhood. For example, a unit owner can invite those who stay in his same unit to use i-Neighbour Apps such as his wife and other family members. Additionally, the owner also can add a master tenant (first tenant) and a few other tenants (if he/she rents the house to several people)

This document explains the procedures for owners to invite members into the i-Neighbour App so everybody in the community can be gathered into one system. In other words, owners need to use the App to mark the status of their units, whether occupied, leased or vacant.

Steps and Procedures
Launch i-Neighbour App. The following are the links to download the i-Neighbour App:
a ) i-Neighbour in Google Play
b) i-Neighbour in iOS


2. Tap on the profile picture.


3. Tap on ‘My Unit’.


4. At Occupancy Status, you need to select the unit’s occupancy status: 
a) Owner - Unit Owner who is living in the unit.
b) Rental - Tenant who is living in the unit.
c) Vacant - Unit Owner who is not living in the unit and the unit is not rented out.


5. Tap on the blue icon at the top right of the screen to proceed.


6. Fill in the Name and Relationship (family members, rental or vacant).


These are the selection views from each of the ‘Relationship’ chosen.

a) Family Members


b) Rental

c) Vacant

Note: Once you updated the Occupancy Status as Vacant, all the resident's information will be removed from your unit. This action is non-reversible. Tap ‘Continue’ to proceed or tap on ‘Cancel’ to cancel the action.


7. Tap on the Submit button to proceed.

8. Tap ‘Share Link’ to send the i-Neighbour registration link to your family members. You can choose any social media apps appeared on your mobile screen.


9. The following screenshot is the example on how to send the link to the family members via WhatsApp mobile application.


10. Once the link has been sent, the family member is pending for account activation.


How to activate the i-Neighbour account after receiving an invitation from a unit owner.

1. Tap on the link in the red box to start activating the account.


2. Enter a valid email address for you to use it in the i-Neighbour’s account and tap on Next.


3. Fill in the information and create a password. Then, tap on Submit.
Note: Password must contain a minimum of 8 alphanumeric and has at least one capital letter. E.g.: Abc123456


4. A successful message will be prompted with the QR code appeared at the bottom of the screen for the user to use it to download the i-Neighbour App.


5. Launch the i-Neighbour App and tap on ‘Login’.


6. Enter the same email address and password that you have registered earlier. Then, tap ‘Login’.


7. Your family members/tenant can start using the i-Neighbour App.


We have prepared a video guide on how to add family members/tenants and how to activate an account in i-Neighbor App. Please follow the links below:

1. How to invite owner/rental

2. How to activate an account

If you are still having problems after completing all of the steps stated above, please contact us via support@i-neighbour.com.

Note: If some of the screenshots or steps viewed here are different from the ones in the current system, this is due to our continuous effort to improve our system from time to time. Please notify us at info@i-neighbour.com, we will update it as soon as possible.


65 comments:

Have any questions or inquiries about FingerTec? Drop your input here.

Periodic Password Change for Ingress Software

Friday, May 17, 2019 TimeTec 1 Comments


Introduction
Starting from Ingress MySQL version 3.2.0.14, a new function known as ‘Periodic Password Change’ policy has been implemented for system user accounts. It is very important for account owners to change his/her password periodically to prevent any form of unauthorized access due to compromised passwords. Besides, consistently changing one’s password would make the old password irrelevant and unusable.

Steps and Procedures:

To enable the periodic password change policy, go to System Setting > System Parameter Setting > System > Days before password expires.

By default, the option is left blank which means that it is disabled. To enable it, user can either choose 30 days, 60 days or 90 days before the password expires.

For example :

In this sample, 30 days is selected for “Days before password expires”.


Therefore, a user is required to change the password upon login to Ingress when it reaches the 30 days mark.


In changing the password, the password policy has to have adhered.

a.       A minimum of 8 alphanumeric characters.
b.      Has at least 1 capital letter.


Other than periodic password changing, the user also needs to set the initial password by following the policy above in the first time login to Ingress or after resetting the password.

Note: If any of the screenshots or steps in this manual are different from the current system, it is due to our continuous effort to improve our system from time to time. Please notify us at info@timeteccloud.com. We will update it as soon as possible.


1 comments:

Have any questions or inquiries about FingerTec? Drop your input here.

Access Combo and Anti Passback Settings for R2 & R2c

Friday, May 17, 2019 TimeTec 0 Comments


Introduction
Access Combo is an access control function that requires verifications to be done by a combination of different users. This function is suitable for highly-secured rooms or vaults that need more than senior-level employees from different departments to verify their identities before the door can be accessed. This tip will explain how to set this function in case your company would want to use it.

Steps and Procedures
To set up an access combo for two persons, each person must be assigned to a different group and a different combination
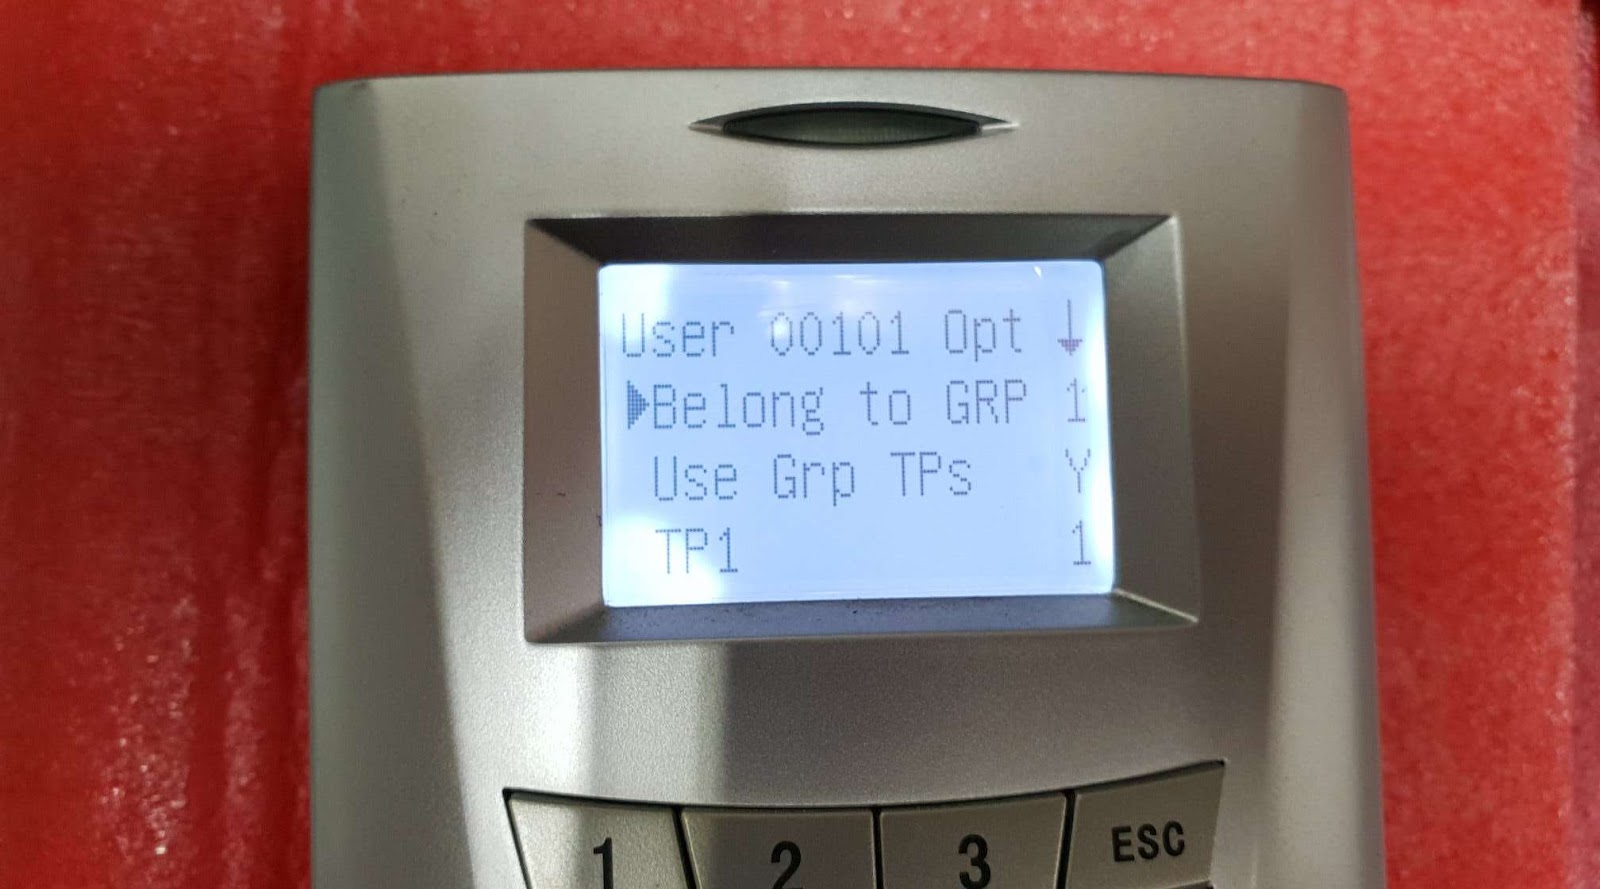
To set up a group and assign a user into a group.
Menu > Options > Access options > User acc opts > ”define user pin” example (101) > Belong to GRP “1”.


Repeat Step 1 for the second user: -
Menu > Options > Access options > User acc opts > “define user pin” example (102) > Belong to GRP “2”.


To assign two persons for an operation combo
2.1 We need to create a combo name, in this example is Combo No 1.
Menu > Options > Access Options > Access Comb > Comb No 1 > OK.


Next, we need to assign two persons in this Operation Combo:-
Person number one belongs to GROUP “1” and Person number two belongs to GROUP “2”.


3. Access Combo For three Persons
Below is an example of Access Combo for three persons but the access can be granted by only two persons at one time: -
3.1 Repeat Step 1 for User Number 3 that belongs to Group 3:-
Menu > Options > Access options > User acc opts > “define user pin” example (103) > Belong to GRP “3”


3.2 Create another combo named as Combo No 2:-
Menu > Options > Access options > Access Comb > Comb No 2 > OK: -


In Combo No 2, the users must be assigned as:-
Person number one belongs to GRP “1” and Person number three belongs to GRP “3”.


3.3 Create another combo named as Combo 3: -
Menu > Options > Access options > Access Comb > Comb No. 3 > OK: -


In Combo No. 3, the users must be assigned as:-
Person number one belongs to GRP “2” and Person number two belongs to GRP “3”.
When the settings have been done, and the door access is assigned with Access Combo function, the relevant people’s fingerprints have to be presented at the door in order to access it.

Anti Passback for One Time IN, One Time Out for R2c (Slave) and R2

Anti Passback is a feature that prevents users from tailgating through controlled areas by tracking the entry and exit counts. A user can only exit an area that they have already been entered and can only enter an area that they have been previously exited.

How to Use
First, we need to determine which device will be assigned as IN and OUT, depends on the installation of the device.

If the R2 has been determined as IN for the door, you can change the configuration as below: -


Menu > Access Options > Slave Unit “Y”
If the R2c (Slave) has been determined as IN for the door, you can change the configuration as below: -

Menu > Access Options > Slave Unit “N”

The configuration for an Anti Passback can be set as below: -
Menu > Options > System opt > Adv Option > Anti Passback NoA 

Menu > Options > System opt > Adv option > Anti Passback “In Out” > OK > Esc > Save

If the configuration doesn't work, it means that the CMOS battery inside the R2 has already drained. To fix this, change the battery CR11220 inside the R2 and all enrolled users have to be *deleted. Then, re-enroll the users via Ingress software. 

*Please make sure to do the back up from the device before you delete the enrolled users.

NOTE: For R2 Firmware, the version is 5114-07. Once you have checked the firmware version,  key in the number “6 1 6 1” and then press the “Up” button.


If you find the firmware version is different from the picture above, please contact support@fingertec.com to request for an assistance to update the firmware.

Note: If any of the screenshots or steps in this manual are different from the current system, it is due to our continuous effort to improve our system from time to time. Please notify us at support@timeteccloud.com. We will update it as soon as possible.


0 comments:

Have any questions or inquiries about FingerTec? Drop your input here.

How To Customize Visitor Details via Web

Friday, May 17, 2019 TimeTec 0 Comments


Introduction
It is very important for residential management to record every visitor’s details before allowing the visitor to enter a neighborhood. The detail information of a specific visitor can be viewed in the walk-in registration form. The information includes name, identity card number, phone number, the purpose of visit and etc and all of this information is available on the web for the admin.

The management can customize the information required from their visitors and therefore, we have prepared a short guide on this topic.

Steps required:
1. Login to i-Neighbour admin web portal. Select Neighbourhood > Settings > Visitor Settings.

2. Select ‘Visitor Details’ and click on the ‘Edit’ icon on the right screen. The three (3) visitor details (ID/Driving License, Name and ID No.) displayed in the picture below are already set as default in the i-Neighbour web for visitor registration and cannot be removed.
3. Upon clicking the Edit button, there are another three visitor details displayed in the red box below that are already added in the web by i-Neighbour. These visitor details are optional and they are irremovable.

To enable the visitor details, click on the desired details and it will turn into blue. The selected visitor detail(s) will be displayed in the walk-in registration form. If you need other information on the visitors, click the +ADD button on right the screen and write the field that you want to add. Then, click on the check icon. To confirm, click on Save.

4. An alert message will be prompted. The added visitor details will be reflected in the walk-in registration form once the guard has synchronized it with the latest updates. Click Yes to proceed. The guards must synchronize their i-Visit to get new detail information of the visitors.
 

5. The added new visitor details are successful.

6. From the i-Vizit view, the newly added details (Mobile No. and Remark) are already displayed in the app for visitors record.

If you are still having problems after completing all of the steps stated above, please contact us via support@i-neighbour.com

Note: If some of the screenshots or steps viewed here are different from the ones in the current system, this is due to our continuous effort to improve our system from time to time. Please notify us at info@i-neighbour.com, we will update it as soon as possible.


0 comments:

Have any questions or inquiries about FingerTec? Drop your input here.