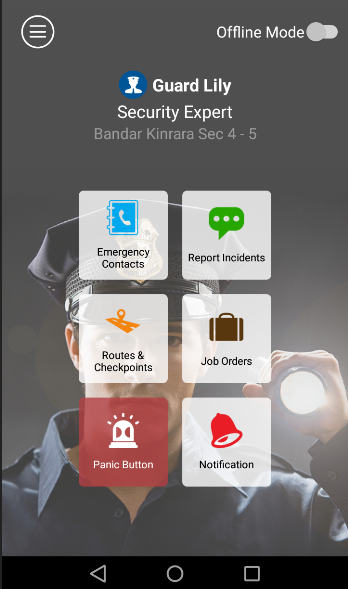
How to Use TimeTec Patrol’s Panic Button
Introduction
Within TimeTec Patrol Mobile App,
there is a useful feature known as the Panic Button that will automatically
send out alert notifications when it is triggered, complete with the user’s GPS
location and auto-captured photos. However, prior to using this button, you
will need to first define the contact list for each of your patrol location, to
ensure the alert only goes out to relevant people who will respond to the
emergency. After the alert is sent, recipients who have viewed the alert
message will also be tracked in the system.
Back in the control room, these
details are then displayed in real-time on the Monitoring page, providing
Security Managers or Supervisors with vital information that helps them make
better decisions for the incident response. In our recent release, we also
added an SOS Alert Report in order for you to easily review the history of its
usage. Since the Panic Button can play an important role when used effectively,
let’s learn more details as shown below.
Overview
We begin with a summary of the
Panic Button’s prerequisite settings and a general look at how it works for the
3 different categories of users:
Where to find this feature?
|
● Guard:
|
i. Mobile App login > Panic Button
|
|
● Admin:
|
i. Web login > Menu > Records > Monitoring
|
ii. Web login > Menu > Report > SOS Alert Report
|
Setup for Notification Recipient(s)
|
● Firstly, Admins should configure the list of Contact person to be alerted (Notification recipient) for each Patrol Location:
|
[ Web login > Go to Routes > Incidents & Notification > Assign Notification Recipients to Incident > choose specific Patrol location > click Edit > add Notification Recipient for SOS Alert (** You can only select TimeTec Patrol user that has been assigned to that patrol location) ]
|
|
● It is recommended to add the Security manager/supervisor and all guards for a particular location, so that any nearby guard can respond
|
|
● All recipient(s) added above will receive both Web and Mobile notifications if a guard under that Patrol Location triggers their Panic Button
|
How to Use/ Process
|
Guard on Duty
Mobile App
|
1. Trigger the button (** Internet connection is required to send the alert immediately; if a guard is using offline mode, it will only be pushed to server once internet connection is available). Once pressed, you can still tap to cancel within 3 seconds before actual activation (To cancel, you must input your user account password)
|
2. After activated, the siren will sound. Your GPS location will be recorded. (** Location services/GPS for mobile must be turned on)
|
3. Four photos will be auto-captured and uploaded to the server
|
4. Once uploaded, you can press Done and input your user account password to stop the siren
|
Notification Recipient/ Contact Person
|
● Recommended to include Security Manager/Supervisor and
|
● Security Guards on location
|
● All recipients will receive both Web and Mobile notifications for S.O.S Alert
|
|
A) Web Notification
|
1. Whichever screen the user is on, they will receive an alert
|
2. S.O.S Alert icon on Menu flashes in red
|
3. Siren is sounded on the computer (you can mute this)
|
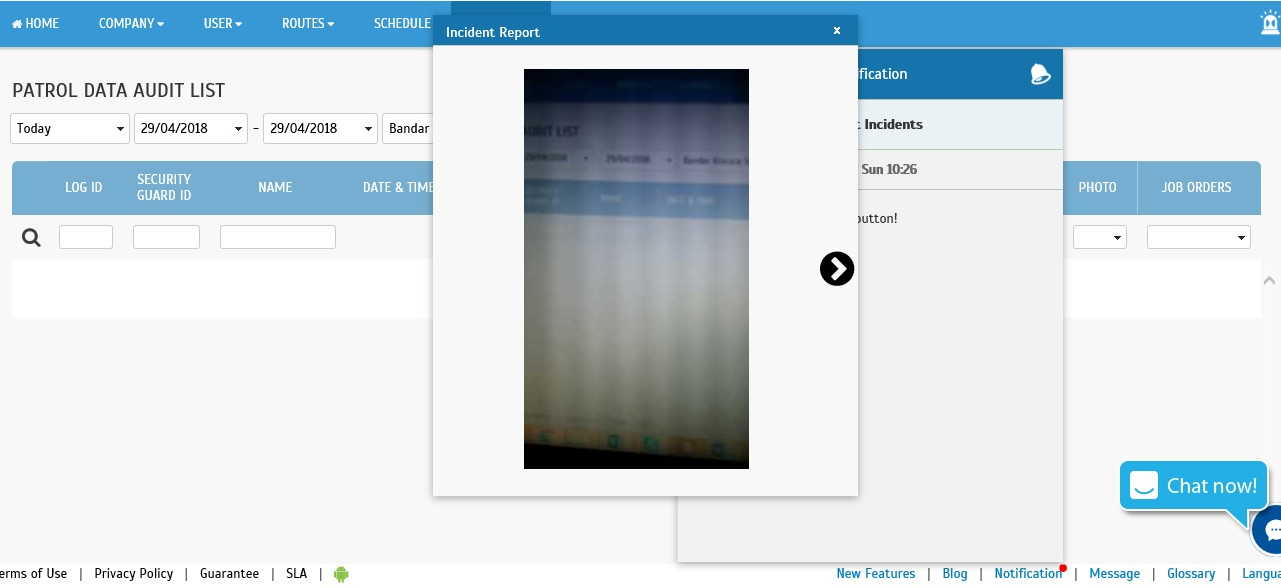
4. Click the S.O.S Alert icon on Menu - View message with GPS location (if available) & the four photos attached
|
5. Once viewed by the user, the alert will stop - Flashing & siren deactivated
|
6. Respond accordingly
|
7. Recipient that viewed the alert is tracked in the system
|
|
B) Mobile Notification
|
1. If user is logged in to the Patrol App when the Button is triggered, they will receive push notification on the mobile phone
|
2. Tap on the notification > redirected to the App’s Notification screen > select Report Incidents to view the notifications
|
3. From there, select the S.O.S Alert - View message with GPS location (if available) & the four photos attached
|
4. Respond accordingly
|
|
|
Admin/ Control Room
|
● Security Manager/Supervisor
|
● Should be assigned as Admin role with rights over the Monitoring module
|
● Should also be added as one of the Notification Recipient to receive the alert
|
|
Web Application
|
1. Monitor patrol shifts at Record > Monitoring. Select the appropriate Patrol Location
|
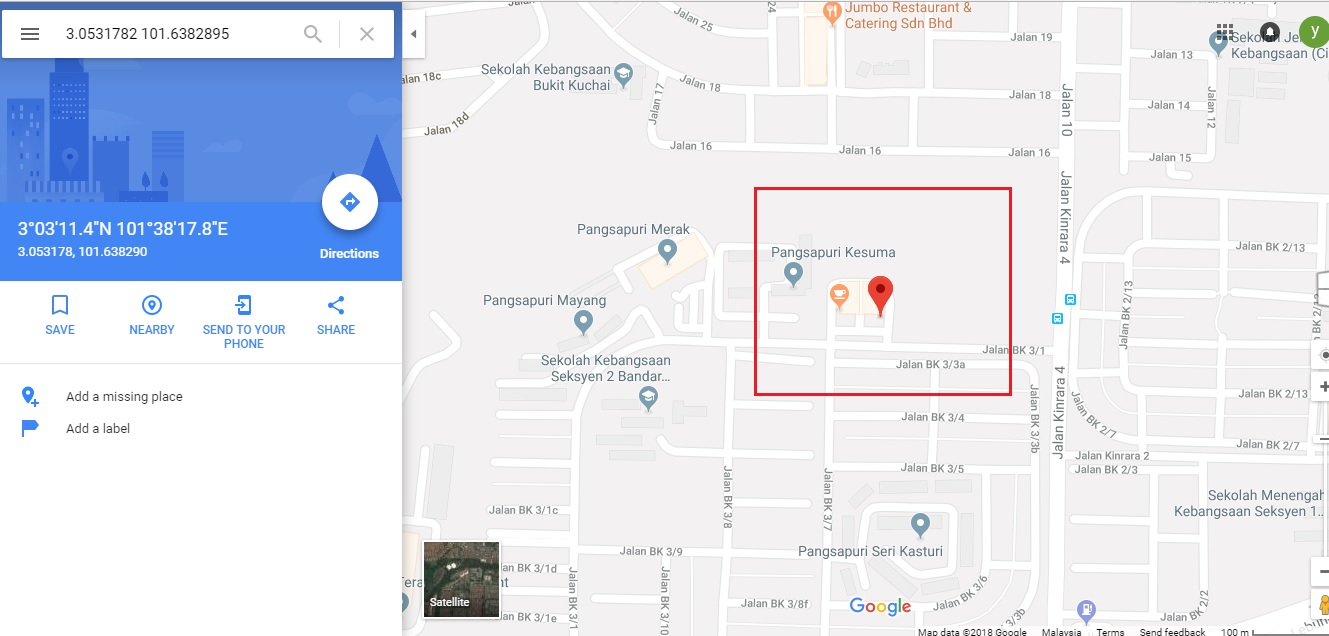
2. Receive alert as a Notification Recipient (refer to the section above) - Click to view the SOS Alert message with GPS location (if available) and photo attachments
|
3. If an Admin has been added as Notification Recipient, they will also be alerted through the standard system notification window (bottom right of the screen)
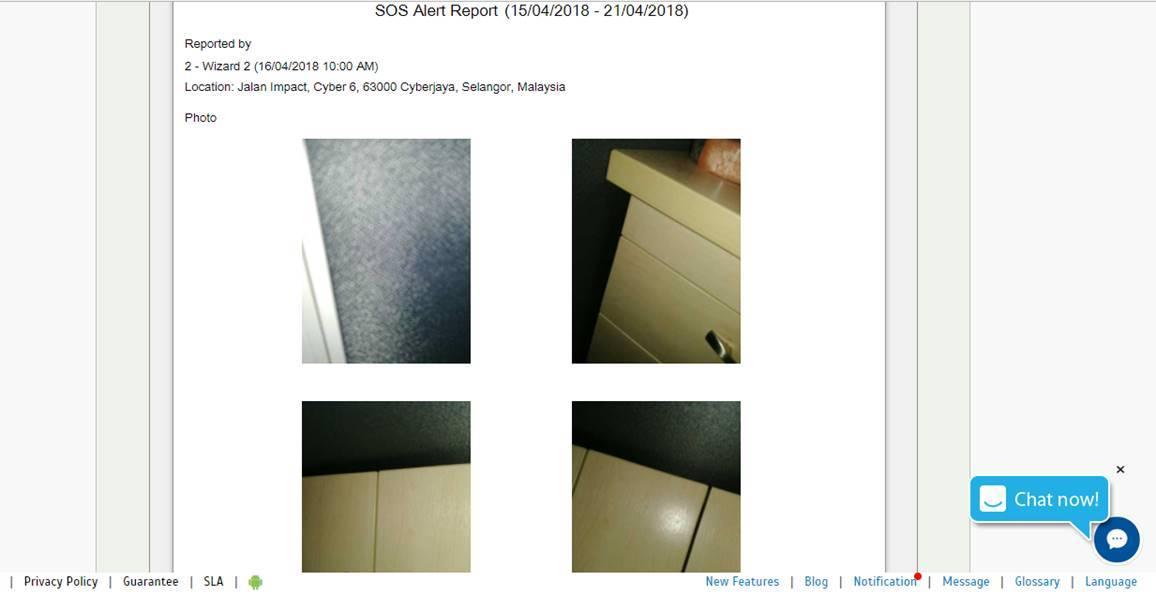
4. Click on Notification > Report Incidents > S.O.S Alert - View message with GPS location (if available) & the four photos attached
|
5. Elsewhere, at Records> Monitoring > scroll down to SOS Alert listing > Review who has viewed/acknowledged the alert to assess for further action
|
6. Coordinate the emergency response
|
7. After resolution, generate the SOS Alert report for review or filing by going to Report > SOS Alert Report
|
|
** Requirements
|
● Before using Panic Button, you need to configure Notification Recipient. In order to do that, you must first configure Patrol Location and assign guards
|
|
● Internet connection must be available to send the alert immediately; if a guard is using Offline mode, it will only be pushed to server once internet connection is available
|
|
● Location services/GPS for mobile has to be turned on, otherwise the Alert will not have the location reported
|
Note: This
feature should only be deployed when there is a genuine need for assistance and
not to be handled irresponsibly.
Step-by-Step Guide
Now that you have an idea of the
overall process, please refer to the relevant sections below for a walkthrough
(with screenshots):
A)
Setup for Notification Recipient
B)
How to Use: Guard on Duty
C)
How to Use: Notification Recipient/ Contact Person
D) How
to Use: Admin/ Control Room
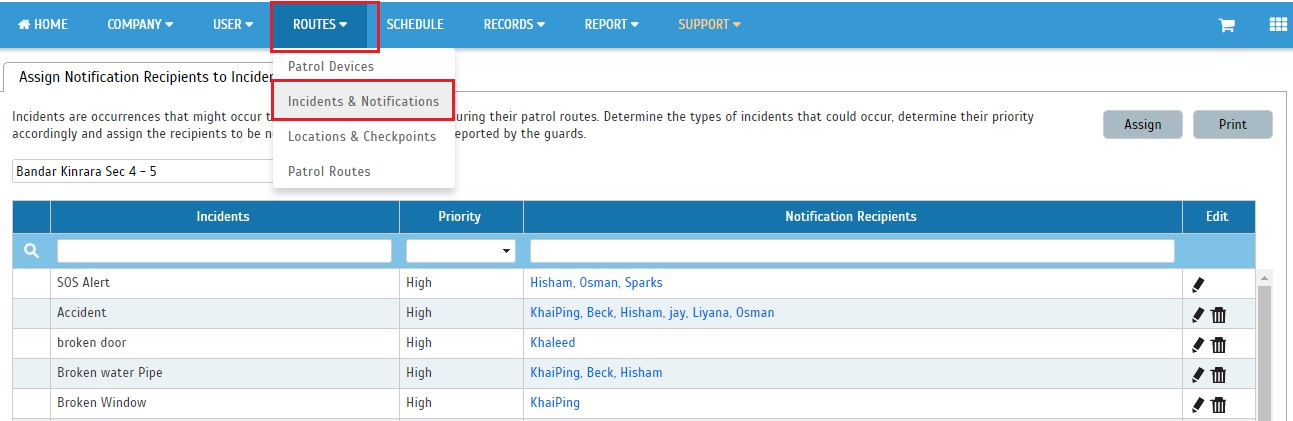
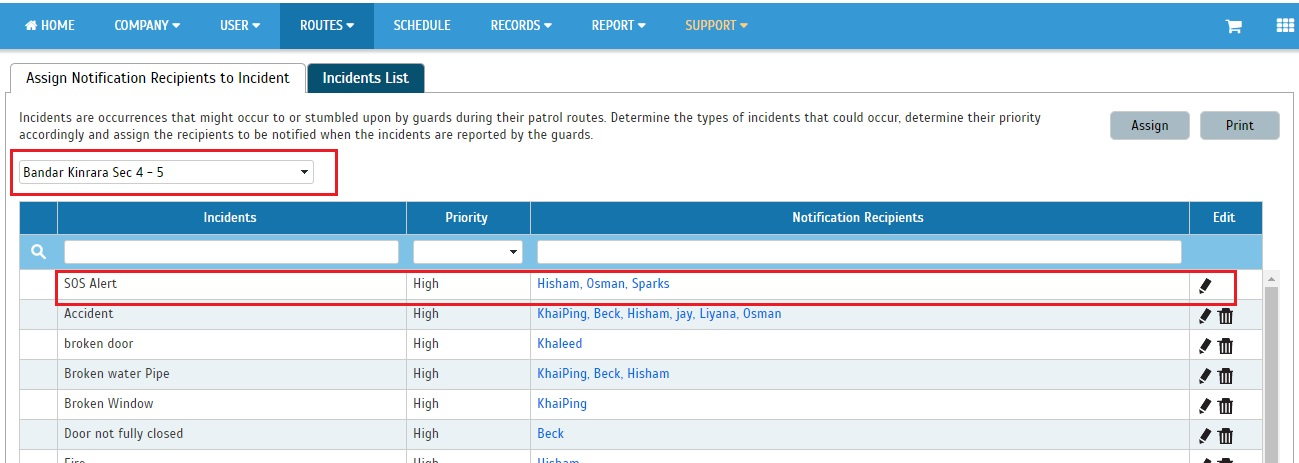
A) Setup for Notification Recipient
1. Firstly, Admins should
configure the list of Contact person to be alerted (Notification recipient) for
each Patrol Location.
Login to Web > Go to Routes
> Incidents & Notification > Assign Notification Recipients to
Incident.
2. Choose your specific Patrol
location > click Edit for SOS Alert > select User > add Notification
Recipient for SOS Alert.
Note: You
can only select TimeTec Patrol user that has been assigned to that patrol location.
3. It is recommended to add the Security
manager/supervisor and all guards for a particular location, so that any nearby
guard can respond.
4. All recipients added above
will receive both Web and Mobile notifications if a guard under that Patrol
Location triggers his/her Panic Button.
B) How to Use: Guard on Duty
Mobile App
1. Trigger the button. (Note: Internet connection must be to send the alert immediately; if a guard is using Offline mode, it will only be pushed to server once internet connection is available)
2. Once pressed, you can still
click to cancel within 3 seconds before the actual activation (To cancel, you
must input your user account password).
3. After activation, the siren
will sound. Your GPS location will be recorded. (Note: Location services/GPS for mobile
must be turned on) Four photos will be auto-captured and uploaded to the
server.
4. Once uploaded, you can press
“Done” and input your user account password to stop the siren.
C) How to Use: Notification Recipient/
Contact Person
1. For each Patrol Location, we
recommend that the appropriate Security manager/ supervisor and all the
security guards on location are included as a Notification Recipient. Please
refer to the relevant section above on how to configure that.
2. Once the Panic Button is
triggered by a guard, all recipients will receive both Web and Mobile
notifications for S.O.S Alert. Therefore, both types of notifications are
discussed below.
Web Notification
1. After the Panic Button is
triggered, whichever screen you are viewing, you will receive the alert. You
can see that the S.O.S Alert icon on the right side of the Menu will be
flashing in red.
2. A Siren will also be sounded
on your computer (You can mute this by clicking on the speaker icon in the
message). Click the S.O.S Alert icon on Menu > View message with GPS
location (if available) and the four photos attached.
Note: GPS
location will only be reported if the guard has turned on Location services/GPS
on their mobile phone.
3. Once viewed by the user, the
alert will stop which means the flashing icon and Siren will be deactivated.
Following that, you can respond to the emergency according to your security
protocols. Please be aware that the Notification Recipient who viewed the alert
will be tracked in the system (At Records > Monitoring).
Mobile Notification
1. Meanwhile, for those using the
Mobile App, if you are logged in to the Patrol App when the Button is
triggered, you will receive a push notification on your mobile phone.
2. Tap on the notification. You
will be redirected to the App’s Notification screen > select Report
Incidents to view the notifications.
3. From there, select S.O.S Alert
in the notification listing to view the message with GPS location (if
available) & the four photos attached.
Note: GPS
location will only be reported if the guard has turned on Location services/GPS
on their mobile phone.
4. Following that, you can
respond to the emergency according to your security protocols.
D) How to Use: Admin/ Control Room
1. The guide below is mainly for
Admin/ Control Room use.
2. In TimeTec Patrol, these users
should be assigned with an Admin role and granted rights over the Monitoring
module.
3. We also recommend that that
they are added as one of the Notification Recipient, in order to receive the
alert. Please refer to the relevant section above on how to configure it.
Web Application
1. Monitor patrol shifts at
Record > Monitoring. Select the appropriate Patrol Location.
2. Receive alert as a
Notification Recipient (refer to the relevant section above for more
information). Click to view the SOS Alert message with GPS location (if
available) and photo attachments.
3. If an Admin has been added
as a Notification Recipient, they will also be alerted through the standard
system notification window (bottom right of the screen).
4. Click on Notification >
Report Incidents > S.O.S Alert - View message with GPS location (if
available) & the four photos attached.
5. Elsewhere, at Records >
Monitoring > scroll down to SOS Alert listing > Review who has
viewed/acknowledged the alert to assess for further action. You can also click
“View Map” or “Photo” for more information.
6. Following that, you can
coordinate your team’s emergency response, send instructions, assistance and
equipment or escalate to the authorities. After resolving the emergency,
generate the SOS Alert report for review or filing by going to Report > SOS
Alert Report.


0 comments:
Have any questions or inquiries about FingerTec? Drop your input here.