

How to Better Use Features Available in Flexi Schedule to Benefit Your Business

Introduction
Flexi Schedule is a flexible hours schedule that allows workers to alter workday start and finish
times. In FingerTec software, Flexi Schedule is being offered as one of the schedule options for
users. However, over the years we received feedbacks that some customers do not quite grasp the
usage of some features in Flexi Schedule. The top 5 useful features in Flexi Schedule that need
further explanation include:
1. Capture the first and last record as attendance
2. Specify the maximum number of in-out clocking pairs for this flexi-hour schedule
3. Enable/Disable employee work code for job costing records
4. Maximum work hours to be considered as the same work day
5. Last logout time to consider as same work day
Benefits
Flexi Schedule doesn’t have a fixed time for users to check in or out from work. Therefore, it is
suitable for individuals without a rigid working time such as doctors, factory workers, and etc. By
reading this tip, you are exploring more features in Flexi Schedule that might be useful to your
organization. Let’s explore these features in detail.
Feature 1
Capture the first and last record as attendance
This feature is only available in the TCMS V3 and Ingress Software. It should be used when user
only requires the first IN and the last OUT transactions of the day within the attendance sheet and
report.
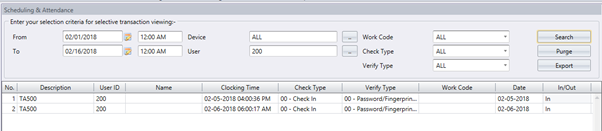
For example, Clocking Data of an employee is recorded 6 times: 8:00AM, 10:00AM, 10:15AM,
1:00PM, 2:00PM, 5:00PM. However, when this feature is enabled the attendance sheet will only
display two time, which are the IN time and the OUT time.
The figure is showing an attendance sheet with this feature enabled and you can only see the IN
time at 8:00AM and the OUT at 5:00PM.


Feature 2
Specify the maximum number of in-out clocking pairs for this flexi-hour schedule
Please note that the maximum clocking pairs supported in the Flexi Schedule is 3 Pairs (6
Transaction Data). Please also note that if Feature 1 mentioned above, the “Capture the first and last
record as attendance” is not enabled, the attendance sheet will display according to what you have chosen in this feature.
If you don’t do anything, by default, the system will display 3-pair clocking data as shown below. If you choose 2-pair, the system will take the first two pairs, 8:00AM, 10:00AM, 10:15AM, 1:00PM into the system as normal working hour, and the OT and Done will be displayed in attendance sheet and calculate it as OT (Overtime) - See figure below. If you choose 1- pair instead of Feature 1, and you have 3-pair clocking data, the attendance sheet will display the first pair as normal clocking data and the 2nd pair as OT and Done, while ignoring the 3rd pair.
If you don’t do anything, by default, the system will display 3-pair clocking data as shown below. If you choose 2-pair, the system will take the first two pairs, 8:00AM, 10:00AM, 10:15AM, 1:00PM into the system as normal working hour, and the OT and Done will be displayed in attendance sheet and calculate it as OT (Overtime) - See figure below. If you choose 1- pair instead of Feature 1, and you have 3-pair clocking data, the attendance sheet will display the first pair as normal clocking data and the 2nd pair as OT and Done, while ignoring the 3rd pair.
Therefore, it’s up to you to choose the number of clocking pairs to be displayed through feature 1
and 2 of Flexi Schedule, according to your business’s preference.


If 3 is chosen in 3-pair clocking environment

If 2 is chosen in 3-pair clocking environment
For more explanation about the clocking pairs in Flexi schedule, you can refer to this article:
http://www.fingertectips.com/2015/01/ingress-tcms-v3-setting-up-flexi.html
http://www.fingertectips.com/2015/01/ingress-tcms-v3-setting-up-flexi.html
Feature 3
Enable/Disable employee work code for job costing records
Okay, now you require more than 3 pairs of clocking data, is flexi schedule a dead end option for you? Not at all. If you decide to include more than 3 pairs of Transaction Data, yes you can. Basically when you are using this feature in flexi schedule, all clocking data will be labelled in pairs (IN and OUT). If any of the clocking data does not have an OUT pairing, the data will not be included in the attendance sheet.

For example,
1 ) Clocking Data : 8:00AM (IN), 10:00AM (OUT), 10:15AM (IN) , 1:00PM (OUT), 2:00PM (IN), 5:00PM (OUT), 5:10PM (IN) , 8:00PM (OUT) – 8 Transaction Data will be shown in the Attendance Sheet because all have their pairs.

2) Clocking Data : 8:00AM (IN), 10:00AM (OUT), 10:15AM (IN) , 1:00PM (OUT), 2:00PM (IN), 5:00PM (OUT) , 5:10PM (IN) , 08:00PM (OUT) , 08:05PM (IN) – The last 08:05PM (IN) will not appear on attendance sheet because it doesn’t have any OUT pair.

Feature 4
Maximum work hours to be considered as the same work day
This feature allows you to set the maximum work hours to be considered as the same work day i.e. 13 hours (maximum time) and allows attendance sheet to capture correct data from audit list for Over night shifts and to make sure that in the attendance sheet the out time does not fall into the "IN" time of the next working day. Hence, as long as the OUT time after 12:00 AM is still in the 13th hours range, the system will consider it as the same working day.
For example when you use this feature and you check in on 20/2/2018 at 13:00 PM and out at 21/2/2018, at 1:00 AM, the attendance sheet will take the clocking at 21/2 for the out time of 20th’s attendance. At 1:00AM you have just crossed the 12th hour and not exceed that 13th hour maximum time, so your out will be recorded for the 20th even though you clocked out on the 21st. A bit confusing at the beginning but you’ll get there.

You can set the maximum hour here. In this example, we put 13.
Please refer below for further examples and explanations:
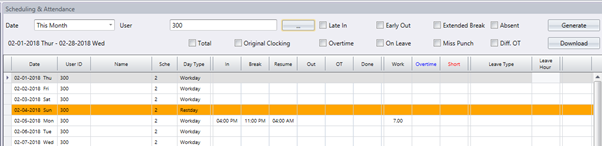
1) User ID100, Check IN at 4:00PM / Check OUT at 4:00AM > Check OUT at 4:00AM is still within the 13 hours range. Therefore, the system will consider clocking OUT at 4:00AM as the same work day.


2) User ID200, Check IN at 4:00PM / Check OUT at 6:00AM > Check OUT time at 6:00AM is already out of the 13 hours range. Therefore, the system will consider clocking at 6:00AM as the next day check IN.

3) User ID300, Check IN at 4:00PM / Check OUT at 11:00PM > Check OUT time at 11:00PM is still within the 13 hours range. Therefore, the system will consider clocking at 11:00PM as OUT time. Note that if the user arrive at work too early for the next day (say at 4:00AM), the system will consider the clocking IN at 4:00AM as the data from the previous day.

Feature 5
Last log out time to consider as same work day
Similar with Feature 4, this option allows the last log out time to be considered as same workday (i.e. 4:00AM daily). Therefore, any clocking data before 4:00AM will be considered as same work day and users must check OUT before 4:00AM. Note that this option cannot be used in conjunction with Feature 4.

Please refer below for further examples:
1) User ID100, Check IN at 8:00PM / Check OUT at 3:00AM > Check OUT at 3:00AM is still before 4.00AM thus it will be considered as the same work day.


2) User ID200, Check IN at 4:00PM / Check OUT at 6:00AM > Check OUT at 6:00AM will be considered as next day check IN, because user punch OUT late which is after 4:00AM.


3) User ID300, Check IN at 4:00PM / Check OUT at 11:00PM > Check OUT time at 11:00PM will be considered as the same work day. However, if users arrive at work too early for the next day, say at 3:00AM, the system will consider the clocking IN at 3:00AM as data from the previous day.


Now that you know how to use these 5 features in Flexi Schedule, you will feel at ease using our system as your Time & Attendance solution. Please note that on top of TCMS V3 and Ingress, we also offer cloud -based Time & Attendance solution for easier management of data. Get your trial account for FREE and try the system first hand, we sure you will like it.


5 comments:
Have any questions or inquiries about FingerTec? Drop your input here.