Showing posts with label face id5 series. Show all posts

Invalid Time Period Error in Face ID5 for New Registered User


Introduction
When a new user has been created and enrolled in Face ID 5 series devices, the user does not have any access level assigned to him yet. This will lead to a failed verification with ‘Invalid Time Period’ error message shown at the device screen during verification. This article will explain the steps on how to solve the ‘Invalid Time Period’ error at Face ID 5 devices.

Process
1. Once a new user has been created in a Face ID 5 device, you need to download the user to Ingress software. New users will be automatically pushed to AWDMS software. Thus, you only have to download the user in Ingress software.

2. Go to Users module > Download User > Double click on Device > Select new user > Select All Data > Click Download

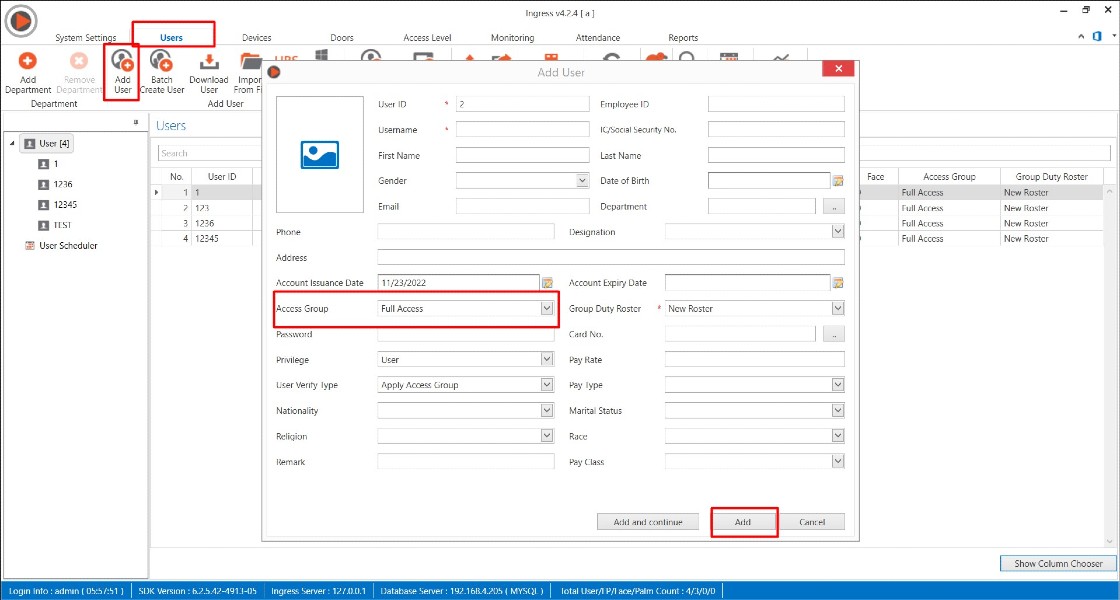
3. After the user has been downloaded into Ingress software, you need to assign the user to the existing access level that you already configured during the first setup. There are two ways to assign new users to the access group.
 
First, you can directly assign the user group in the Users module. Select New User > Go to Access Control > Edit > Select Access Group to Full Access > Save.

Secondly, you can go to Access Level module > Select Full Access group > User tab > Edit > Add > Select Users > Click OK

4. Once a new user has been assigned to Access Group, you can directly upload the user to the AWDMS. Go to Users module > Click Upload User > Select AWDMS > Select New User > Select All Data > Click Upload.


5. If a new user is created from Ingress software, you need to make sure to assigned the user Access Group before uploading the user to the device.
REMARK : Above article can only be performed if the Access Level has already been created and synchronised from Ingress software to AWDMS during the first time setup.
 
Note: If some of the screenshots or steps viewed here are different from the ones in the current system, this is due to our continuous effort to improve our system from time to time. Please notify us at info@timeteccloud.com, we will update it as soon as possible.


Troubleshoot Alarm Triggered From Face ID 5/TD/FTD


Introduction
An alarm is very important to notify a user if something is happening to the device or the access system. However, users sometimes do not know what causes the alarm to trigger. Here, we will show you how to troubleshoot what caused the alarm to trigger.

Step 1:
-         First, check the alarm symbol from the top right corner of the device.

Step 2:
-         Please check and make sure the tamper switch (magnet) is perfectly fit to the back casing.

Step 3:
-         Check door sensor setting:-
Go to MENU -> Access Control -> Access Control Options -> Door Sensor Type -> Select ‘NONE’ if you don’t use door sensor.

 
*Notes: If you are using a door sensor and the alarm is still making a sound, please check your door sensor wiring.
 
Step 4:
-         Please restart the device after all the settings above have been done.
 
Alarm triggered for external siren:
External alarm will trigger if you set up one of these settings on the device:-

1. Temperature over the range and mask detection
-         Go to MENU – System – detection management

 
2. Door alarm.
-         It will trigger when the door does not close after the time set on the device is up.(go  to MENU – Access Control – Access Control Options)

3. Verification failure:
-         Go to MENU – Access Control – Duress Options

 
Note: If some of the screenshots or steps viewed here are different from the ones in the current system, this is due to our continuous effort to improve our system from time to time. Please notify us at info@timeteccloud.com, we will update it as soon as possible.


How to Clean Old Attendance Photo for Face ID 5 Series


Introduction
It is crucial to perform maintenance for attendance photos regularly to maintain the database size for Ingress and AWDMS. Too many attendance photos will cause database size to keep on increasing tremendously and cause a backup problem if there is too much data. 

Device side
1) Please make sure you downloaded all the logs and attendance photos into your software 
2) Delete the attendance photos in the device to avoid old attendance photos being downloaded again into the database upon performing the maintenance
Go to Menu > Data Mgt > Delete Data > Delete Attendance Photo > can select Delete All or Delete by Time Range 


Software Side 
1) Backup Process: 
Please copy one folder that contains a user photo and attendance photo for backup purposes in case the administrators need to re-check the attendance photo for future usage
Go to C:\Program Files\BioSecurity\service\zkbiosecurity\BioSecurityFile\upload and copy the whole Upload folder then paste it elsewhere as your backup 

 
2) Delete old attendance photo in AWDMS
a. Go to the respective attendance photo folder location in Program Files C:\ProgramFiles\BioSecurity\service\zkbiosecurity\BioSecurityFile\upload\event\photo

b. Upon going to the photo folder, you can view all Face ID 5/Smart AC series device serial number 

c. Open each serial number folder to delete the old attendance photo. Right-click to sort all the attendance photos by name/date to ease the selecting and deleting process

d. Select your preferred data to be deleted

3. Please download the MySQL Manager tool from the link below to delete attendance photos in the Ingress database:
SQLyog installer (64-bit operating system)
https://s3.amazonaws.com/SQLyog_Community/SQLyog+12.2.1/SQLyog-12.2.1-0.x64Community.exe
SQLyog installer (32-bit operating system)
https://s3.amazonaws.com/SQLyog_Community/SQLyog+12.2.1/SQLyog-12.2.1-0.x86Community.exe

a. After successfully installing the SQL Community, please run the software to connect with the MYSQL database. First, you need to fill in the required Host address, Username and Port of the MYSQL database. Then, click on Test Connection and Connect.

b. Upon connecting to the localhost database, you should see on the left panel of the window a list of the available databases. Next, click + on the Ingress database and + table 


c. Click on att_photo and click Table Data 

d. Run the command below on the query tab to delete the attendance photo based on the date range 
DELETE FROM `attn_photo` WHERE checktime >= '2022-01-01' AND checktime < '2022-12-28' ;
Remark: Please adjust the date based on your preferred data to be deleted 

Note: If some of the screenshots or steps viewed here are different from the ones in the current system, this is due to our continuous effort to improve our system from time to time. Please notify us at info@timeteccloud.com, we will update it as soon as possible.


Face ID 5 External Alarm Wiring Diagram


Introduction
The Face ID 5 series are equipped with an alarm function to notify the user of any restrictions on entry or security measures such as a door or device being forced open, high body temperatures (Face ID 5 TD /FTD), denying unknown access, etc.
Face ID 5 features an output for an external alarm. The user can set a scheduled bell where the alarm goes off based on the time of day. It can be used to signal break, lunch or the end of a working shift depending on the user's needs.
In this tip, a wiring connection for integration with an external alarm, siren or bell has been drawn for reference to suit user requirements.


Wiring Diagram 1: Connection to external alarm, siren or bell that uses 12Vdc operating voltage.


Wiring Diagram 2: Connection for external alarm, siren or bell that uses 240Vac operating voltage.
 
Note: If some of the screenshots or steps viewed here are different from the ones in the current system, this is due to our continuous effort to improve our system from time to time. Please notify us at info@timeteccloud.com, we will update it as soon as possible.


Overview on how to connect Smart AC 1 Series / Proface X Series / Face ID 5 Series from the remote location to the main HQ PC via DDNS


Introduction
By centralizing the Ingress database in a specific PC, you can minimize data redundancy as all the data is stored together and not scattered across different locations. To centralize the database in one specific location, you may link all the devices from the remote locations to the main HQ PC by implementing DDNS (Port Forwarding). You can manage users and transaction logs in the main HQ PC even though the devices are installed in other branches.


Process
1. Main HQ PC
a.    You need to install the Ingress MySQL and AWDMS accordingly. Both Ingress and AWDMS MUST BE INSTALLED on the same PC. Please install Ingress MySQL Server first, followed by the AWDMS.

b.    Kindly check the PC IP address for the PC installed and the Port Number for the device to connect with the AWDMS

·         To check PC IP address:
            Go to Start Menu > Type cmd > ipconfig > check the PC IP Address

·         To check the device port number to be linked with the AWDMS:
            Go to AWDMS web browser > Device icon > click Search Device > You will be able to             view the Port Number

Remark: The default Port Number is 8088 unless you change it during the AWDMS installation process

2. Main HQ Router
Kindly note that we do not provide direct assistance regarding network support including VPN, DDNS or port forwarding configurations. As a different router requires a different network configurations, it is best to get your IT expertise or local network engineer to provide assistance on this router configuration.

a)    Configure the DDNS URL (ex:abc.ddns.org )

b)    Port Forwarding: Redirect incoming request for port 8088 to 192.168.1.102 (PC IP Address installed with Ingress and AWDMS)

Remark:
- Please make sure you allow both Incoming and Outcoming for port 8088.
- Besides port 8088, please make sure that you also do not block all the listed port numbers in your router and firewall settings.
·         3000 (Port for Ingress software)
·         3306 (Default Port for Ingres MySQL)
·         4370 (Device Port)
·         8098 (Link Ingress – AWDMS software) 

3. Remote Location
a)    Make sure that the device is connected with the Internet connection either using TCP/IP or WiFi

b)    Connect the device to the AWDMS server (Main HQ PC) by pointing it to the DDNS URL ( ex: abc.ddns.org)

To configure the AWDMS settings in the device:
Go to Menu > Cloud Server setting > Turn on “Enable Domain Name” > Set the server IP: abc.ddns.org:8088

4. Main HQ PC
a)    Upon configuring the settings above, check whether devices from the remote locations are connected to the AWDMS or not.

Go to AWDMS web browser > Device icon > click Search Device > It will list all the devices connected to the AWDMS

b)    Once successful, you may add all the remote location devices in the Ingress software and manage all the users and transaction logs accordingly.

Note: If some of the screenshots or steps viewed here are different from the ones in the current system, this is due to our continuous effort to improve our system from time to time. Please notify us at info@fingertec.com, we will update it as soon as possible.

HOW TO DOWNLOAD MISSING PERSONNEL INFORMATION (FINGERPRINT/PALM/FACE) FROM DEVICE (SMART AC1/FACE ID 5 SERIES) INTO AWDMS AND INGRESS SOFTWARE


Introduction
The Smart AC1 and Face ID 5 series are the new facial recognition devices with multiple verification mode options such as Fingerprint/Palm/Face/Card/Password. These new devices require connection to the AWDMS before it can be connected to Ingress software. Once the users are registered with Fingerprint/Palm/Face enrollment, these data will automatically synchronize to AWDMS. In some cases, those data are not showing in AWDMS due to the synchronization process is not completed.


This article explains the steps to manually download missing user data in AWDMS from the device.

Process
1. Open TimeTec Cloud AWDMS > Login with your Username and Password > Go to Access Module > Device > Click Device > Tick checkbox to select the Device > Click on View and Get Device Info > Click on Get Personnel Information.


2. Next, Get Personnel Information screen will pop up. Click on Obtain personnel information > Click Start.

3. Once completed, you can continue to click on Obtain palm information and Start. Repeat the same steps for Fingerprint and Face information.
IMPORTANT NOTE: Please make sure to start with Obtain Personnel Information before you continue with Palm, Fingerprint and Face information.

4. Then you can see the user data for Face is updated in AWDMS. Once the user data is updated, you can proceed to download those data to Ingress software. So, all the user data will be stored in the Ingress software.

5. Go to Users tab > Download User > Double click on AWDMS > Select User > Select Data > Click Download.


Note: If some of the screenshots or steps viewed here are different from the ones in the current system, this is due to our continuous effort to improve our system from time to time. Please notify us at info@fingertec.com, we will update it as soon as possible.


How to Connect Smart AC1 Series & Face ID 5 Series to AWDMS & Ingress Software


Introduction
TimeTec new models such as Smart AC1/TD and Face ID 5/TD carry new firmware and architecture that need a new SDK set to make sure seamless integration of hardware and software. Therefore, TimeTec introduces AWDMS as the middleware between Ingress and the devices. 
Many users do not get a clear picture of how to connect the devices to AWDMS and Ingress. To accomplish this, you just need to follow the below steps.

Process
1) If you use LAN connection, configure the IP Address, Subnet Mask and Gateway on your device. Go to Menu > COMM. > Ethernet. 

2) Configure the Server Address and Server Port on your device. Go to Menu > COMM. > Cloud Server Setting. 


Note: Server Address is your computer IP address where the Ingress and AWDMS are installed. You can check it using Command Prompt and type in ‘ipconfig’.


Server Port is the default port which is 8088 or you can check it in AWDMS. Go to Access module > Device > Search Device. 

3) Before you can activate your device in Ingress, you need to make sure that you are able to search it in AWDMS. Go to Access module > Device > Search Device > Search.
Note: Once the device is found, DO NOT add it via AWDMS. You only need to add it in Ingress.


4) Add the device in Ingress. Go to Devices > Add Device > Fill in the Device Name, Serial No. and choose the Communication Mode as AWDMS > Add.


Note: If some of the screenshots or steps viewed here are different from the ones in the current system, this is due to our continuous effort to improve our system from time to time. Please notify us at info@fingertec.com, we will update it as soon as possible.