

TimeTec TA - How to Assign Division in Clocking Schedule

Recently, we released a new function in TimeTec TA that affects access rights to clocking schedules. Prior to this, all clocking schedules are not assigned to/owned by specific divisions no matter which Admin originally created the schedule. Edit rights for Admin are also blanket rights, meaning either you are allowed to edit all the available schedules or you are not allowed to edit any. This means there’s a chance of another Admin accidentally altering the schedule you’ve tailored for your division.
To address this, we added Division Access Right control in the Clocking Schedule module. With this, when you create a schedule, you can set restrictions by assigning divisions that are allowed to share access to it. Subsequently, only Partial Admins with rights for the ‘Assigned Divisions’ will be able to edit or delete this particular schedule.
Note: Full Admin (Admin with Full Division rights) will still have unrestricted access.
Process
The basic details are as follows:
i. Firstly, Master Admin/ Full Admin needs to enable the ‘Assign Divisions’ right in System Role > Module rights > Schedule > Clocking schedule tab to use this function.
ii. Next, for the Partial Division Admin (Partial Admin), once you have added a schedule, click on Assign Division icon. In the Organization Structure, tick to select the allowed division. If you are a Partial Admin with rights to only one (1) division, you can only assign this one division for the schedule.
iii. Once a clocking schedule is assigned to a division, only Admin for that division will be able to edit and delete the schedule (Full Admin also have unrestricted access). Admin for other divisions are not allowed to edit but can still view the schedule for reference.
iv. All clocking schedules without at least one Assigned Division are free for all Admins to edit and delete.
For more details on how to use this feature, please refer to the step-by-step guide below.
Steps
Setup for Master Admin/ Full Admin
1. Login to Master Admin/ Full Admin account. Go to Manage System Roles and Admin > System Roles > Edit System Role > Module rights > Schedule > Clocking Schedule. Tick to enable ‘Assign Divisions’ > Save.
Note:
i. It is recommended to synchronise the right for ‘Assign Divisions’ with rights for ‘Add’, ‘Delete’ and ‘Edit’ (i.e. enable all 4 of the rights together) since the aim here is to control Admins’ edit and delete rights. If the Admin in question do not have any responsibility for clocking schedules, you can choose to enable ‘View’ only.

2. Repeat Step 1 for another System role, where necessary. Assign these roles to the appropriate Admin. In the example we are using, there are two Admins, “Head of Division 1” and “Head of Division 2”. Both of these users have been designated as Partial Admin with rights over their own division only.

Assign Division at Clocking Schedule (Partial Admin’s View)
1. Continuing with the example, we login to a Partial Admin’s account, e.g. “Head of Division 1”. At Clocking Schedule, click ‘Add’ to create and configure your schedule.
Note:
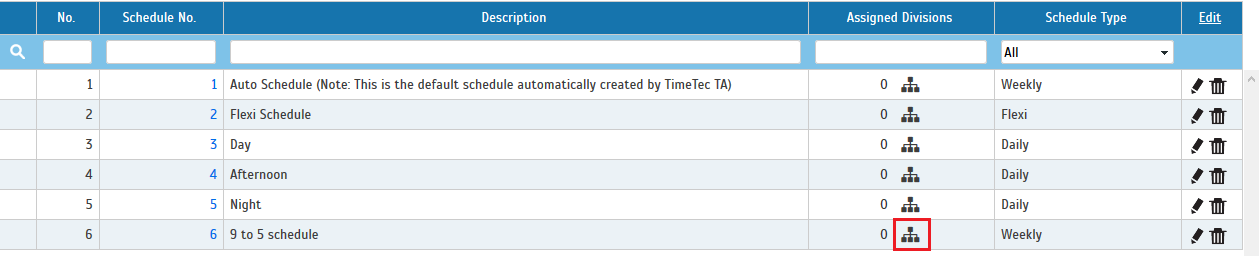
i. In the following image, there are no Assigned divisions yet for all the available clocking schedules, which means these are currently free for all Admins to edit and delete.

2. Once you have added a schedule, e.g. Schedule No.6 , click on the ‘Assign Division’ icon.
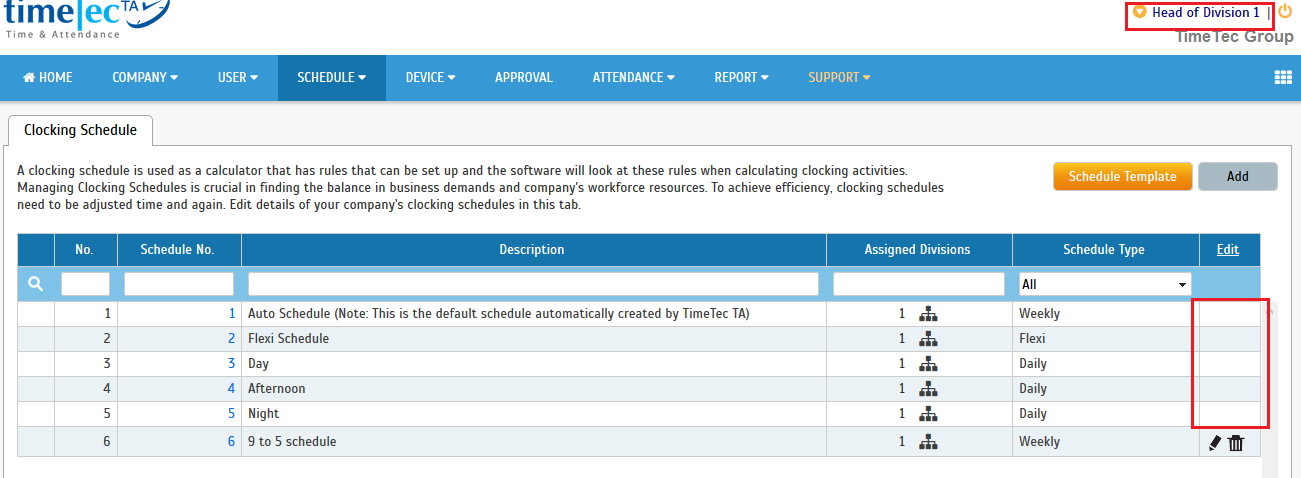
3. In the Organization Structure, select the allowed division, e.g. ‘Division 1’. If you are a Partial Admin with rights to only one (1) division, only one checkbox will be enabled and you can only assign this one division for the schedule.

Note:
i. For the Full Admins, all checkboxes will be enabled and they can assign any division (one or more) to the schedule.

4. Once a clocking schedule is assigned to a division, only Admin for that division will be able to edit and delete the schedule (Full Admin also have unrestricted access). Admin for other divisions are not allowed to edit but can still view the schedule for reference.
Partial Admin View- “Head of Division 1”

Partial Admin View- “Head of Division 2”

5. Taking the example further, if we assign all the other clocking schedules (Schedule No.1 to 5) to ‘Division 2’, notice that “Head of Division 1” will no longer be allowed to edit and delete these schedules.

Partial Admin View- “Head of Division 1”
Note: If some of the screenshots or steps viewed here are different from the ones in the current system, this is due to our continuous effort to improve our system from time to time. Please notify us at info@timeteccloud.com, we will update it as soon as possible.


Hi fingertec , When Ingress Software have this function ?
ReplyDeleteHello Sir/Madam,
DeleteGood day to you.
With regards to your query, kindly be informed that for Ingress or TCMSv3, you may refer to this link in order to create different account to control different division :
http://www.fingertectips.com/2015/02/how-to-create-different-user-roles-for.html
Dear Athirah, When will ingress be able to have these functions for assigning each users to be able to edit, individual clocking schedules.
ReplyDeleteHello Sir/Madam,
DeleteKindly be informed that there will be no function available for assigning each users to be able to edit, individual clocking schedules in Ingress software.
You only able to assign admin to administrate certain division/department schedule or all department following link below :
http://www.fingertectips.com/2015/02/how-to-create-different-user-roles-for.html