How The Long Range Reader Works With Ingressus Controller

Wednesday, June 27, 2018 TimeTec 4 Comments


Introduction On Vehicle Access Control:
Vehicle Access Control System is a security control method that can be utilized to allow the access of transportation vehicles such as cars into a compound. In access control systems, users are required to present their credentials before they can be granted access and the same can be said for the Vehicle Access Control System as well. Access Control is the concept of utilizing advanced technology to keep unauthorized individuals from accessing a building or an area within a facility. Therefore in a Vehicle Access Control System, the vehicle boom barrier operation is the main platform designed to manage the car’s access areas.

Normally, this operation requires an RFID Access Card and users will need to present the RFID card in order to obtain the access for their vehicles. Now with the latest technology, TimeTec presents the Anti-Torn UHF Long Range RFID Sticker to replace the traditional RFID Access Card. Simply stick it on the inside or outside of the vehicle’s windscreen in order for the  Long Range Reader to automatically grant your vehicles access into the premise.

Below is a depiction on how this particular system operation works together with Ingressus Controller:
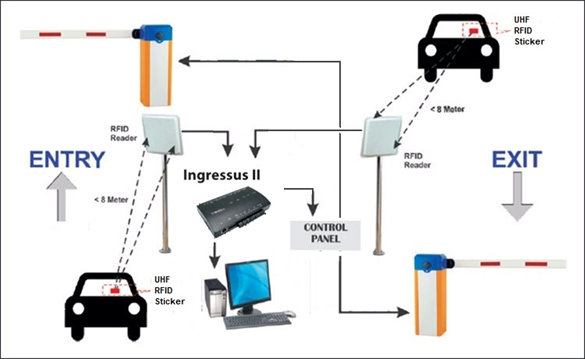
 

How It Works?
Whenever a vehicle approaches the gate, the Long-Range Reader will read the UHF RFID Sticker with up to a maximum of 10 Meters distance depending on the Reader and environment.

Once the Reader has obtained the information from the Sticker, the data will then be sent to the Ingressus Controller which contains all of the user data for verification to allow the users to enter the premise.

After the Ingressus Controller has identified the data, the device will in turn send a signal to the Barrier Gate Controller. Once received the signal, the Barrier Gate Controller will unlock the gate and close it after the vehicle has completely passed the loop sensor.

Wiring Connection:

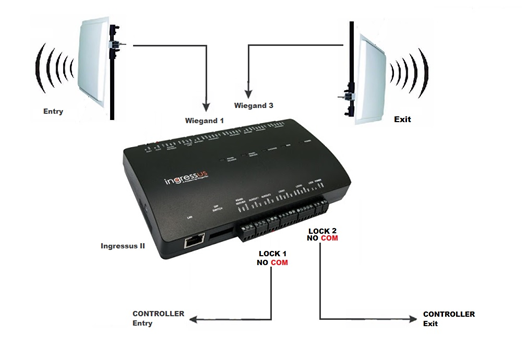
As the Long-Range Reader uses a Wiegand connection for its communication, Wiegand 1 at the Ingressus will be used to connect the Long-Range Reader for the Entrance gate. The NO and COM at Lock 1 will be used as an Output to send a signal to the Barrier Gate Controller.
For the Exit gate, the device uses the Wiegand 3 as connection to the Long-Range Reader. The NO and COM at Lock 2 will be used as an Output to send a Signal to the Barrier Gate Controller.

All in all, the Ingressus Controller is a one stop verification that not only centralizes the devices involved but also provides a centralized verification for an exceptional security that no other brands can provide.

Note: If some of the screenshots or steps viewed here are different from the ones in the current system, this is due to our continuous effort to improve our system from time to time. Please notify us at info@timeteccloud.com, we will update it as soon as possible.

4 comments:

Have any questions or inquiries about FingerTec? Drop your input here.

How To Manage Half Day Leave In Ingress / TCMS V3

Wednesday, June 27, 2018 TimeTec 3 Comments


Introduction:
On certain occasion, workers will tend to apply half day leave instead of the entire day based on the individual needs. Therefore in Ingress or TCMS V3 software, users can thus configure the half day leave for their employees in order to prevent short hour from showing on the attendance sheet.

Benefits:
By using this feature, users can better manage the attendance of the employees. Previously, if users assign leave for a specific user, the system will calculate the leave for the entire day. However with this function, users can manage half day leave more efficiently whenever employees attend the office for only half of the total work time.

Process and setting:
1) Below are sample pictures that display the differences between half day leave as well as without any leave taken.

    Note: Please double click on the image to view full size  

Date 05/06 - No leave applied
Date 06/06 - Apply for half day leave, leave hour- 5.00

2) To configure half day leave, users will firstly need to add the leave type by referring to these steps:  Proceed to the Attendance tab > Leave Type > Add > Set Your Leave Name > OK.


3)  Next, proceed to the user duty planner in order to set the half day leave. Select the user and right click on a specific date to obtain the option as shown in the picture below. In the option, please set the leave hour so that the current short hour will be deducted from the attendance sheet.


After users have set all the options, they can then refer back to the attendance sheet to view the configured result.

Note: If some of the screenshots or steps viewed here are different from the ones in the current system, this is due to our continuous effort to improve our system from time to time. Please notify us at info@timeteccloud.com, we will update it as soon as possible.

3 comments:

Have any questions or inquiries about FingerTec? Drop your input here.

Prevent Duplicate Password During Enrollment Process (Ingressus Controller / k-Kadex)

Wednesday, June 27, 2018 TimeTec 0 Comments


 Introduction:
Ingressus controller is a device that is developed to be paired with a slave device, such as k-Kadex. To ensure that the Ingressus Controller is always functioning properly with k-Kadex, we’ve prepared this article to explain how to configure the Ingressus controller when utilizing the password verification option. This is because the Ingressus controller cannot verify the user’s password if there are duplicate passwords (2 or more users using the same password). Note that by installing the latest Ingress Software installer, the system now has the option to check for any duplicate password before uploading all the users enrolled into the Ingressus Controller.

Process:
1. Double check your Ingress Software version (Click Ingress Icon (Top left Corner) > About Us)
If the system is below Version V3.1.5.11, you will need to download the installer from the links provided below:

Ingress Server MYSQL V3.1.5.11: https://s3.amazonaws.com/files.fingertec.com/Software+Releases/Ingress/2018/Ingress+V3.1.5.11+2018-05-30/Ingress+Server(MySQL).zip

Ingress Client MYSQL V3.1.5.11:
https://s3.amazonaws.com/files.fingertec.com/Software+Releases/Ingress/2018/Ingress+V3.1.5.11+2018-05-30/Ingress(MySQL).zip

2. After adding Ingressus controller into the Ingress Software, click the “Doors” tab and select Verify Mode as “Card or Pin Plus Password”


3. For New Ingress Software Installation - Before enrolling the users into Ingress Software, please enable “Disallow” duplicate password value for users.
 

4. After enabling this option, whenever another users fill in the same password, the system will display a duplicate password detected message to inform the users.
 

Additionally, before uploading all the existing users from the Ingress Software into the Ingressus controller, please also turn ON “ Disallow duplicate password value for users “, in order for the system to check if have any user has a duplicate password.

Below is a screenshot that display the existing users with a duplicate password after enabling the “Disallow duplicate password value for users” option.


If there are users using the same password, Admin will then need to click the “Reset Password” button to reset/delete the affected users password. Afterwards, the Admin will be required to assign/enroll a new password for the users, and upload it into the existing devices and Ingressus controller.

Note: If some of the screenshots or steps viewed here are different from the ones in the current system, this is due to our continuous effort to improve our system from time to time. Please notify us at info@timeteccloud.com, we will update it as soon as possible.  

0 comments:

Have any questions or inquiries about FingerTec? Drop your input here.

Troubleshoot Missing Attendance Data in TimeTec TA

Wednesday, June 27, 2018 TimeTec 0 Comments


Introduction:
Missing attendance data within the Electronic Time Card report is most often caused by a few issues such as wrong issuance, expired date, no group duty roster assigned and no clocking data in the device itself. Therefore, we’ve prepared some tips on how to troubleshoot this issue in order to identify the exact root cause of the problem.

Process:
A. Check if the user’s raw data is available in the Data Audit List report
1. Go to Report > Device Analysis > Data Audit List


2.  Search for the User ID of the employee, choose the correct date range(date range where the data is missing on the Electronic Time Card report) and then click on the Submit button.


3.  Check if there is any data listed on the Data Audit List report. If the data is available on this report, please proceed to Step B. If the data is not available, kindly check the connection status of the device and please ensure that the device is connected.

B. Check the user’s Issuance Date and Expiry Date
1. Go to User > Manage User


2. Search for the User ID of the employee and then click on the Settings button.


3.   Check the Issuance Date and Expiry Date and make sure that both dates are correct and then click on the Tick icon. (Issuance Date is the period when the employee has joined in the workforce while Expiry Date is the period when the employee has resigned from the workforce.) Note that if the employee is still working, please do not fill in the Expiry Date field.


4.  Please double check on the Electronic Time Card report after you have made the changes to the Issuance Date or Expiry Date. If the same problem still persists on the report, kindly proceed to Step C.

C. Re-Assign the User to Group Duty Roster
1. Go to Schedules > Assign Schedules and Users into Roster.


2. Click the ‘+’ button on the User’s Duty Roster.


3.   Search for the User ID of the employee, then tick the box beside the User ID and click on the Submit button.


4.   A Generate Attendance window will be displayed. Hence, choose the correct Start Date and End Date. Once done, click on the Submit button.
 

5.   After the generation process is completed, please generate the Electronic Time Card report again and check if the same problem still persists. If the problem still persists, kindly report the problem to TimeTec Support Team at support@timeteccloud.com.

Note: If some of the screenshots or steps viewed here are different from the ones in the current system, this is due to our continuous effort to improve our system from time to time. Please notify us at info@timeteccloud.com, we will update it as soon as possible.  

0 comments:

Have any questions or inquiries about FingerTec? Drop your input here.

How To Configure System Roles and Admin Module

Wednesday, June 27, 2018 TimeTec 0 Comments


NOTE: 
Please note that the information and images below refer to TimeTec TA software. However, this particular module/ feature is also available in TimeTec Patrol and TimeTec Leave with the same rules and functionality, hence you can also use this as reference for all three abovementioned softwares.

Introduction:
In view of security concerns, TimeTec TA offers control of access rights to authorized users as permitted by the organization. By default, there are two types of User Role:

1. Master (System Administrator) who have full access and responsible for setting up and maintaining the TimeTec TA system
2. Normal User - TimeTec TA allows customer to create and customize the access rights that are given to the Admin roles which are then assigned to select employees. 

In our goal to improve the system for better user experience, we’ve prepared some tips on how users can now manage the System Roles and Admin module more efficiently and effortlessly. Below are some quick tips that show how this can be done:

Add System Role:
At the System Role tab, users can create a new System Role with specific access rights by clicking on the Add button.
 

In the pop-up window, there is an option that allows user to copy the access rights from existing System Role or even edit the copied role if necessary. This is to fasten the process when the user is creating a new system role with major similarity to other existing roles. Next, please fill up the System Role Name and Description.


Moving on, selecting Full Division will allow the Admin to access all users in the Organization Structure while Partial Division will only allow Admin to access certain users based on the structure.


Subsequently, set the access rights for the System Role by ticking Full Module Rights to allow all modules access in TimeTec TA while unticking it allows users to select which module is accessible for the role.
 

Assigning Admins Into System Role:
After setting up the System Roles, the Admin can also be easily assigned under the System Role by clicking on the ‘+’ button.
 

Once clicked on, a pop-up window will appear and a list of Admins (excluded from the role) will be displayed for the users to select.


Configuring System Role While Adding Admins Into the System:
On the other hand, System Roles can also be specified while adding an Admin into the system. To add an Admin into the system, please click on the Add button under the Admin tab.
 

In the pop-up window, select the existing system user that you wish to assign as Admin and select the System Role. Note that the default System Role is Master if users do not create any System Roles within the system.


For further enquiries about TimeTec TA, feel free to contact our Support Team by sending an email to support@fingertec.com

Note: If some of the screenshots or steps viewed here are different from the ones in the current system, this is due to our continuous effort to improve our system from time to time. Please notify us at info@timeteccloud.com, we will update it as soon as possible.  

Related  Posts:
Boss Mode - A System Role for Bosses to Monitor Workforce Performance

0 comments:

Have any questions or inquiries about FingerTec? Drop your input here.

Handle Employees’ Leave With Crunch Time In TimeTec Leave

Wednesday, June 27, 2018 TimeTec 0 Comments


Introduction:
TimeTec Leave is a cloud-based solution that allows staffs to better manage their leave and contribute more productively to the company’s development. However on certain occasions, it is necessary for the company to schedule an annual Crunch Time in order to ensure that the company’s business is running smoothly during high-volume periods. Below is a quick guide on how to setup the Crunch Time in TimeTec Leave:

Process:
1) In TimeTec Leave, go to Leave Settings > Crunch Time.
 

2) Select the organization or department that you want to assign with the Crunch Time setting on. At the Organization Structure > click the Drop-down Option > Filter.
 
3) After selecting the specified department > click Add Crunch Time.

You will need to configure 4 listed options as shown below:

i) Name – Name the Crunch Time setting [e.g.: iPhone Rollout – special event in which the company requires a high demand for workers].
ii) Leave Request – Select the setting as to whether the staffs are allowed to apply for leave or not on that particular day.
 

- Allowed: The staffs can apply for leave without any issues for this particular occasion.
- Allowed With Warning: The staffs can still apply for leave but they will receive a warning.
- Not Allowed: The staffs are restricted from taking any leave.

iii) Type: You may select either a single or multiple dates for the Crunch Time period.
 

iv) Date : Assign the date for the occasion.

Single Day:
 

Multiple Days:


User Application During The Crunch Time Period:
1) Not Allowed – The users will be prompted with a message that their leave application is prohibited during that specified period.

2) Allowed With Warning – The staffs can still apply for leave but they will be notified with a warning message.
  
3) Allowed – No restriction for leave application on the specified date.
  
Note: If some of the screenshots or steps viewed here are different from the ones in the current system, this is due to our continuous effort to improve our system from time to time. Please notify us at info@timeteccloud.com, we will update it as soon as possible.

Related Page

0 comments:

Have any questions or inquiries about FingerTec? Drop your input here.

Ingress Release Note (v3.1.5.11 & v3.1.5.16)

Friday, June 01, 2018 TimeTec 0 Comments


This month, FingerTec has released Ingress v3.1.5.11 which adds 21 new features and fixed 4
software bugs and Ingress v3.1.5.16 which adds 2 more new features and fixed 4 software bugs
to greatly enhance the user experience while using Ingress software.


New Features and Enhancements (Ingress v3.1.5.16) :

1. Support download/upload unicode username.


2. Added new column User ID for export audit data in monthly view.


Bugs Fixed:
3. Fixed Report Scheduler not generate report.
4. Fixed ETC report does not show total rate when enabled Rate/Hour option.
5. Fixed Extra break time did not deduct from work hour if given flexible break time.
6. Fixed failed to add new holiday in Access Level.

New Features and Enhancements (Ingress v3.1.5.11) :

1. Added DIFF OT calculation for Early Login time range.


2. Added notification message in System Settings when restarting the services.


3. Added clocking schedules General options, to manage Late In/Early Out work hour deduction.


4. Added drop-down list in department selection ONLY for single level department setup.


5. Added selection for Default Payroll in System Settings.


6. Added Electronic Time Card Report with 2 or 4 clocking columns.


7. Added Rate/Hour option for Electronic Time Card Report.


8. Holiday List can now be assigned to a different schedule instead of following the default roster
schedule.


9. Added Export Alphanumeric User ID to USB.


10. Added selection (comma or semicolon) for Default CSV Export Format in System Settings.


11. Added Company Name at the top bar of the software.


12. Added Export Audit Data in Monthly View.


13. The system now remembers the last export format done by the user.


14. Added option to avoid duplicated password for terminal users.


15. Added option to enable/disable Holiday Permanent Door Open Timezone for Standalone Device.


16. Added "View All Scheduled Report Jobs" option in System Role.


17. Added New Language - Italian.


18. Added "Remove all assigned access group" warning message when removing the device from
the door.


19. Added "Permanent Door Open Close Timezone will be overridden" warning message when
users setup more than 15 Timezones.

20. Added Q2i Support Multiple Permanent Door Open.


21. Added option “Append data to output” for Audit Data in Export Scheduler.


Bugs Fixed:
1. Fixed wrong calculation of the total work hour for overtime differential rate in overnight schedule.
2. Fixed unable to save changes in User Duty Planner if using Arabic Language.
3. Fixed Attendance Sheet - Imported leave missing after generating the attendance sheet.
4. Fixed unable to export Sage UBS using Employee ID.
Note: If some of the screenshots or steps viewed here are different from the ones in the current system, this is due to our continuous effort to improve our system from time to time. Please notify us at info@timeteccloud.com, we will update it as soon as possible.

0 comments:

Have any questions or inquiries about FingerTec? Drop your input here.