Ingress software Release Note v4.1.0.4


For this month, FingerTec has released Ingress software v4.1.0.4 which has 9 new features and 13 bug fixes to enhance the user experience when using Ingress Software.

1. Added support AWDMS ATT module

2. Added new date selection when generate attendance sheet

3. Added new selection from customized fields when Export User


4. Added options for temperature alert and without mask filter when generating the Health Screening Report and Health Screening Visitor Report

5. Added Show All Users option inside Health Screening Summary report


6. Added new user role for Pay Rate and Type


7. Added Issue Date, Expiry Date and Palm Vein in the Users Column Chooser

8. Added AWDMS database backup & restore

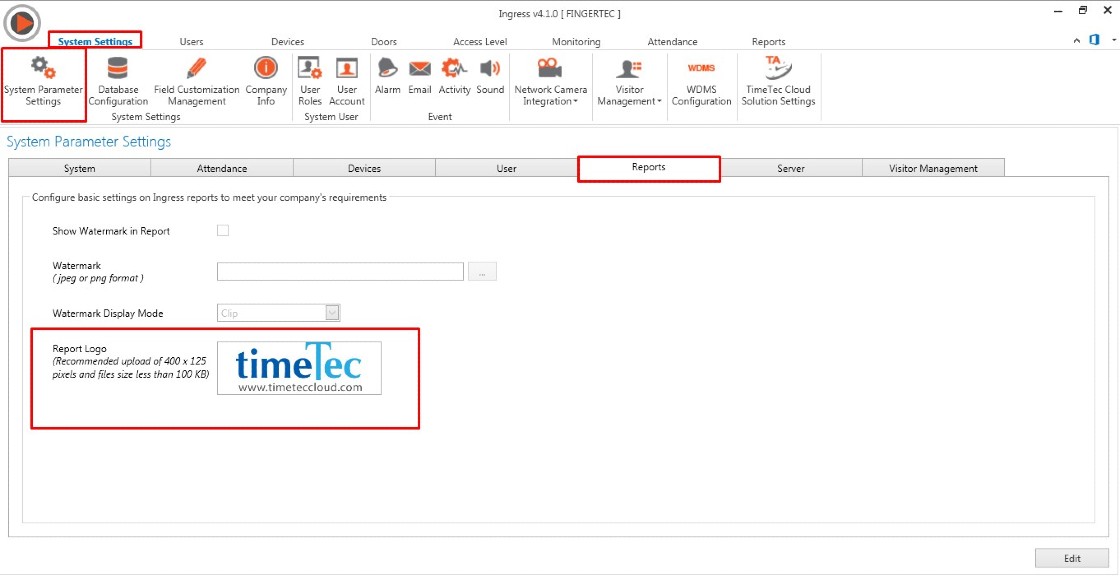
9. Added report logo at System Settings – Report


Bug Fix:
10. Fixed incorrect total face count for user downloaded from AWDMS in User Listing Report
11. Fixed Last Name displayed problem in ETC Report when generating from Report Scheduler
12. Fixed incorrect result displayed on ETC Report when untick show zero hour option
13. Fixed double punch clocking go to next day IN column when using last log out time with first rounding time range (Flexi Schedule)
14. Fixed incorrect sorting for date time (AM/PM) in Transaction Listing Report
15. Fixed incorrect calculation Total OT and Diff OT when interval start from 00:00/12:00 AM
16. Fixed concurrent download issue when download attendance logs from AWDMS
17. Fixed manual download cause TIMING file missing logs if remove transaction after auto download is enable
18. Fixed incorrect export serial number to TIMING file for Smart AC1 device which more than 10 digits
19. Fixed failed to remove leave type in attendance sheet when using User Duty Planner
20. Fixed incorrect date range display in report if filter by "Last Month"
21. Fixed crash issue in Weekly Listing Report after Export by User Selection was clicked
22. Fixed unable to save Permanent Door Open Close Timezone and Permanent Door Open Close Holiday Timezone to none

Forgot your i-Neighbour login password? Steps to reset it


Introduction
It is common to forget a password to a system. Don't worry, simply use the forgot button to reset and change to a new password.
Enter the same email you registered with i-Neighbour before, as the system will send the link to reset the password directly to your inbox.

Process
Below are the steps to reset password in Mobile Apps and Web:

MOBILE APP
1. Open your i-Neighbour App, press “Forgot”

2. Insert your email address and verification code, then press “Reset password”

3. The i-Neighbour system will send an email to email provided. 

4. You will receive an email like the below screenshot. Press “Reset Password”


5. Insert a new password - at least 8 characters including uppercase and lowercase letters, with symbols or numbers

6. Successfully changed password.


WEB
1. Open www.i-neighbour.com , click at Login and select “forgot your password”

2. Insert email address and the captcha


3. System will send an email to your email address


4. Received email and directly press “Reset password”


5. Insert your new password, and press submit


6. Successfully changed password, You can now login using a new password.


Note: If some of the screenshots or steps viewed here are different from the ones in the current system, this is due to our continuous effort to improve our system from time to time. Please notify us at info@i-neighbour.com, we will update it as soon as possible.

[i-NEIGHBOUR ADMIN GUIDE] How to add a unit number / remove a unit number for selected building/street in Manage Unit


Introduction
If you have a missing unit number or add a unit to the created block and street, this is the guide to do it without creating a new building/street and uploading back all the owner's details.

Since this is an option to add an extra unit number, you need to add it one by one. In case you want to add two extra units, you must add the first unit number, save, before adding the second unit number.

Example: 
In the screenshot below, Block E has five units in level 1, but the admin wants to add one more unit (E-1-6) on this level.


Process
Refer to the steps below to add this unit number:
1. Click Neighbourhood > Manage unit

2. Click at Manage unit, then click view button

3. Click “Edit” to add/remove unit number

4. For example you want to add unit number E-1-6. Put a cursor on the 3 line icon at unit number E-1-5 (As you want to add a new number to the right side of this unit)

5. Select “Add Unit (Right)” 

NOTE: 
Now put the cursor on the 3-line icon at E-1-5 

-If you click “Add Unit (Left)” , the new unit will be available on the left side
Result : E-1-4 > New unit > E-1-5

-If you click “Add Unit (Right)”, the new unit will be available at the right side
Result : E-1-4 > E-1-5 > New unit

-If you click “Remove” , it will remove unit number E-1-5

6. Add unit number, press submit.

7. The new unit number has been successfully added.

8. A new unit number is available in the list


Note: If some of the screenshots or steps viewed here are different from the ones in the current system, this is due to our continuous effort to improve our system from time to time. Please notify us at info@i-neighbour.com, we will update it as soon as possible.

Changing Unit Owner in i-Account


Introduction
Periodically, there will be instances of sale or sub sale of a unit in a property. When this happens and management is notified, the Admin has to change the unit owner information and add the new owner into the system.  This step is to remove i-Neighbour access for the ex-owner and provide access to the new owner. Furthermore, for communities which are also using i-Account, this is to create a new account code under the new owner for account management and further billing. 

Process
i-Neighbour 
Once the management is notified of legal change in ownership, Admin can proceed to the Manage Unit page in i-Neighbour to make the changes. 

Step 1
Login to i-Neighbour Admin account, choose Community and click Manage Unit.


Step 2 
Choose the Block that has a change of owner. For example, the owner is in Block B, then click Block B. Click on the View icon to see the details.

Step 3
Next, choose the unit which needs to be changed. For example, click on B-2-2.

Step 4 
Click on the “Change Unit Owner” button at the top right and click “Proceed” to change the owner. 


Step 5 
Fill in all the details as required. It is compulsory to enter a new unique Account Code (there is no default setting, up to Admin preference). 
For example, if the existing owner’s Account Code is B-2-2, Admin can assign a new Account Code as B-2-2-1 or B-2-2/1 or B-2-2/01 and etc. Click Save once completed.

Note: 
- For i-Account users, when adding unit owners at i-Neighbour, you must assign a unique Account code to identify each individual owner. This Account code will be imported into i-Account and used to sync owner accounts in both applications (e.g. account data such as invoices, receipts and Statement of Account). 

- If account code is left as blank, the record will not be synced to i-Account.

Step 6
Once you click Save, the information for the new owner will be displayed. Thus, the change of owner was successfully recorded in i-Neighbour.


i-Account 
Once the process inside i-Neighbour is completed, all the information will automatically sync to i-Account. The ex-owner will also be deactivated in i-Account (hidden from dropdown menu selection) at all the transaction entry pages. In order to activate or reactivate the ex-owner for entry of new transactions (e.g. issue receipt) or to check records, refer to the following steps: 

Step 1
Inside i-Account, under Accounting Module, go to Sales > Maintenance > Customer.

Step 2 
Tick on the “Show inactive” checkbox. Search and select the ex-owner name by using the Customer drop down menu.

Step 3
Change the Customer Status to “Active” if you want to issue new billing for the ex-owner or receive any payment for the previous billing. Click “Update Customer” once completed. After you set the ex- owner as an “Active” status, you can do billing and record payment received from the ex owner. 


Additional Notes:

Customer Group Assignment 
After you change the owner,  the system will automatically assign the new owner into the existing Customer Group(s) to replace the assignment for the ex-owner’s Account Code. Therefore, the next time you perform billing, the invoice will be issued under the new owner’s Account Code. 

However, if you wish to change settings or unassign the new owner from any group, you can follow the steps as shown below:

1. Go to Property Module > Setup > Customer Groups. Choose the Group Name and click the “Assign” icon.
2. The checkbox next to the new owner’s Account Code, i.e. B-2-2-1 will be ticked. Untick the box if you want to unassign from the group. Click the “Assign” button at the bottom of the page to save the settings.


Mailing Address
1. In order to change the Mailing Address, go to Sales > Maintenance > Customer Branch to add the owner’ correspondence/mailing address.


2. Select the owner and click the “Edit”(pencil)  icon. At the box for Mailing Address, enter the information and click the “Update” button.

Note: If some of the screenshots or steps viewed here are different from the ones in the current system, this is due to our continuous effort to improve our system from time to time. Please notify us at info@i-neighbour.com, we will update it as soon as possible.