How to Import Users from Active Directory (AD) using FingerTec Ingress/ TCMS V3 software


Introduction
There are multiple ways for admins to import users into FingerTec Ingress/TCMS V3. One of the method is by importing users from the Active Directory (AD). Active Directory is a directory service available in Windows, which contains information such as users, computers and groups.

You can find this option at Users > Import from AD.
intro.png

How to Import Users from Active Directory (AD) using FingerTec Ingress software

Before you can import the users into FingerTec Ingress/TCMS V3, you need to ensure that the computer used is within the domain network as well as the fact that you are logged in as the domain user and have the rights to access the Active Directory Information.

1. Make sure that the computer used is within the domain network. Please refer to Figure 1 below.

1.png

Figure 1


  1. Login to the computer by using Domain users, e.g.:Domain\user. Please refer to Figure 2 below.

2.png
Figure 2

3.    Please make sure that the user login has the rights to access the Active Directory information.

4.    Open Ingress software and proceed to import the users from AD. Fill in the LDAP information and click Connect. Refer to Figure 3 below.
*Please consult with your System Administrator to obtain the LDAP connection information.

4.png
Figure 3

5. Once successfully connected, you will see a drop down menu options for you to choose and match them with the columns available.

6. Next, click Populate User to obtain the user's information. All imported users’ information will be displayed at the table as per Figure 3. Please click Download to complete the import process.
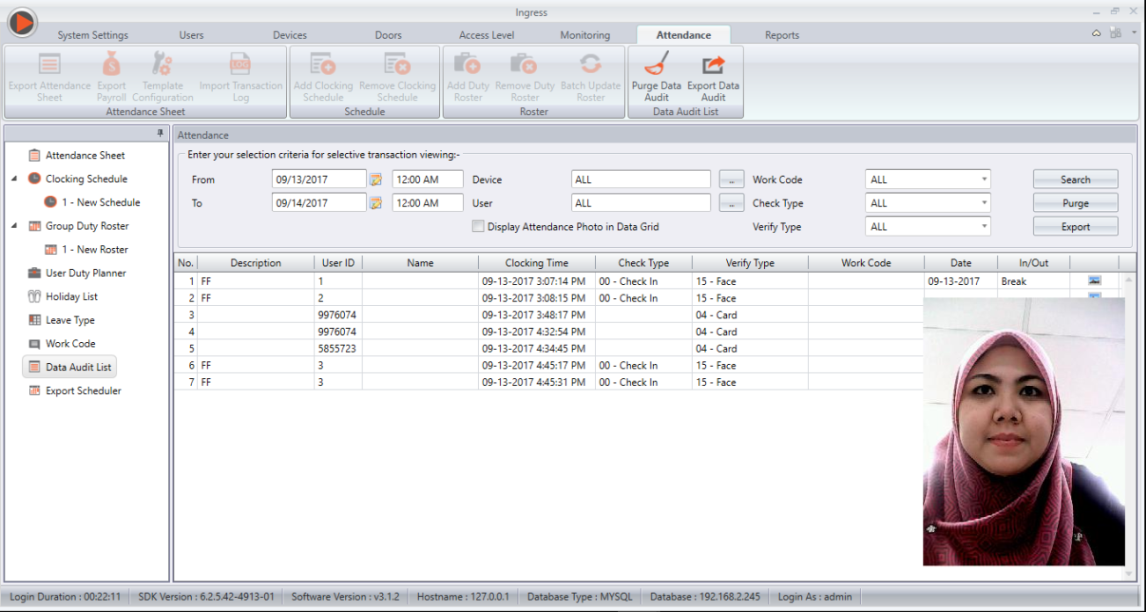
6.png
Figure 4

Figure 4 shows the example of user’s information available at the Active Directory server.

Overview of Organization Structure in TimeTec Patrol


Introduction
Organization Structure in TimeTec Patrol was mainly designed for security companies to set up their guarding operations on various locations and structures freely. In fact, the Patrol Locations that are created through this module is one of the fundamental features in the entire system. Before you can configure the details for your guards’ patrol, it is crucial that you create a Patrol location first and then assign the security guards accordingly.

In addition, the functionality of Organization Structure is to allow you to determine the user’s access rights later in the Manage System Roles & Admin. This feature can be used to restrict information that can be accessed by Admin for specific Patrol Locations.

Please refer below for an overview of the module.

Content
A. Key Facts on Organization Structure
B. Organization Structure’s User Interface
C. How to Use

A. Key Facts on Organization Structure

ORGANIZATION STRUCTURE
Where to configure
Support > Wizard > Company Setup Wizard > Organization & Patrol Location; or
Company > Organization Structure
Glossary
Allows you to create your company’s branches, departments or sections in multiple sub-level of each division. You can then assign users into their respective division.
Requirement
Compulsory for full system function.
Main Function
1) Create Division (Div) / Patrol Location (PL)
2) Assign users into Division
Division Types
Div - For your standard company divisions eg. Human Resources, Sales & Marketing and etc. (OPTIONAL)
PL - Locations for patrol and to assign guards (COMPULSORY)
Name-Color Indicator
Div - Black ; PL - Blue
Organization Structure Effects
A) System Role - Setting accessibility of system administrators:
User > Manage System Roles & Admin > System Roles > Edit > Full Division / Partial Division
B) When adding new guards after initial setup:
User > Manage user > Edit > Employment information tab > Organization Structure
C) Routes, Schedule & Records module:
Select the relevant Patrol Location to view its information.
In these modules, most functions are disabled until you add a patrol location.
If you are viewing e.g. "Patrol Location A", only users assigned to that location are available in the User lists.

Organization Structure Module


Company Setup Wizard – Organization & Patrol Location


Patrol Location Selection in Other Modules


B.  Organization Structure’s User Interface
a. Full organization structure is displayed at the left panel.
b. Division profile, contact person/emergency contact and employee lists for each division are placed at the right panel.
c. Left and right panel can be collapse/expand/drag.
d. Grid and card view options for contact person and employee view.

i. Organization Structure - Employee List in grid view


ii. Organization Structure - Employee List in card view


iii. Organization Structure - Division Profile


iv. Organization Structure - Contact Person


v. Organization Structure - Assign user as Contact Person from User List   


C. How to Use
i. Add Division
ii. Shift Division
iii. Remove Division (you can only remove division when all the users have been assigned to other division)
iv. Assign & Re-assign User
v. Remove User

Note: The term “Division” is used in this section as a general reference and the steps are the same for both division types; whether it’s for standard Division or Patrol Location.

i. ADD DIVISION
1. On the left panel, right click at company name or division > select Add Division.


2. Click on the Plus button to create a new Division / Patrol Location (It is compulsory to create Patrol Location; Division is optional).


3. Insert name > Click √ to Save.


ii. SHIFT DIVISION
1. After you have created any sub-level or division - Drag & drop to rearrange the position. 


iii. REMOVE DIVISION
1. Before you remove a division, please ensure that it is not in use within other modules (e.g. User, System Roles, Routes, Schedule and etc.). For instance, “Area 17” in the screenshot below can’t be deleted as there are currently 10 users assigned to the division.


2. Right click at your chosen division > Remove Division.


iv. ASSIGN & RE-ASSIGN USER
1. On the right panel under Employee, select the Assign Users into Division icon.


2. Choose the User that you want to assign to this division > Submit.


3. Once it is complete, if you wish to re-assign this User to another division, repeat the same process. 


v. REMOVE USER
1. To remove any User from a division, select the user and press Delete (trash icon).  


TIMETEC TA ELECTRONIC TIME CARD REPORT ENHANCEMENT


Introduction
There are various types of report that can be generated in TimeTec TA for organizations to manage their workforce. The most popular report is the Electronic Time Card (ETC) which is a record comprising of employees’ detailed clocking activities in a month such as calculated work time, overtime, work hour shortage and etc. Below are the enhancements made:

New Features
Previously, Electronic Time Card can only be generated in Portrait orientation. We have now allowed the report to be generated in Landscape orientation to accommodate customers’ need.

1.png

Remark can also be previewed in ETC reports now (ONLY in Landscape Orientation). Users can manually input the remark (max 250 characters) in the Attendance Sheet and it will automatically be displayed in Landscape generated ETC.

2.png

3.png

Ingress Release Note (v3.1.2.16 & v3.1.2.9)


FingerTec always strives for the best to accommodate users with the best experience. This brings to the release of v3.1.2.16, which contains 3 new added features while in release v3.1.2.9, there are 18 new features and enhancements, 1 feature removed and 5 bugs fixed as shown below.

Ingress v3.1.2.16 14-09-2017
1. Added filter by Department option in Export Scheduler (alternative for filter by User).
1.jpg

2. Added ‘Leave in Hour’ option and ‘Card Number’ field in Export Attendance Summary.
2.png

3. Added ‘5 mins’ and ‘15 mins’ selection in Data Audit List Export.
3.png


Ingress v3.1.2.9 30-08-2017
1. Added Export Scheduler for Automatic Export of Attendance and Transaction data in Attendance Module.
1b.jpg

2. Added new payroll - Million Payroll (Malaysia and Singapore only).
2b.png

3. Added new option to browse the path of User/Attendance USB file for import to software. Previously, the software was only able to detect User/Attendance file from a USB drive. But as of now, users can specify the folder path that contains the supposed USB file from any virtual machine (VM).
3b.png

4. Added predefined schedule templates to select from while creating new schedules. Click ‘More’ when adding a new schedule to explore this feature. 
4b.png

5. Added Export Short Hour & Leave Type in Sage UBS Payroll.
5b.png

6. Added selection on exporting for 1st and 2nd half of Sage UBS Payroll.
6b.png

7. Added user selection filter by Employee ID in Reports module. To enable this function, go to System Settings > User > Tick ‘Enable Employee ID selection’.

7c.png

8. Added new option ‘Enable display Time Zone setting’ in System Settings module (Devices).
8b.png

9. Added new option ‘Enable device “Working” status while transferring data to/from software’ in System Settings module (Devices).
9b.png

10. Allows the defining of Monthly Payroll Cycle Start Date on System Settings module (Attendance).
10b.png

11. Allows the configuration of advanced export format option in Report Scheduler.
11b.jpg

12. Enhanced to support up to 2 Database backup intervals in System Settings module (Server).
12b.jpg

13. Enhanced User Monitoring to display user status as ‘Valid’ / ‘Expired’ in Monitoring module.
13b.jpg

14. Revamped Transfer Access Group in Access Level module. This enhancement allows the users to select preferred User IDs to be transferred along with the Access Level to the terminal. 
14b.png

15. Revamped System Parameter Settings in System Settings module.

16. Enhanced device list ordering to alphabetical.
16b.jpg

17. Enhanced export attendance summary for .txt file, whereby the format for Numerical User ID is aligned to the right.
17b.png

18. Enhanced attendance sheet filter history by User Account. As of now, the filter settings on attendance sheet will be specifically saved to each user account.

19. Removed .XPS report format from the existing export format list.
19b.jpg

20. Fixed ‘Remote Close Door’ function in Monitoring module.
20b.png

21. Fixed unable to open exported .XLSX file in Attendance Sheet module. 

22. Fixed User Name and User ID display on User Movement analysis within multiple page.
22b.png

23. Fixed upload Verify Type in Access Level module.

24. Fixed download new terminal Captured Attendance photo to Data Audit List.
24.png

Get the software update here