

In-depth Guide on FingerTec Device Management in TimeTec TA

Introduction
This is an in-depth guide for TimeTec TA on how to manage/handle our cloud-based solution with FingerTec Terminal. As such, in this article, we will be discussing on features such as How to Add Terminal Group, Manage Terminal, Deactivate or Remove Terminal and etc.
Table of Content
1. How to Add Terminal Group
1.a Edit Terminal Group
1.b Assign Group Administrator
1.c Delete Terminal Group
2. Add Terminal
3. Manage Terminal
3.a Upload User
3.b Download User
3.c Delete User
3.d Reboot Terminal
3.e FingerTec Command Queue
4. Deactivate or Remove Terminal
4.a Deactivate Terminal
4.b Reactivate Terminal
4.c Remove Terminal
5. Manage Terminal Users
6. Terminal Related Report
6.a Terminal Disconnection Report
6.b Terminal User List
6.c Terminal Transaction Listing
1. How to Add Terminal Group
TimeTec TA allows you to add terminal(s) into the same Duty Group for staff management.
1. Login to your account at: www.timetecta.com.
2. Click on Device > TimeTec Terminal > Terminal Group.

3. Select the Add icon to proceed with creating a new Terminal Group.

4. After filling in the required information including Terminal Group Number, Description, and Enable Group, save your settings by selecting the Update icon.

5. The new terminal group is now available in the Terminal Group List.
1.a Edit Terminal Group
1. By selecting the Edit option, you are able to edit the listed information.

2. Update your changes once confirmed.

1.b Assign Group Administrator
For each terminal group, you can assign more than one Group Administrator.
1. First, select the group that you want to assign the Admin into and click on the Assign Group Administrator icon under Edit column.

2. You will be directed to a pop-up window as shown below.

3. Under Select Admin list, choose the Admin(s) from the registered list and click Submit to save your selections.
4. After saving your settings, you can view the Admin(s) that you have assigned from the Assigned Admin tab.

1.c Delete Terminal Group
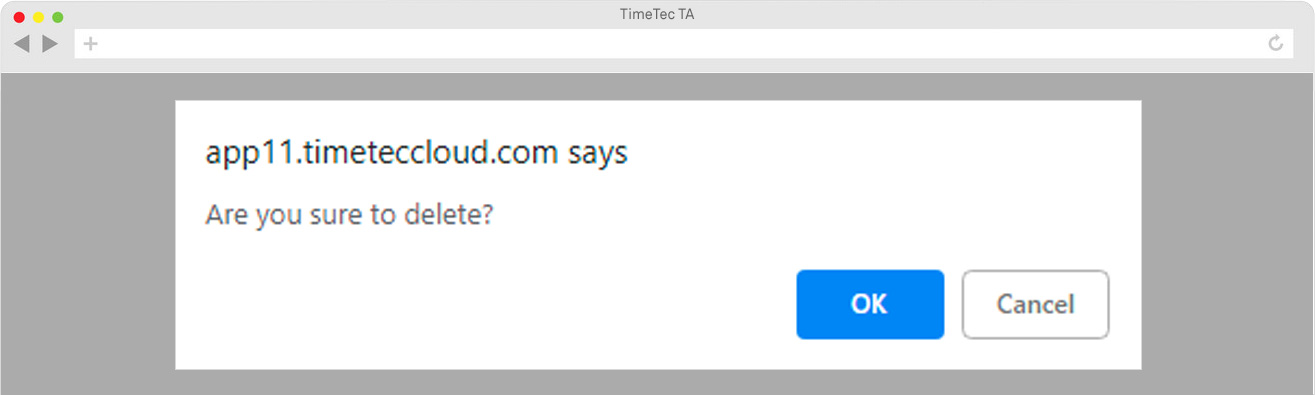
1. Additionally, TimeTec TA also provides the option to delete the terminal group by clicking on the Trash icon.

2. Once done, a confirmation message will be prompted by the system. Note that the selected terminal group will no longer be listed on the page after deletion.
2. Add Terminals
By adding terminals to TimeTec TA, users are able to track employees’ attendance records, download all attendance data contained within the terminals via the web as well as upload and update relevant information to the terminals. Besides, this also allows users to monitor the activities of each terminal effectively.
To connect the terminal into TimeTec TA
1. Go to Device > TimeTec Terminal > Manage Terminal on TimeTec TA.
2. Then, configure your settings on the terminal.
(For TA100C, go to Menu > Comm. > Web Setup)
Under Web Server settings, please enter TimeTec Server IP (refer to Webster IP on Manage Terminal) and Port Number either 80 / 90 according to your terminal version. Note to contact your Local Reseller or forward your terminal Serial number to support@timeteccloud.com to confirm your terminal version.

3. After setting up your terminal, select the Add icon to connect a new terminal into the server.

4. Fill out the required details, including Serial No. of the terminal, Terminal ID, Terminal Group, Location, and Time Zone (Time will be synced on the terminal accordingly). After entering the Serial No., click the Tab Button on the keyboard for the system to check the connection of the device. The terminal model will be displayed automatically if the device connects to the server.

5. Then, select Update option under Edit column to save the new terminal.

6. After the terminal is successfully connected, the system will update the Firmware version, User Count, Fingerprint, Activated Status, as well as Connection Status of the terminals on the Display List.

7. Under Connection Status column, you are able to check the last connectivity time of a disconnected device. When a terminal is disconnected, hover your mouse to the red circle and view a message showing the last connectivity time of the terminal.

8. Also, you can select the Edit icon for the respective terminal to modify the information for the Connection Status, Terminal ID, Terminal Group, Location and Time Zone. Update your settings before proceeding to the next configuration.

3. Manage Terminal
Manage Terminal tab allows users to edit the terminals’ information, view the details of each terminal, Upload User(s), Download User(s), Delete User(s), Manage Work Code, Delete All Work Code, Download Terminal Data, Clear Terminal Data Only, Erase All User Info, Terminal Info, Reboot Terminal, Deactivate Terminal as well as Download Transaction Logs From USB.
3.a Upload User
This feature allows you to upload user(s) from your terminal to TimeTec TA.
1. Go to Device > TimeTec Terminal > Manage Terminal.
2. Select the device(s) (You can upload users to multiple devices at once) that you wish to upload user(s) into.

3. Click on Manage Terminal and from the drop-down menu, select Upload User.

4. Next, you will be directed to the following window which displays the list of users including information such as User ID, Name, Device Username, Privilege, Password, Card ID, Fingerprint, and Organisation Structure.

5. After selecting the user(s), click on Submit to upload user(s) into the terminal.

6. A confirmation message will be prompted to confirm your action. Select Submit to proceed.

7. You can go to Terminal Command Queue to review the status of the upload process. (Refer to Section e under C. Manage Terminal)
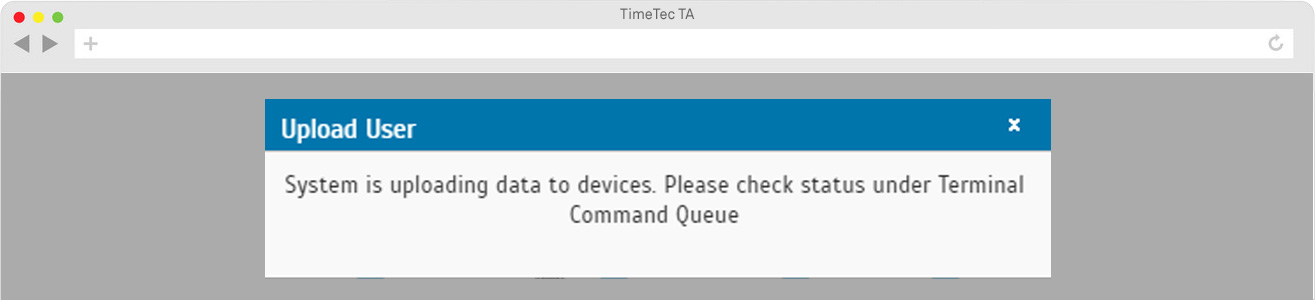
8. When the Status of the action shows Completed, this means that the users have been successfully uploaded to the selected terminal.

3.b Download User
To view the available users on each terminal, you can download the user list from terminal to the server by:
1. Go to Device > TimeTec Terminal > Manage Terminal.
2. Select the device that you wish to download user(s) from.
3. Click on Manage Terminal and from the drop-down menu, select Download User.

4. A pop-up window will be displayed as shown below.

5. From the window, a Sync option is available to ensure that the list of Terminal Users are updated. You can check the Last Updated date beside the Sync button. If the list is outdated, click on Sync to update the terminal users into TimeTec system.

6. You can check the syncing progress at FingerTec Terminal Command Queue.
(Refer to Section e under C. Manage Terminal)

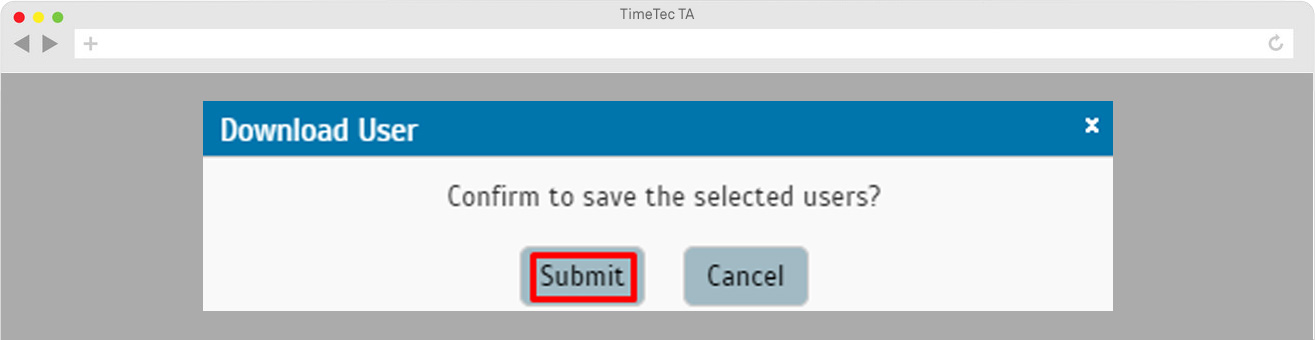
7. You can check or uncheck your preferences on the users’ information as well as the users that you wish to download into the server. Then, click on Submit to proceed.

8. After submitting your confirmation, the users are now downloaded from the terminal into the server.
3.c Delete User
Other than deleting user(s) manually from the device, you can also delete user(s) from the terminal on TimeTec TA.
1. Go to Device > TimeTec Terminal > Manage Terminal.
2. Select the device that you wish to delete user(s) from.
3. Click on Manage Terminal and from the drop-down menu, select Delete User.

4. From the pop-up window, select user(s) that you wish to delete from the selected terminal then submit your selections by clicking on the Submit button.

5. The system will prompt a confirmation message before proceeding with the action. Once Submit is selected, the user(s) will be deleted from the terminal.

3.d Reboot Terminal
Other than rebooting the terminal manually, you can also do so at TimeTec TA. This feature allows you to control the selected terminal remotely during situation whereby the terminals freeze or face some technical problems that require rebooting.
1. Go to Device > TimeTec Terminal > Manage Terminal.
2. Select the device that you wish to reboot.
3. Click on Manage Terminal and from the drop-down menu, select Reboot Terminal.

4. A confirmation message will be prompted to confirm your action. Select Submit to proceed.

5. The terminal will then be rebooted upon confirmation.
3.e FingerTec Command Queue
Terminal Command Queue allows you to view all executed commands on FingerTec Terminals via TimeTec TA along with its relevant information, such as when the software received the commands and when the commands were completed in this tab. As this page is intended for FingerTec technical support purposes; no command is made available.
1. From the menu, go to Support > FingerTec Support > Terminal Command Queue.

2. You will be directed to a web page with a list of commands with information including Serial No., Description, Command, User ID / Work Code, Request Time, Response Time, Complete Time, Return and Status.
Command - Command sent from server to terminal.
Request Time - Time at which the command is sent from server to terminal.
Response Time - Time at which the command is accepted at the terminal.
Complete Time - Time at which the command is completed at the terminal.
Return - Status of the command. 0 refers to completed command whereas ≠0 refers to pending or failed command.
Status - Display the status of a command, i.e.: pending, completed or cancelled.
3. From the table, you are able to view the commands that had been executed along with the relevant information.
4. Besides, you can also filter the commands by setting the Request Time.

5. If you wish to cancel your command, select the command during its Pending status followed by clicking on the Cancel Process.

6. The system will thus prompt a message to confirm your action and after selecting OK, your command will be cancelled.
4. Deactivate / Remove Terminal
4.a Deactivate Terminal
1. Go to Device > TimeTec Terminal > Manage Terminal.
2. Select the device that you wish to deactivate.
3. Click on Manage Terminal and from the drop-down menu, select Deactivate Terminal.

4. Select Submit when the following message is displayed.

5. To view your deactivated terminal, go to Inactive Terminal tab.

4.b Reactivate Terminal
1. To reactivate terminal, go to Device > TimeTec Terminal > Inactive Terminal.
2. From the list of inactive terminal, choose the terminal that you wish to reactivate then click on the Reactivate icon under Edit column.

3. After confirming the option, the terminal is now reactivated and you can find it under the list of terminals at Manage Terminal.
4.c Remove Terminal
When you opt to remove terminal from the server instead of deactivating it, the deleted terminal cannot be discovered from the list of inactive terminal or in the system, neither can it be added back to the system. Hence, it is recommended to deactivate devices that are no longer in use, rather than removing them. To remove a terminal,
1. Go to Device > TimeTec Terminal > Manage Terminal.
2. Select the active terminal that you wish to delete.
3. Under Edit column, click on the Trash icon to proceed with the delete action.

4. Alternatively, you can delete an inactive terminal. From the Inactive Terminal list, choose the terminal that you plan to delete.
5. Click on the Trash icon to delete the selected terminal.

6. A confirmation message will pop-up to verify your action. After selecting the Submit button, the terminal will be deleted from the system.

5. Manage Terminal Users
TimeTec TA allows you to manage terminal users by assigning them into different clocking devices to enable them to view or report their attendance via the selected devices. You can likewise enable the permitted devices for each user according to the company policy and ignore the devices which you are not assigning to the users. Users are then able to perform clocking and access the attendance record through TimeTec TA Mobile and Web access other than using FingerTec Terminal.
1. Go to Device > Assign Users to Device.

2. You can view a list of users along with their individual settings, which cover Web Access, TimeTec TA App, Checkpoint Group and Terminal Group.
Select the users that you wish to perform changes on their clocking devices and click on the Edit option.

3. You are now able to edit the permission on the clocking devices.

4. Under Allow To Use FingerTec Terminal column, you can determine the Terminal Group, Device Username, Privilege ( User, Enroller, Admin, Super Admin ), Card ID and Password of the selected user. You can also adjust the users access right at the terminal under this setting.

Terminal Group - Terminal group assigned to the users on TimeTec TA.
Device Username - Username shown within the device.
Privilege - Access right as assigned in the System Role.
Fingerprint Count - Show the number of fingerprint that the user has enrolled at the terminal.
Card ID - Smart Card number used by the user for access purpose.
Password - Password set by the user for access purpose.
5. After configuring, save the changes by selecting the Update icon.
6. Terminal Related Report
6.a Terminal Disconnection Report
Terminal Disconnection Report is a report generated to display the selected terminal connection status within a period of time. This report records the disconnected and reconnection time of the terminals. When disconnection or reconnection occurs, the Admin will receive the following push notifications.


To generate Terminal Disconnection Report:
1. Go to Report > Device Analysis > Terminal Disconnection Report.

2. At Select Terminal, you can either filter the report by Terminal(s) or Terminal Group(s) based on your preferences.
3. Also, you can generate the report for certain durations at Date.

4. When the report is generated, there are a few options provided:
- By selecting the search window icon, you can filter the report more efficiently.
- Print the report option allows you to print the entire selected report.
- Print the current page option allows you to print only the selected page of the report.
- Disk icon enables you to download the report and save it.
- You can select the format of the file saved, i.e. PDF, XLS, XLSX and RTF.

5. An example of the report generated:

6.b Terminal User List
FingerTec Terminal User List report will display the user list for the selected devices. It is recommended to synchronise the devices before generating the report.
1. Go to Report > Device Analysis > FingerTec Terminal User List.

2. Select the terminal that you wish to generate the user list from. The terminal can be sorted and grouped by User ID, Device Username, User or Device.

3. An example of the report generated:

6.c Terminal Transaction Listing
Terminal Transaction Listing will generate a report with the details of all transaction data downloaded from every terminal for every user selected.
1. Go to Report > Device Analysis > Terminal Transaction Listing.

2. You can filter the report by User, Group Duty Roster, Terminal and Terminal Group.

3. An example of the report generated:

Note: If some of the screenshots or steps viewed here are different from the ones in the current system, this is due to our continuous effort to improve our system from time to time. Please notify us at info@timeteccloud.com, we will update it as soon as possible.


Very good informative blog,
ReplyDeleteHi, please help as soon as possible.
ReplyDeleteWe have 1 FingertTec device has problem. It's disconnected, since a week ago. However, after check, network in that location is fine. But all the data recorded in the device since then did not show in the TimeTec TA system. How to solve this? Please help
Looking for a dependable
ReplyDeletedry cleaner near me
? Dry Cleaning Junction offers expert dry cleaning, stain removal, and laundry services with eco-friendly solutions. Keep your clothes fresh, clean, and professionally maintained with us.