TCMS V3/Ingress Software - How To Import Different User Leave Type And Remark From Excel


Introduction
In TCMS V3/Ingress, the system has the option “Batch Update Planner”, whereby users can assign the same Leave Type and Remark for all users or selected users at any one time without the need to repeat the same process for each user.

However occasionally, there are various users that are on leave with different leave types and remarks. Therefore, the easiest way to import all the data is to place the data in the Excel file and upload the file into TCMS V3/Ingress Software. Hence, this can help reduce both time and workload as the system can import all kinds of different leave types and remarks without requiring the user to repeat the process. To do so, please refer to the steps below:

Process:
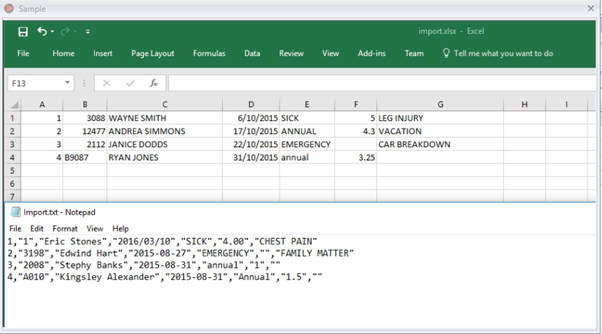
1. Users will need to fill in all leaves or remarks in the Excel File following the format given in
 the software.

You can download a sample Excel file from the link given: (https://s3.amazonaws.com/files.fingertec.com/Yusri+Tools/Sample+Excel/sample+import+leave+and+remark.xlsx)


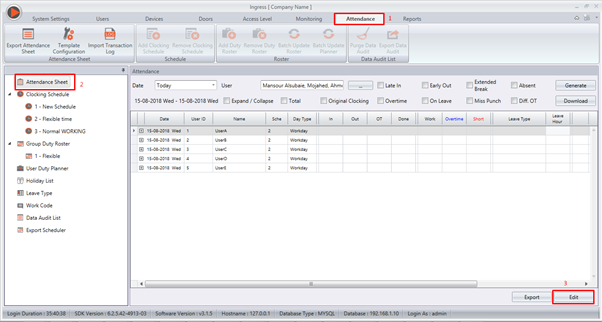
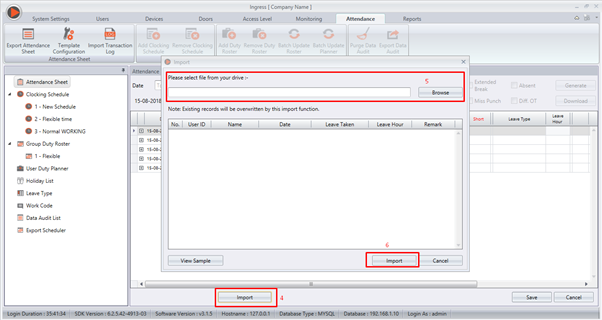
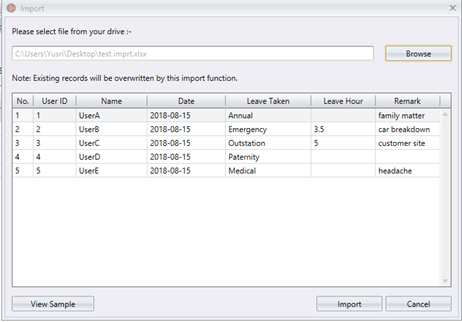
2.  To begin the process, click Attendance sheet > Edit > Import > Browse the Excel file > Import.


EXAMPLE:
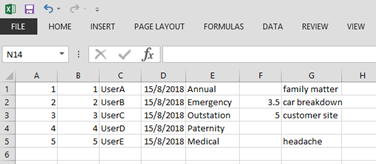
Excel Data -


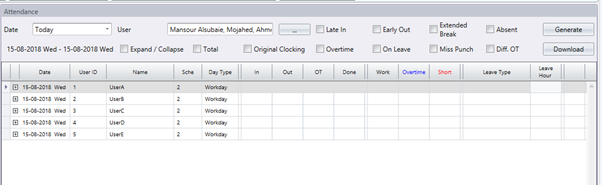
Attendance Sheet Before Importing File.


List Of Leave And Remark That Will Be Imported.


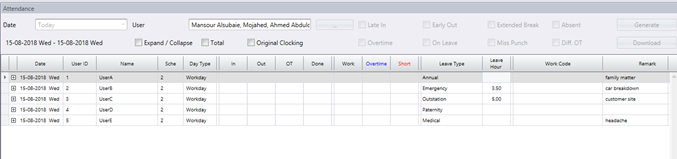
Attendance Sheet After Import.


That’s it, you're all done and you can now make use this handy tip to better improve your experience with our Smart Solution.

Note: If some of the screenshots or steps viewed here are different from the ones in the current system, this is due to our continuous effort to improve our system from time to time. Please notify us at info@timeteccloud.com, we will update it as soon as possible.

Wiring Guide To Setup TimeTec BLE-2 With FingerTec Controller.


Introduction
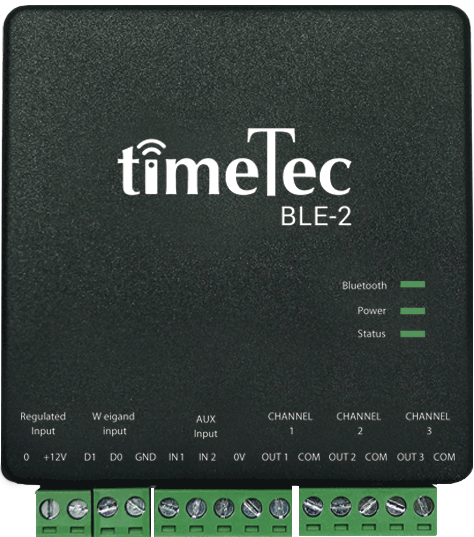
Introducing TimeTec latest product: TimeTec BLE-2 Smart Door Controller which is a new technology for access door controller that brings convenience in unlocking doors as well as enhancing security.


TimeTec BLE-2 uses Bluetooth Low Energy (BLE) technology that allows users to access doors through smartphone via TimeTec Security App. In this Application, the system provides you with up to four choices of unlocking your doors which are Tap, Voice, QR Code, and Auto-Unlock.

In this guide, we will show you the wiring required to setup TimeTec BLE-2 with the current existing FingerTec devices. This is particularly handy for customers that are still using FingerTec products and would like to try out our latest Door Controller along with the Smartphone App function.

Wiring Installation: -
1) NO – COMM
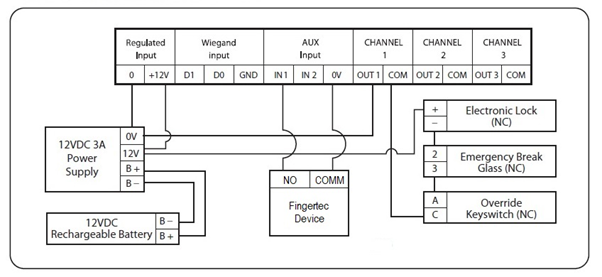
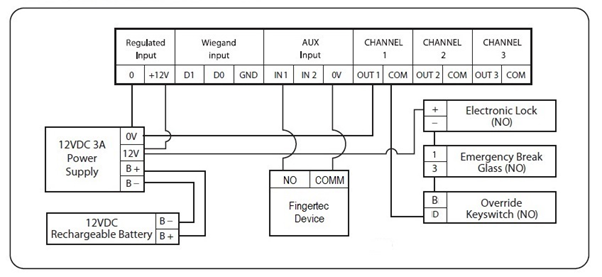
Normally, this wiring connection is used on FingerTec devices, i.e. Adaptec AC door controller. This connection operates like a push button connection. Therefore, when users proceed to carry out verification on the device, the NO - COMM point will be triggered and send the dry contact signal to the IN 1 and 0V Aux Input at TimeTec BLE-2.

Note that this wiring connection can also be used with FingerTec latest readers with door access function. As such, you will need to follow the wiring diagram as shown in the picture below.
 
Type 1: NC Type Electronic Door Lock

 
Type 2: NO Type Electronic Door Lock


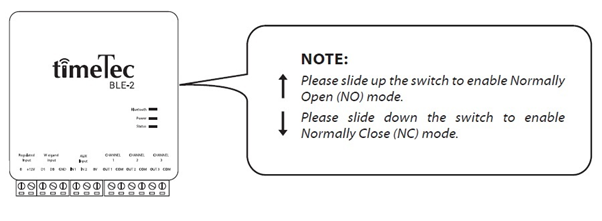
Switch For BLE-2 Wiring Door Lock Type.

Once completed the setup, users can not only unlock doors via Fingerprint verification but also with their smartphones using TimeTec Security (Tap, Voice, QR Code, Auto-Unlock). Additionally, this wiring can also be used in installing Adaptec Plus and Adaptec X Controller; for users who decided to replace Adaptec with the new generation of door controller.

Note: If some of the screenshots or steps viewed here are different from the ones in the current system, this is due to our continuous effort to improve our system from time to time. Please notify us at info@timeteccloud.com, we will update it as soon as possible.

TimeTec TA - How To Export Data Audit List Into A Customized File Format


Introduction
In TimeTec TA, Data Audit List allows users to view all clocking activities along with their details such as clocking date-time, location, reporting channel, etc. That said, we now provide an ‘Export’ function which allows users to export the Data Audit List into a customized file format for a third party system. To know more about the procedure, please refer to the steps below:

Process:
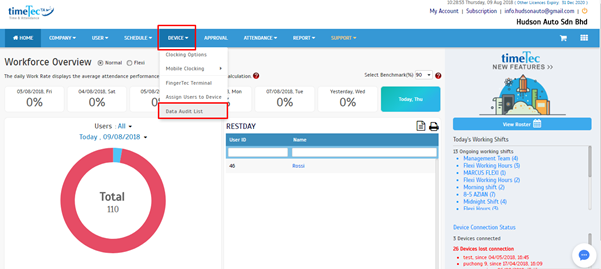
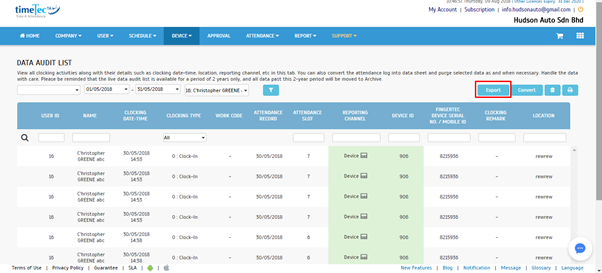
1. To export the Data Audit List, proceed to Data Audit List under Device module and the Export button is located at the top right corner as shown in the screenshot.


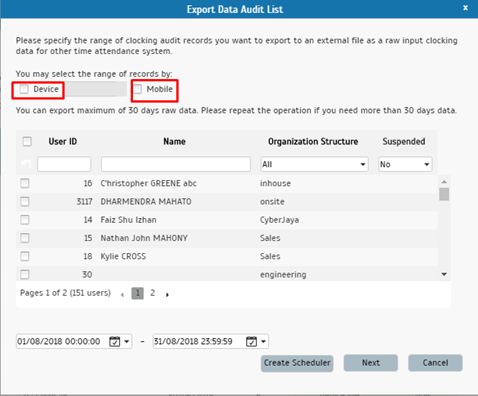
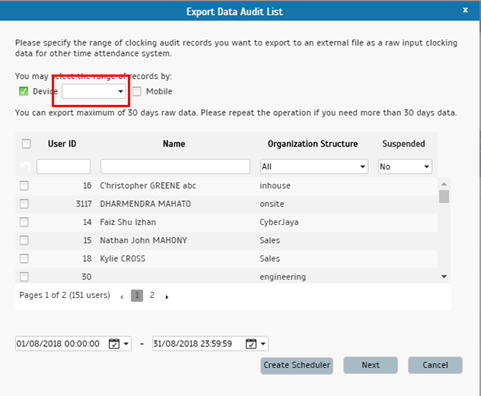
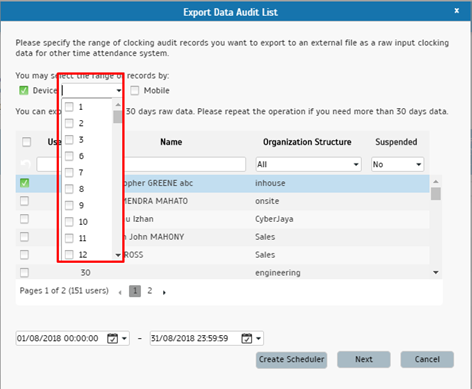
2.  After clicking on the Export button, a pop-up window: ‘Export Data Audit List’ will be displayed. Hence, users may select the range of records by Device, Mobile or even both options. If Device is chosen, users will have to select the Terminal ID from the drop-down list located beside the option. Next, select the user as well as the date range of the data that the users wish to export. Click ‘Next’ to proceed.


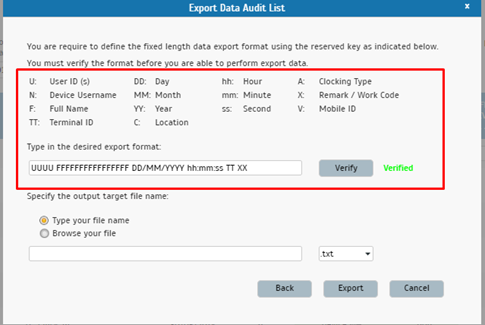
3.   Moving on, users have to input the export format. After selecting the desired export format, click ‘Verify’ and confirm whether the format is correctly configured.
 

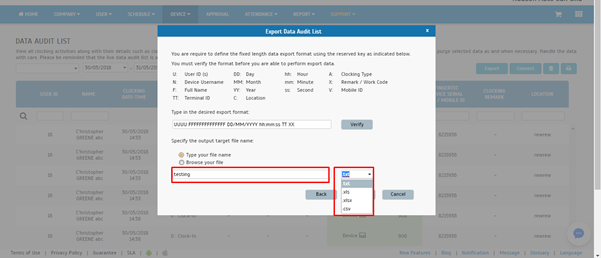
4.   If users wish to save the file as a new file, the ‘Type your file name’ option has to be selected. Next, type the file name and select the file type from the drop-down list.
 

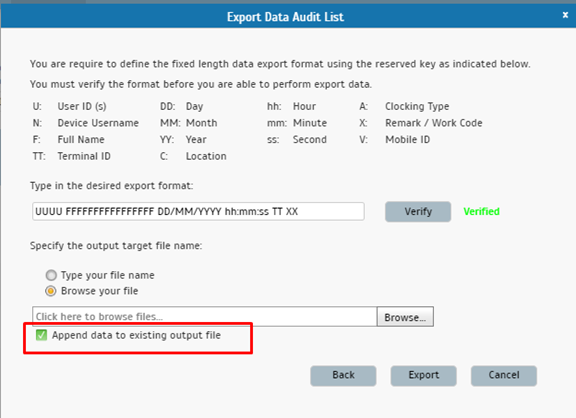
5.   If users choose ‘Browse your file’, an option (Append data to existing output file) will thus appear at the bottom of the window. By selecting this option, the system will update the existing exported file along with the new data.
 

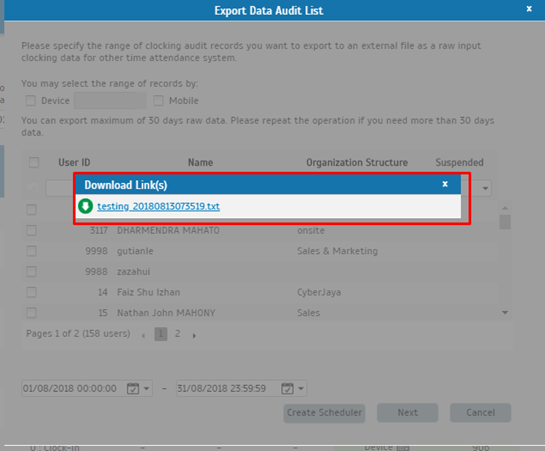
6.  Finally, click on Export and the system will generate a download link for the exported file. Click on the link and download the file into local PC. That’s it, you’re all done.


Note: If some of the screenshots or steps viewed here are different from the ones in the current system, this is due to our continuous effort to improve our system from time to time. Please notify us at info@timeteccloud.com, we will update it as soon as possible.

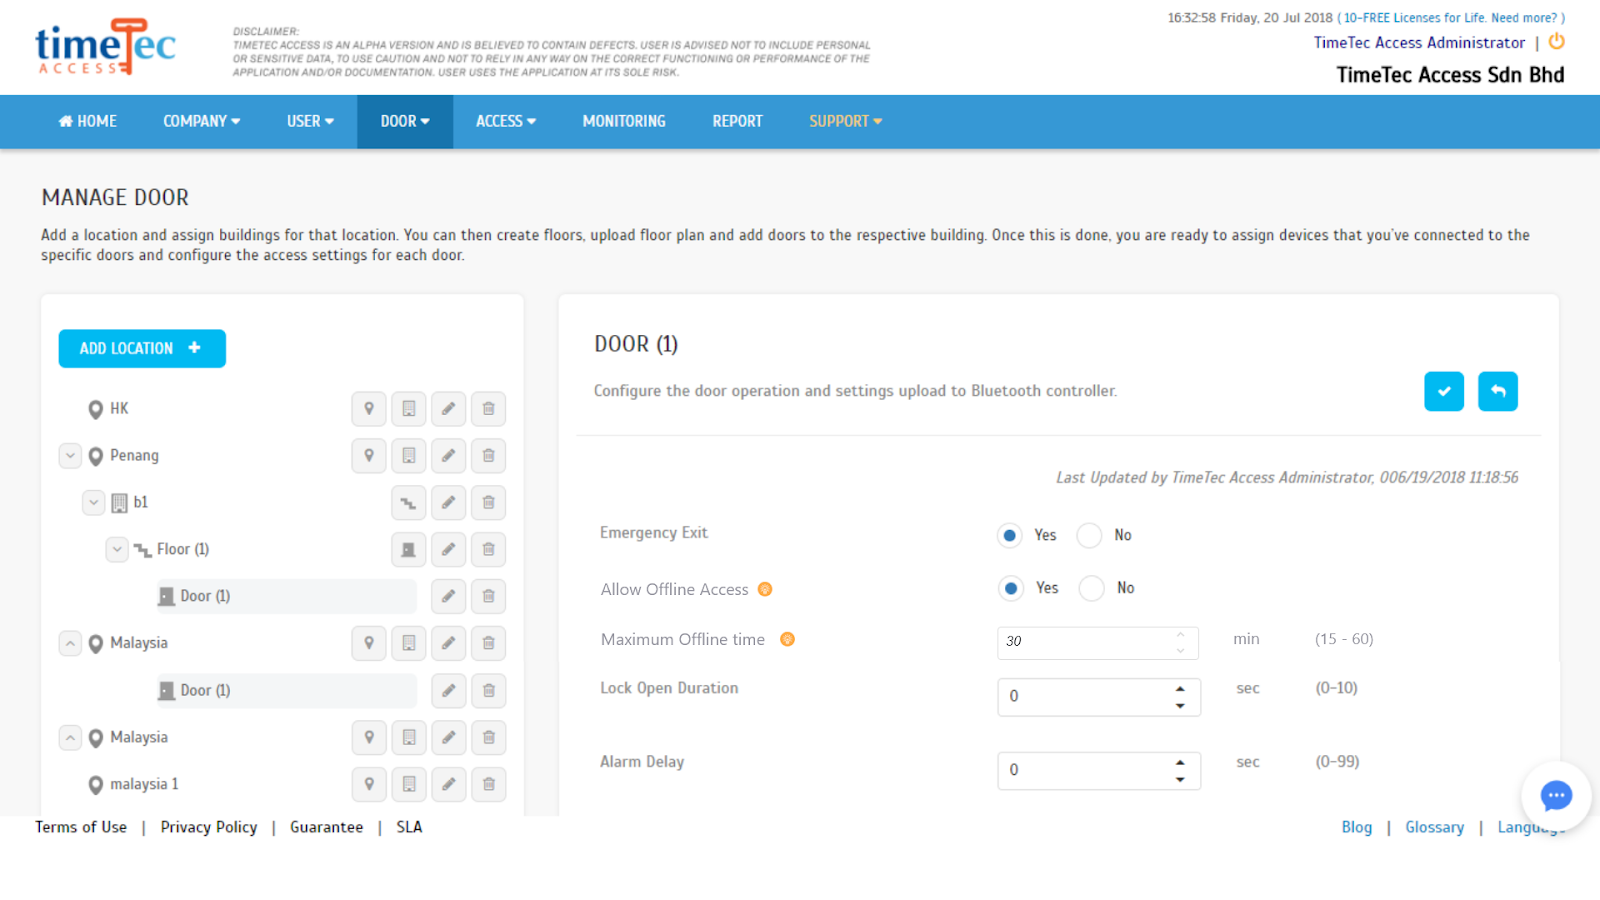
TimeTec Access - Allow Offline Access


Allow Offline Access and Set Maximum Offline Time

By default, user’s TimeTec Access Mobile App must be connected to the Internet in order for the
date, time and access permission to be synced with the data from TimeTec Access cloud server. This is to avoid the users from manipulating the smartphone date and time, and exploit the system.

However, there are certain locations whereby the users’ smartphones have zero or minimum Internet
connectivity. This option thus enable the users to continue using the Mobile App for door access
without the need for an Internet connectivity under a designated time period (Maximum Offline
Time). When using this setting, the Mobile App will only connect to the Internet according to a
predefined time interval.

For example, if you enabled Allow Offline Access and the Maximum Offline Time is set as 30
minutes; therefore, when a user launches the Mobile App at 9:00 am, the App will subsequently
connect and sync to TimeTec Access cloud server. Hence, the user can now use the Mobile App to
access doors even though there is no Internet connection. This is because the App uses the access
permission stored in its memory to determine the user’s access right up till 9:30 am. As such, any
period after the established time period and the App will erase the access permission stored in its
memory which in turn requires the user to connect to the Internet again.

During implementation, it is recommended that the system admins check the Internet connectivity of
the area before installing TimeTec Access BLE-5. If the Internet connectivity is poor at the selected area, the system admins can configure the Maximum Offline Time to 30 minutes and onward to
further increase flexibility for the users. Additionally, the system admin can also improve the Internet
connectivity by installing WiFi access point.


Note: If some of the screenshots or steps viewed here are different from the ones in the current system, this is due to our continuous effort to improve our system from time to time. Please notify us at info@timeteccloud.com, we will update it as soon as possible.


Manage Replacement Leaves (Time Off in Lieu) with TimeTec Leave


This post was originally published in August 2018 and was updated in October 2018. 
 
Introduction
We’re excited to share with you about the brand new Replacement Leave feature that just went live in July. To achieve the best working conditions, companies can now allow staff to apply for replacement leave credits in TimeTec Leave whenever they have to work on public holidays and weekends. This is sometimes known as “Paid Time Off in Lieu” and this means that instead of overtime pay, their staff can be compensated with additional rest days to make up for the busy peaks. This flexible option also helps to balance the budgetary concerns that may arise from an irregular schedule in business operations.    

Process
i. Enable this option in System Settings - Replacement Leave allows users to apply for replacement credit whenever they work after standard hours (in accordance with individual employment contract). By default, this option is turned off and can be enabled or disabled at any time.

ii. After enabling this option, Replacement Leave Wizard will pop-up and users will need to follow the instructions in the Wizard to configure the required Leave Settings > Assign to the relevant Leave Policy and Users (or you can skip for now and do this at Leave Settings > Leave Policy later).

iii. Replacement Credit module will now be displayed in the Menu (for assigned users who are entitled to this leave and their approvers).

iv. User: To apply for Replacement Credit > Go to Replacement Credit > Application tab > Click ‘Apply’ button > Fill in the form > Submit.

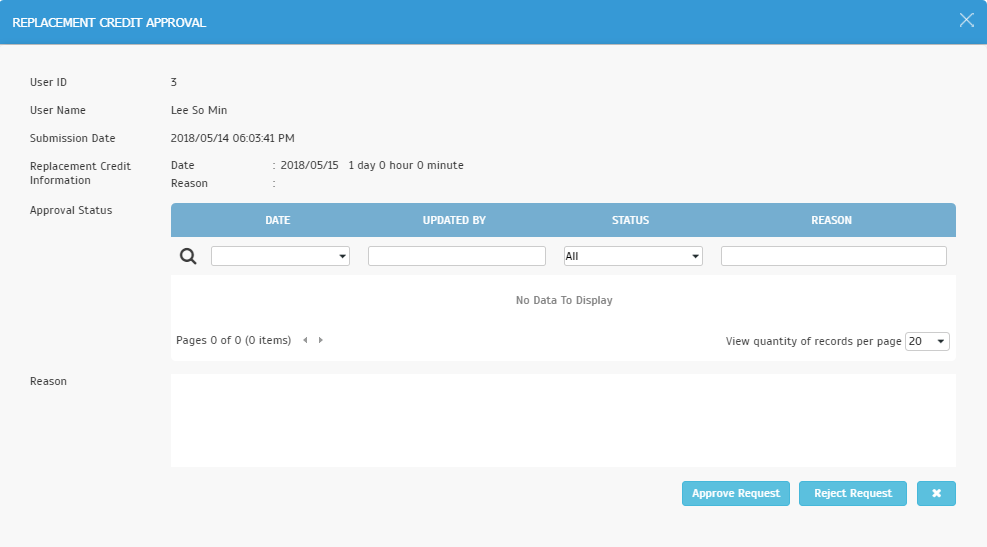
v. Approver: To approve Replacement Credit > Go to Replacement Credit > Approval tab > Edit > Click button to ‘Approve Request’/ ‘Reject Request’.

vi. Once approved, the Replacement Credit will be added to the user’s Replacement Leave balance. Users can then apply for Replacement Leave in the system through the usual leave application procedures.

Please note that Users and Approvers can also perform step (iv) to step (vi) above through the mobile application.

For more details of what’s available with this feature, please refer to the step-by-step guide below. There are 4 sections to this topic:

A) How to Enable/ Initial Setup (Web)
B) How to Apply & Approve Replacement Credit (Web)
C) How to Apply & Approve Replacement Credit (Mobile app)
D) How to Apply for Replacement Leave
E) How to use the Attachment feature  (NEW: Updated in Oct '18) 

A) How to Enable/ Initial Setup (Web)

1. Login to Admin account and go to System Settings. Click Edit, turn on the toggle button to enable Replacement Leave option (Disabled by default).

cid:image034.png@01D41DF9.032EFBE0


2. After enabling the option, Replacement Leave Wizard will pop up. Follow the instructions in the Wizard to configure the required Leave Settings > Assign to the relevant Leave Policy and Users (or you can skip for now and do this at Leave Settings > Leave Policy later).

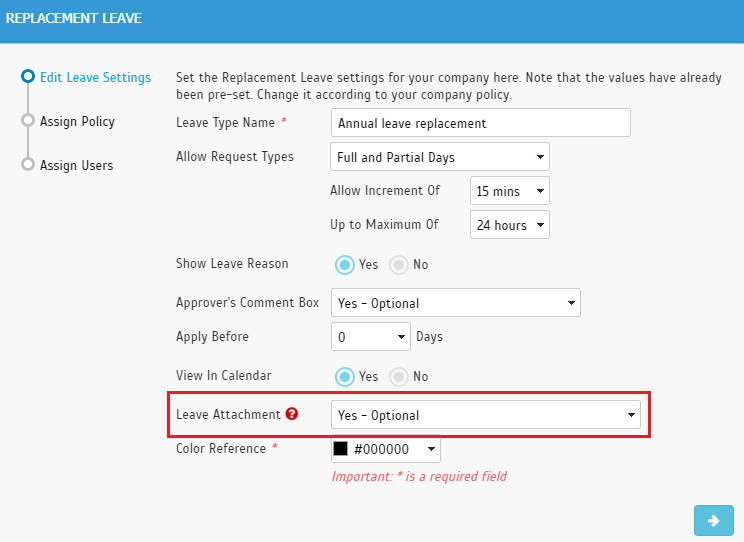
i) Step 1: Edit Leave Settings - Configure Replacement Leave
Note
If you need more details for the Leave Attachment option, refer below to Section E of this article. 
 

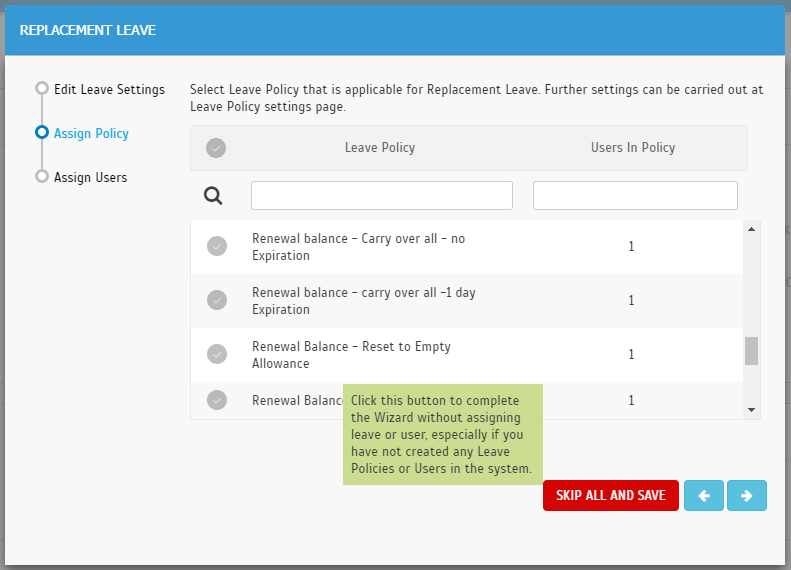
ii) Step 2: Assign Policy – Assign Replacement Leave to Leave Policy (can be skipped)
Note: If you skip, you can configure this later at Leave Settings > Leave Policy.

cid:image003.png@01D41DF9.E8CDF160

iii) Step 3: Assign Users – Assign Replacement Leave to Users (can be skipped)
Note
If you skip, you can configure this later by applying a Leave Policy that contains Replacement Leave to selected user or directly go to Manage User > Leave Settings > Allowance > Add Leave Type.


iv) Success Message after completing Replacement Leave Wizard


3. You have now enabled the Replacement Leave module in your company’s account. This function can be disabled by turning off the same toggle button in System Settings (refer to step 1).  

i) Settings after disabling Replacement Leave

cid:image009.png@01D41DF8.0BE10C20

B) How to Apply & Approve Replacement Credit (Web)

1. Once the Admin enables this feature, relevant users will be able to view a Replacement Credit Module in the Menu. 
Note: It will only be displayed for assigned users who are entitled to this leave and their approvers. Therefore, Admin will only be able to view this if they have also been assigned as an Approver for a user entitled to Replacement Leave. Likewise, non-Admin can see this if they are Approver for relevant users. 

i) Admin/ Approver View

ii) User View

2. Replacement Credit Application
Application
To apply, go to Replacement Credit > Application tab > Click ‘Apply’ button on the upper-right corner > Fill in the form > Submit.

On the Application page, besides applying for credit, users can view replacement balance and application status.


3. Replacement Credit Approval
Approval
To approve, go to Replacement Credit > Approval tab > Edit > View Request form > Click button to ‘Approve Request’/ ‘Reject Request’. 


cid:image021.png@01D41DF8.0BE10C20

C) How to Apply & Approve Replacement Credit (Mobile app)

1. Replacement Credit Application
Application
i. Go to side Menu > Replacement Credit > Credit Application.


ii. Tap on “+” at the upper-right corner to apply > Fill in the form > Tap on the plane icon to Submit. You can then monitor the status (Approved/Pending/Rejected/Cancelled) at Credit Application Listing.


2. Replacement Credit Approval
Approval
i. Go to side Menu > Replacement Credit > Credit Approval.


ii. On the Credit Approval Listing, tap on a Pending request (orange colour) > View Request form > Tap to Approve/ Reject.


D) How to Apply for Replacement Leave

1. Replacement Leave Balance
Once approved, the Replacement Credit will be added to the user’s Replacement Leave balance.


2. Replacement Leave Application
Users can apply for Replacement Leave in the system through the usual leave application procedures.


C) How to use the Attachment feature (NEW - Updated in Oct '18)

In September, we added a new feature called the Leave Attachment. This feature, which is available in both the Web and Mobile App, will enable users to upload supporting documentation (in pdf or images) when making their applications.

To use this, Admin should first enable this option (Optional/Mandatory) when configuring Replacement Leave settings. However, do take note that this setting affects both stages of the Replacement Leave feature: first, the Replacement Credit application and then the actual leave request itself. This means the same condition will be applied, staff will either be allowed or be mandated to attach a file in both types of application. Thus, it is recommended to pick Optional in the setting.
 
1. At Leave Settings, for Leave Attachment option, pick either 'Yes - Optional' or 'Yes - Mandatory'.
cid:image002.png@01D44B78.A8749B80

 2. When a user applies for Replacement Credit (and Replacement Leave), they will either be allowed or required to attach a file.


3. During approval, the Approver will be allowed to download the attachment.

cid:image006.png@01D44B78.A8749B80


4. Mobile App


Related Post:


Note: If some of the screenshots or steps viewed here are different from the ones in the current system, this is due to our continuous effort to improve our system from time to time. Please notify us at info@timeteccloud.com, we will update it as soon as possible.