

How to Manage New Users in FingerTec Terminal & TimeTec TA

With TimeTec TA, an administrator in a company can manage the new user/staff systematically by depending on the reliable data of time attendance management solution. Below is the process to manage the new user/staff in the FingerTec Terminal and TimeTec TA.
Process Part 1: FingerTec Terminal Enrollment of user
Normal user can use the terminal for identity verification, and he does not have any other authorities to access the system. To add a normal user, follow the steps shown below :


Fingerprint Verification

Part 2: TimeTec TA
Download user(s) from a terminal
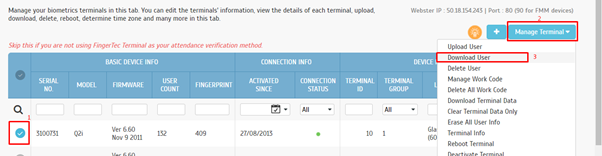
Go to Device > FingerTec Terminal > Manage Terminal.

Select the device that you wish to download its users. Click on Manage Terminal and from the drop-down menu, select Download User.
From the Window below, a Sync option is available to ensure that the list of Terminal Users is updated. You can check the Last Updated date beside the Sync button. If the list is outdated, click on Sync to update the terminal users into TimeTec system.
You can check or uncheck your preferences on the users’ information as well as the users that you wish to download into the server. Then, click on Submit to proceed.


After submitting your confirmation, the users are now downloaded from the terminal into the server.
Update user information
Go to User > Manage User

A user list displays User ID, Name, Organization Structure, Designation, Mobile Contact, Account Issuance Date, and Last Sign In time.

Under the Edit column, select the Edit button.

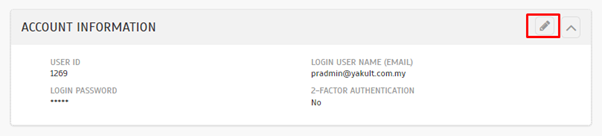
A Window shows the general account information and information of the selected users.
By selecting the Edit button, you can edit the user’s details
(1) To upload User Photo, (2) Deactivate button - To deactivate user if the user resigned, terminated, or suspended from the company. Once the user deactivated, the user moves into an Inactive Tab (3) Pencil Icon - To edit User Name, Joined Date, Organization Structure, Designation, etc.
![]()
On the bottom part, it is compulsory to fill in the User ID of the user and the User ID cannot be duplicated to other users. Login user name (Email) is optional if the user wants to log in their account through Apps/Web. Login Password is the temporary password, and Login password can be reset by admin any time in case the user has forgotten their password.
Assign Users into Organization Structure
Go to Company > Organization structure
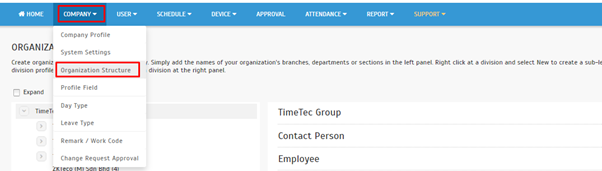
Select the department/group. Assign User into the structure by clicking the button.

Select the user and submit

Assign user(s) into Roster
Go to Schedule > Assign Schedules and Users into Roster

Select the Add button at the roster that you wish to assign user(s) into.

After assigning user(s) into the Group Duty Roster, you need to specify the effective date of the new roster assigned. Determine the Start Date and the End Date at which the new roster takes effect, and the attendance of the user generates according to the date.

Select your preferences on the attendance sheet then Submit your configuration by clicking on the Tick button.

Assign Users to Device
Go to Device > Assign Users to Device.

You can view a list of users along with their settings, which cover Web Access, TimeTec TA App, Checkpoint Group, and Terminal Group. Select the users that you wish to perform changes on their clocking devices and click on the Edit option.

You are now able to edit permission on the clocking devices.
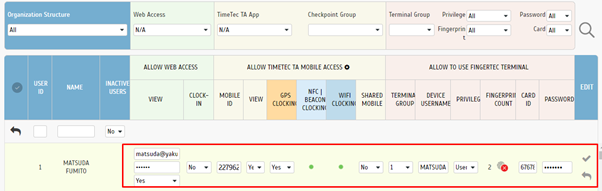
Under Allow To Use FingerTec Terminal column, you can determine the Terminal Group, Device Username, Privilege ( User, Enroller, Admin, Super Admin ), Card ID and Password of the selected user. You can also adjust the users' access rights at the terminal under this setting.
Terminal Group - A terminal group assigned to the users on TimeTec TA
Device Username - A username assigned to the device
Fingerprint Count - The number of fingerprints that the users have enrolled at the terminal
Privilege - Access rights as assigned in the System Role
Password - Password set by users for access purposes
Card ID - Smart Card number used by users for access purposes
Mobile ID - Unique mobile ID assigns to the mobile phone, and TimeTec TA stores this particular mobile ID
After configuration, save the changes by selecting the Update icon.
How To Enable/Disable GPS & Web Clocking In TimeTec TA:
Click on ‘Edit’ icon at User’s tab and Set Web Clocking to ‘Yes/No’ to Enable/Disable.

To Enable/Disable GPS Clocking, Set the GPS Clocking option to Yes/No. Next, click Update/Cancel to save the changes.

Note: If some of the screenshots or steps viewed here are different from the ones in the current system, this is due to our continuous effort to improve our system from time to time. Please notify us at info@timeteccloud.com, we update it as soon as possible.
(1) To upload User Photo, (2) Deactivate button - To deactivate user if the user resigned, terminated, or suspended from the company. Once the user deactivated, the user moves into an Inactive Tab (3) Pencil Icon - To edit User Name, Joined Date, Organization Structure, Designation, etc.
On the bottom part, it is compulsory to fill in the User ID of the user and the User ID cannot be duplicated to other users. Login user name (Email) is optional if the user wants to log in their account through Apps/Web. Login Password is the temporary password, and Login password can be reset by admin any time in case the user has forgotten their password.
Assign Users into Organization Structure
Go to Company > Organization structure
Select the department/group. Assign User into the structure by clicking the button.
Select the user and submit
Assign user(s) into Roster
Go to Schedule > Assign Schedules and Users into Roster
Select the Add button at the roster that you wish to assign user(s) into.
After assigning user(s) into the Group Duty Roster, you need to specify the effective date of the new roster assigned. Determine the Start Date and the End Date at which the new roster takes effect, and the attendance of the user generates according to the date.
Select your preferences on the attendance sheet then Submit your configuration by clicking on the Tick button.
Assign Users to Device
Go to Device > Assign Users to Device.
You can view a list of users along with their settings, which cover Web Access, TimeTec TA App, Checkpoint Group, and Terminal Group. Select the users that you wish to perform changes on their clocking devices and click on the Edit option.
You are now able to edit permission on the clocking devices.
Under Allow To Use FingerTec Terminal column, you can determine the Terminal Group, Device Username, Privilege ( User, Enroller, Admin, Super Admin ), Card ID and Password of the selected user. You can also adjust the users' access rights at the terminal under this setting.
Terminal Group - A terminal group assigned to the users on TimeTec TA
Device Username - A username assigned to the device
Fingerprint Count - The number of fingerprints that the users have enrolled at the terminal
Privilege - Access rights as assigned in the System Role
Password - Password set by users for access purposes
Card ID - Smart Card number used by users for access purposes
Mobile ID - Unique mobile ID assigns to the mobile phone, and TimeTec TA stores this particular mobile ID
After configuration, save the changes by selecting the Update icon.
How To Enable/Disable GPS & Web Clocking In TimeTec TA:
Click on ‘Edit’ icon at User’s tab and Set Web Clocking to ‘Yes/No’ to Enable/Disable.
To Enable/Disable GPS Clocking, Set the GPS Clocking option to Yes/No. Next, click Update/Cancel to save the changes.
Note: If some of the screenshots or steps viewed here are different from the ones in the current system, this is due to our continuous effort to improve our system from time to time. Please notify us at info@timeteccloud.com, we update it as soon as possible.


how to distinguish in the printed copy or at the system if the time in was edited/
ReplyDeleteHi Sir/Mdm, you can distinguish it very easily by looking at the attendance time where the edited data will become bold font while original data is in normal font.
Deletehttps://prnt.sc/1roj6pv
Programming assignments used to be quite overwhelming for me, especially when I had to debug complex code and work with multiple programming languages simultaneously. After using the programming assignment writing service I gained a much better understanding of coding logic, syntax, and problem-solving techniques. The experts explained challenging topics clearly and helped me organize my projects in a more efficient way.
ReplyDeleteRapid Assignment Help provided well-written, precise, and thoroughly tested programming solutions that exceeded my expectations. I highly recommend it to any student looking for dependable guidance and top-quality assistance in their coursework.