Introduction
Season parking lets vehicle owners park vehicles regularly near their homes or workplaces at a fixed monthly rate. TimeTec Parking is a tool for the admin to manage all season passes applications, renewals and terminations online. Users can review, purchase, renew and terminate season passes via the TimeTec Parking web portal or mobile app.
Besides individual season pass, corporate admin can log in to TimeTec Parking to do bulk purchase, renewal or termination of season passes. Corporate admin can also assign season passes to employees via the TimeTec Parking app anytime. TimeTec Parking accepts all types of online payment (credit cards or e-wallets) to ease individual or company admin to subscribe and renew for season passes via a web portal or mobile app. The system will send all receipts to individuals or company admins via emails and a copy to the individual account.
Process
The System Admin must create or import the company name under Manage Corporates Season Pass. The company ID is a unique reference number that will be auto-generated for admins and individual users to insert into their mobile app when purchasing season passes for the company.
To create a company Name one by one, you may go to Season Pass > Manage Corporate Client > click Add button.
Insert Company Name information and set its maximum season pass.
To create Company Name in bulk by import Excel file, click Import button
You may download the sample file here and fill in the company information inside the excel file.
Click Browse to read the excel file and click Submit to start import.Note: If some of the screenshots or steps viewed here are different from the ones in the current system, this is due to our continuous effort to improve our system from time to time. Please notify us at info@timeteccloud.com, we will update it as soon as possible.
Introduction
In TimeTec Claim, users with Master or Admin roles can add new users into the system. There are two ways to add users: first, by using the Add User (add one user only) and second, Import User using Excel file (add multiple users). This article will provide a step-by-step guide on adding users from single users to multiple users into the system.
Process
A. Add User (add one user only)
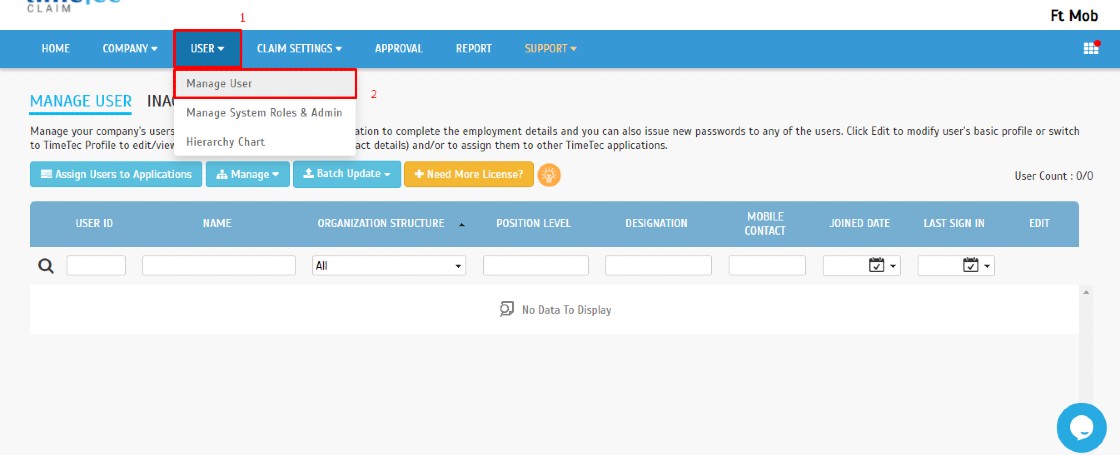
1. Go to User > Manage User.
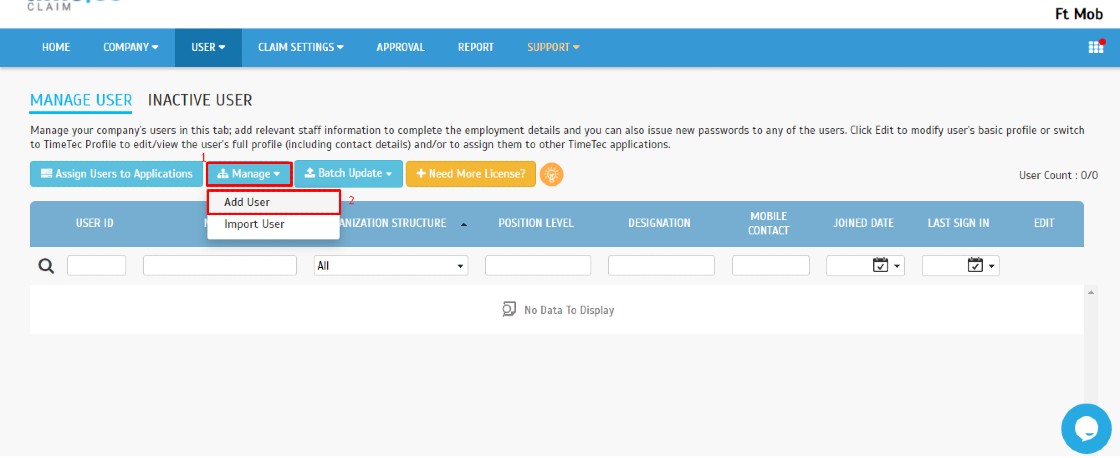
2. Click on Manage > Add User.
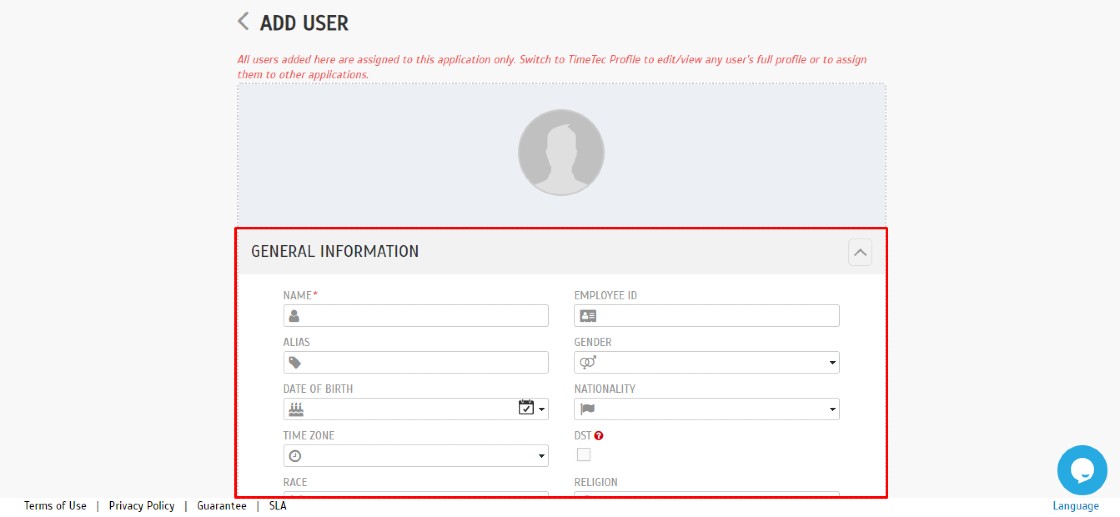
3. Fill up all the required information in the General Information and Account Information module > Click Submit.
Remark: (*) symbol is a compulsory part to be filled.
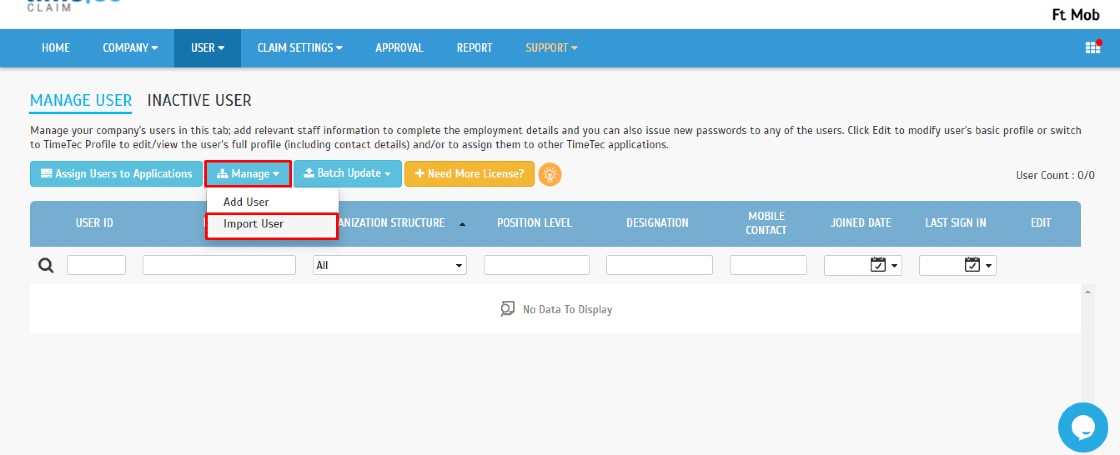
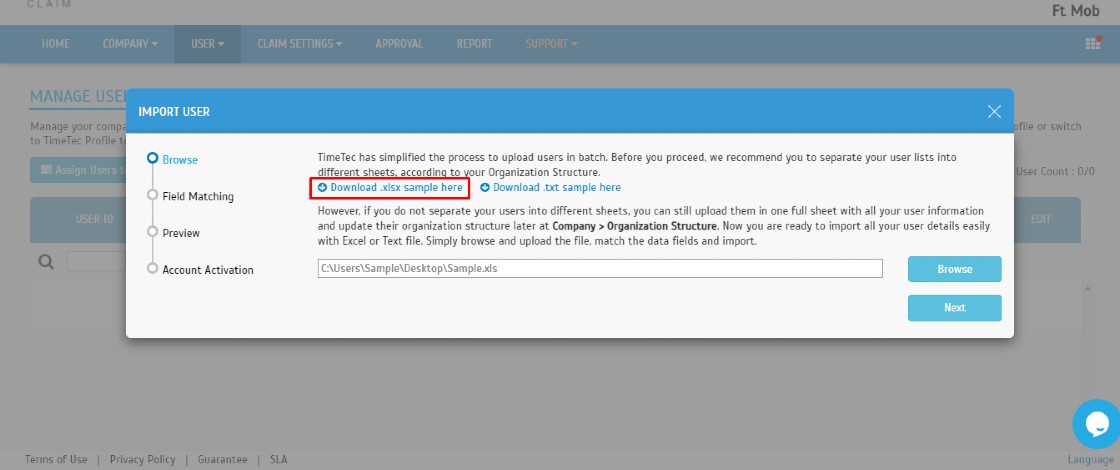
B. Import User (add multiple users using Excel File)1. Click on Manage > Import User.
2. Download the sample file.
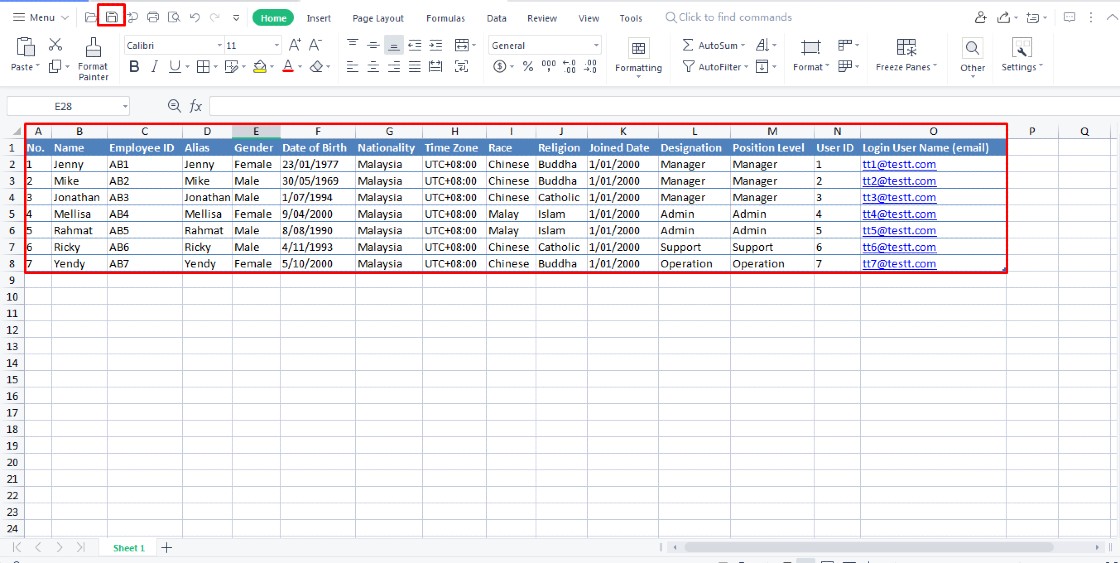
3. Fill up all the details needed in the Excel file > Click Save the file.
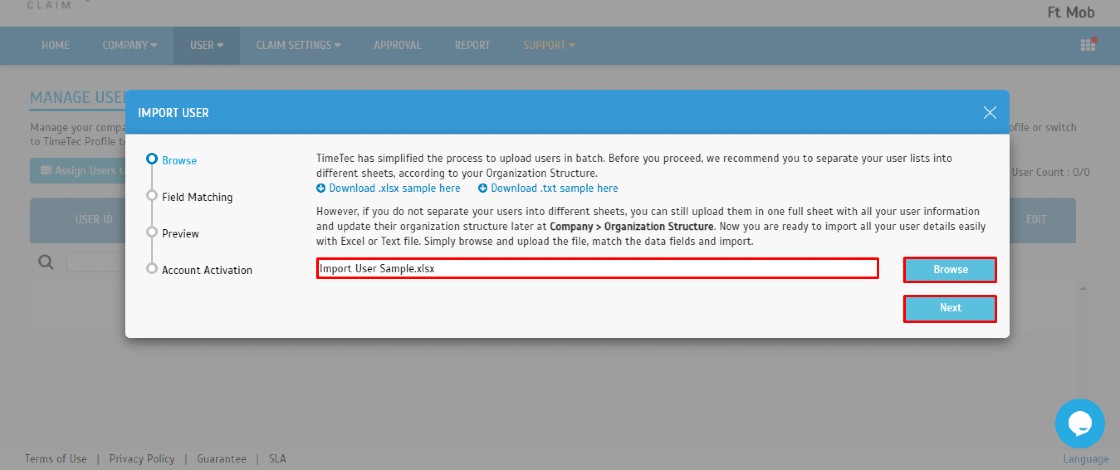
4. Repeat step B(1) > Browse File > Select the Saved File > Click Next.
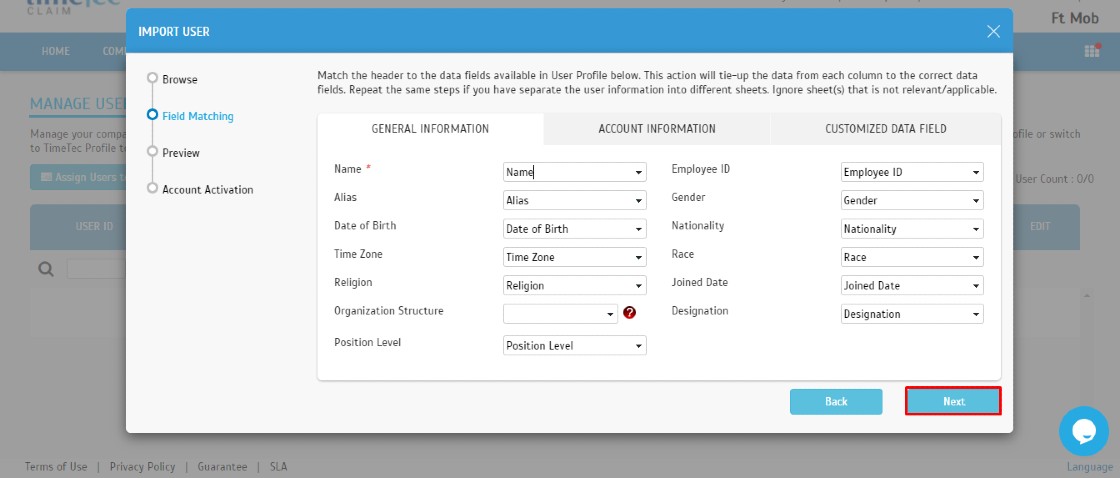
5. Click Next (Users can directly do field matching after importing the file).
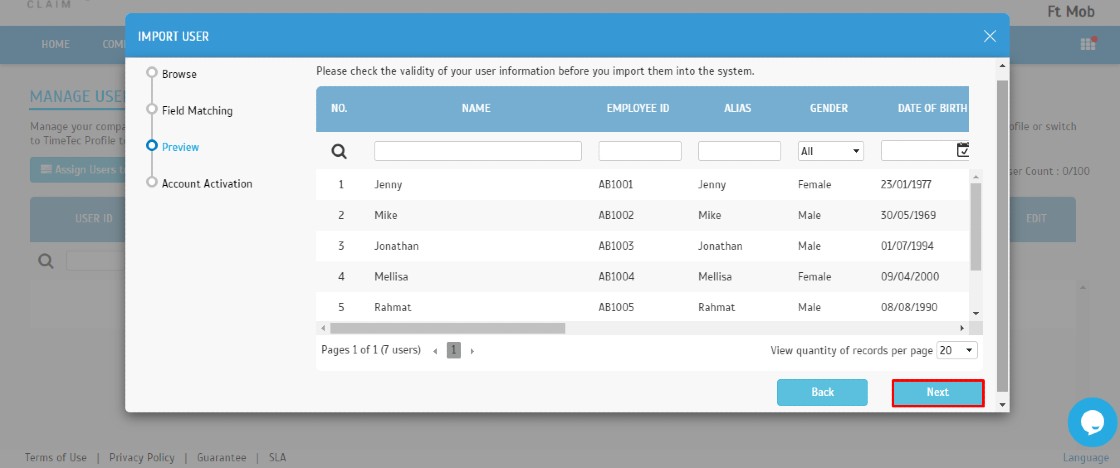
6. On the Preview Tab, all the completed data will appear to let us preview all the data before importing them to the system > Click Next.
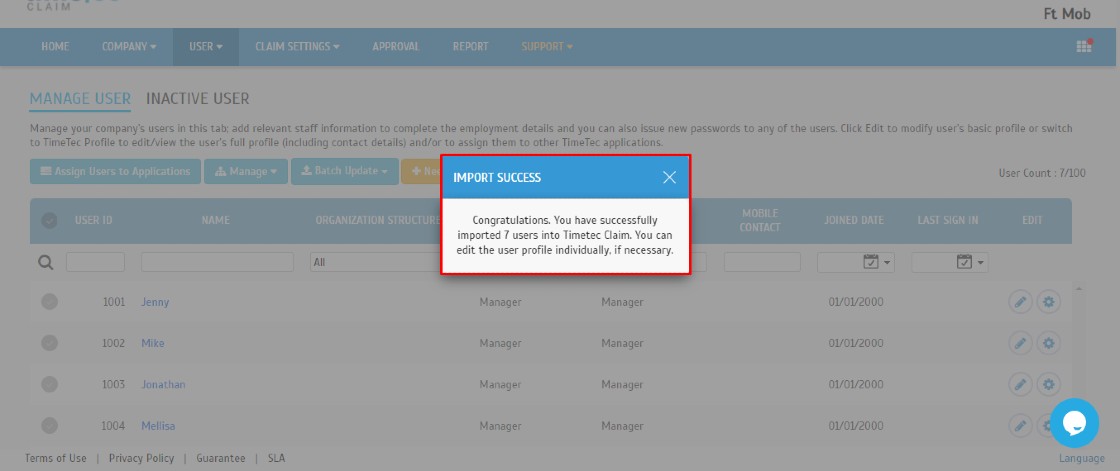
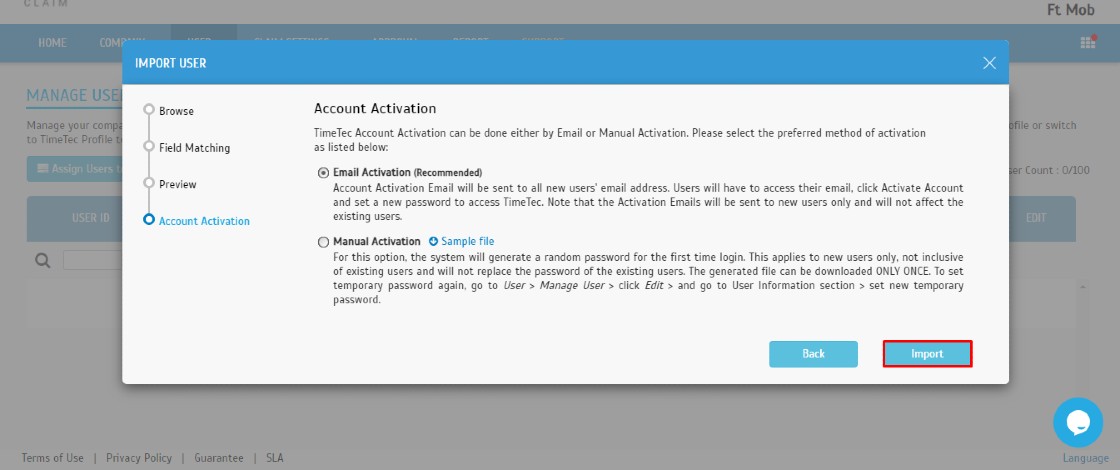
7. You can select the account activation method on the Account Activation Tab, either using Email Activation / Manual Activation > Click Import.
Email Activation: Account Activation Email will be sent to all new users' email addresses. Users will have to access their email, click Activate Account and set a new password to access TimeTec. Note: The activation emails will be sent to new users only and will not affect the existing users.
Manual Activation: For this option, the system will generate a random password for the first time login, and it applies to new users only, and not inclusive of existing users and will not replace the password of the existing users. The generated file can be downloaded ONLY ONCE. To set a temporary password again, go to User > Manage User > click Edit > and go to User Information section > set new temporary password.
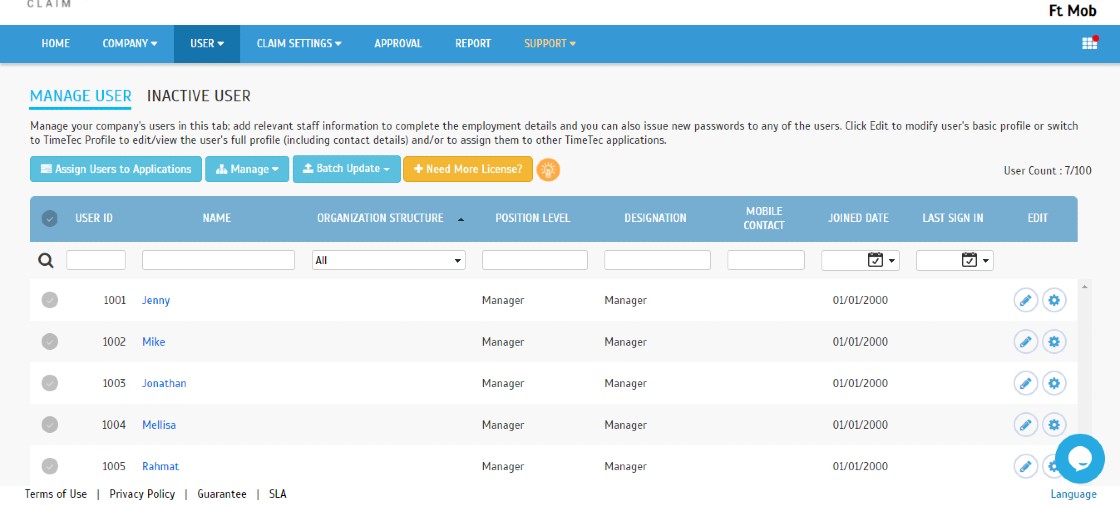
A notification will appear once you have completed the Import User process and the total users added will appear on the Manage User module.
Note: If some of the screenshots or steps viewed here are different from the ones in the current system, this is due to our continuous effort to improve our system from time to time. Please notify us at info@timeteccloud.com, we will update it as soon as possible.
Introduction
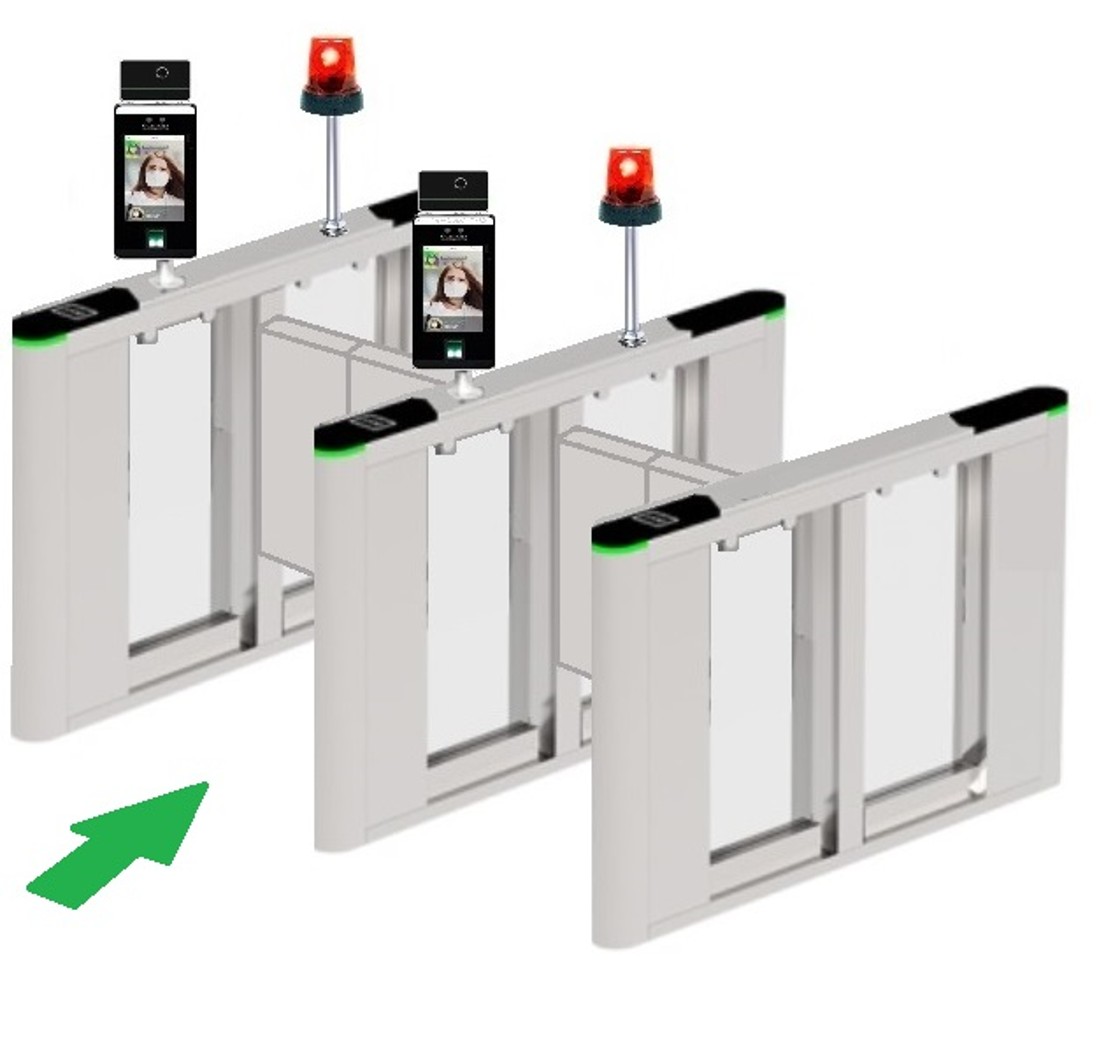
Turnstiles are access gates for controlling traffic, allowing one person a time to control traffic flow for in and out. Face ID 5 TD/FTD with a Temperature Sensor can detect and alert a person with a high body temperature. Adding an external alarm to work with the temperature sensor makes it easy to manage the traffic. When a person with a high temperature is detected, the system will notify the security team, reducing the need for constant human supervision. The use of turnstiles is suitable for industrial use such as in big factories, transportations use such as at train stations, and commercial use such as in big mall complexes, and more.
Figure 1: Example of An External High Temperature Alarm Installation
Authorized building managers can decide to allow only personnel and visitors with normal body temperature to access the turnstile and disallow those who exceed the temperature limit to pass the turnstiles. Building management needs to enrol each user's face and ID and store the information inside the Face ID 5 TD/FTD to set this permission by using TimeTec AWDMS for local servers. Please find the information on how to do it at the following link:
(https://www.fingertectips.com/2020/12/how-to-add-new-device-smart-ac1-series.html )
Similarly, for visitor access, Face ID 5 TD / FTD can screen body temperature and block visitors with high body temperature from entering the premises. Below is an example of a wiring schematic diagram for the Face ID 5 turnstile with an external temperature alarm.
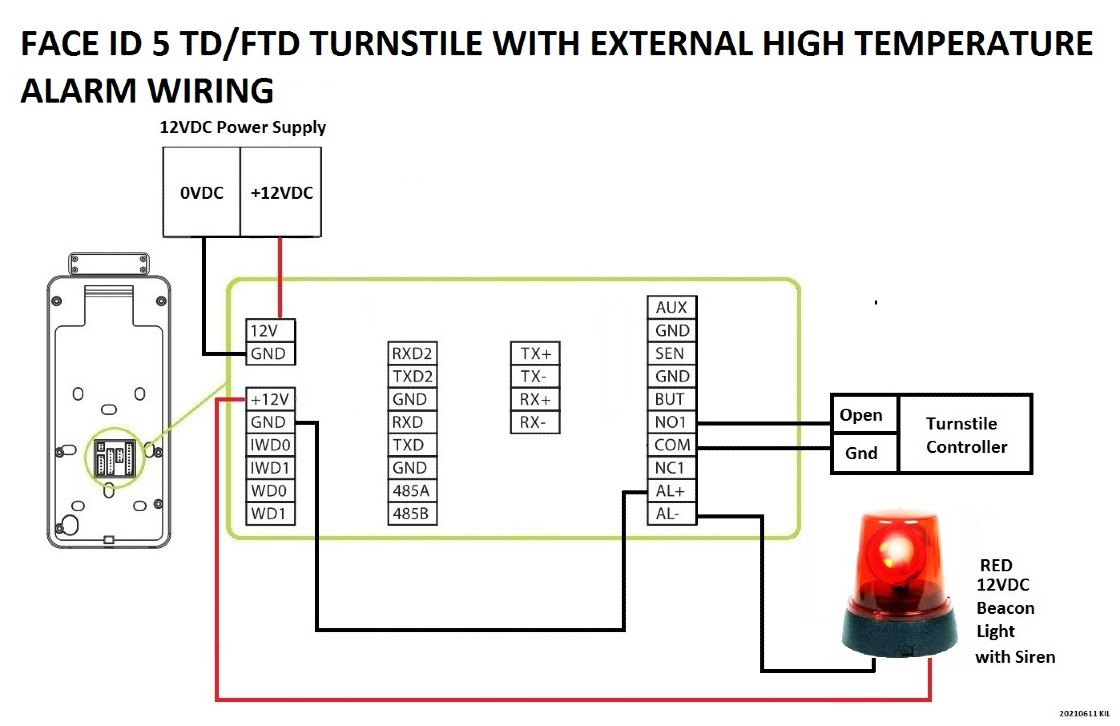
Figure 2: Example of Face ID 5 TD /FTD Turnstile Connection With An External Temperature Alarm
Each turnstile controller has a different input signal; please check the controller device schematic before installing.
Note: If some of the screenshots or steps viewed here are different from the ones in the current system, this is due to our continuous effort to improve our system from time to time. Please notify us at info@timeteccloud.com, we will update it as soon as possible.
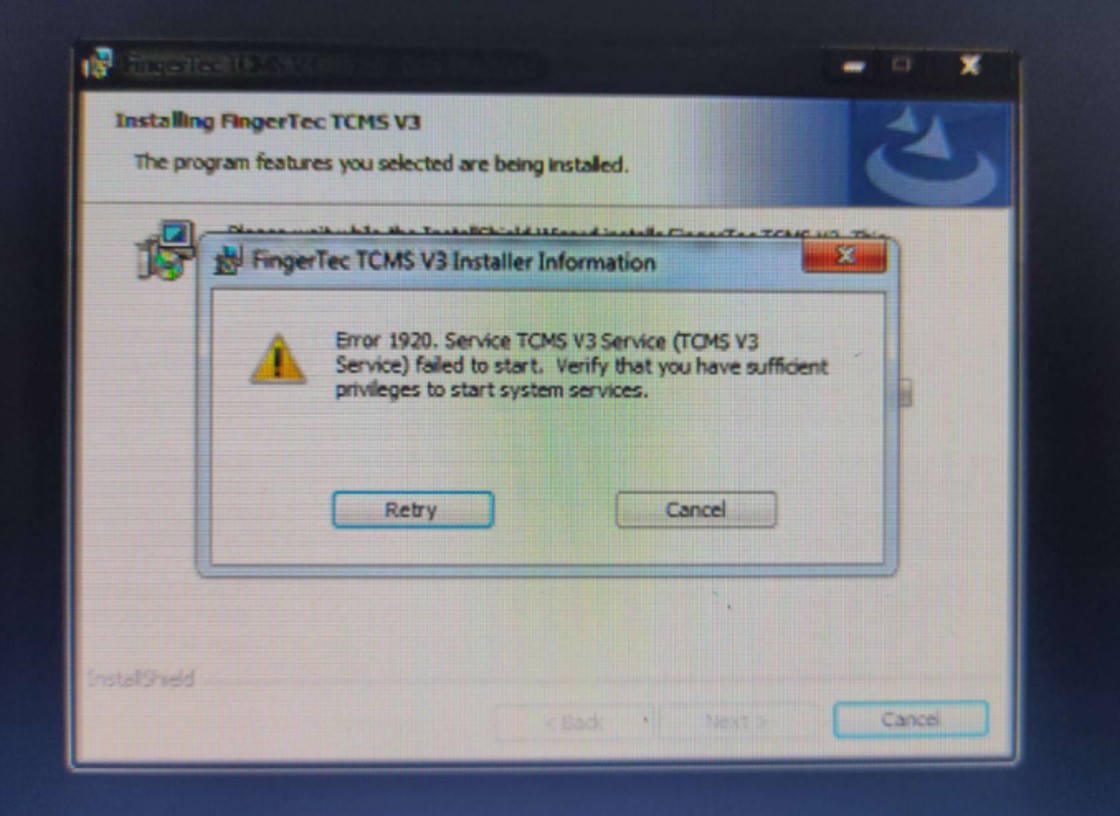
The error message below appears because your Windows account login does not have sufficient privileges, or you are not logged in as an Administrator. The Administrator account you are having also must be able to access any folders and have privileges to start services for FingerTec Software to be successfully installed.
If you have already logged in as an Administrator account but couldn't install FingerTec Software successfully, please check the Windows software updates. Ensure you have updated your Windows to the latest version, and you need to restart the computer once before proceeding to perform software installation.
If the issue persists, the last solution you would try is following the steps below. And please note that this issue is related to your Windows operating system or Microsoft settings. So, if this is still unable to solve the issue, my advice is to get help from a computer or technical guy or change to another computer to install the FingerTec Software.
Process
1. Go to start, search and type:- cmd, right click on cmd.exe and select "run as administrator"
2. At the command prompt type:- net localgroup Administrators /add networkservice
3. Press enter.
4. Then type:- net localgroup Administrators /add localservice
5. Press enter.
6. Then type:- exit
7. Press enter and restart your computer
8. Proceed with FingerTec Software installation.
Note: If some of the screenshots or steps viewed here are different from the ones in the current system, this is due to our continuous effort to improve our system from time to time. Please notify us at info@timeteccloud.com, we will update it as soon as possible.
Introduction
FingerTec Kadex is an access control device that supports RFID, Mifare, or HID cards. Unfortunately, only one card type is applicable at a specific Kadex. Therefore, if you have a Kadex RFID, you can't use the same device to verify MiFare cards. However, Kadex RFID can be switched to accept MiFare cards as a verification option with some device adjustment. A MiFare card is a smart card that can contain data and be read at the device. This tip will show you the step-by-step process to convert Kadex RFID into Kadex MiFare.
Requirements
- Solder equipment
- Screwdriver
- MiFare module
- MiFare antenna
- Wire cutter
Steps
- Unscrew all 4 screws at the back of the device casing.
- Remove the coreboard and all the cables that are connected to the MCU.
- Unplug the cable behind the MCU
- Unscrew all 6 screws that are holding the keypad PC module
- After you have taken out the keypad PCB module, unscrew the 3 screw and remove the RFID antenna
- Take the MiFare antenna and cut it following the white line.
- Take only the cable and solder it at the keypad PCB board
- Take the cable and put it here but make sure the red cable must be on top.
- Solder the 2 cable antennas
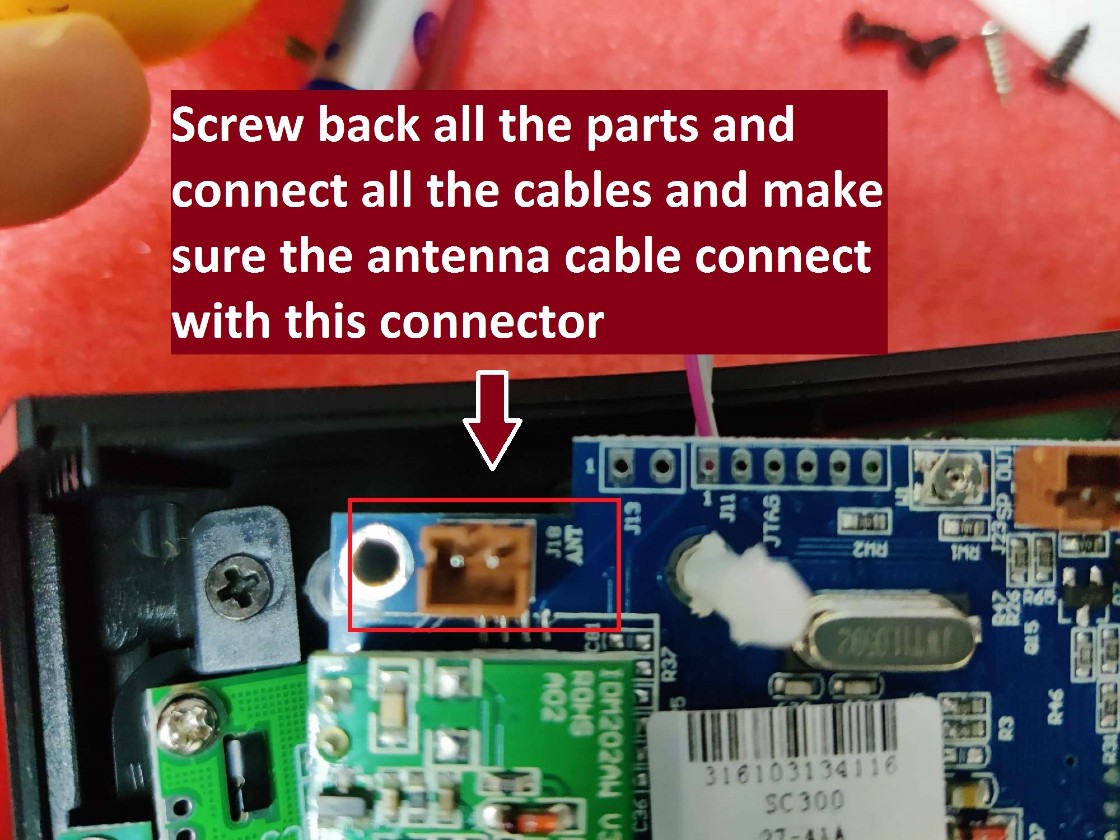
- Take the MCU board and desolder RFID module
- Desolder all these 3 points and change to a MiFare module- After soldering the MiFare module, connect all the cables and remember to connect the antenna cable to this connector.
- Then, update the device with Mifare card function using card management tools. Please contact FingerTec Support team at support@fingertec.com to obtain the Card Management Tool.
Note: If some of the screenshots or steps viewed here are different from the ones in the current system, this is due to our continuous effort to improve our system from time to time. Please notify us at info@timeteccloud.com, we will update it as soon as possible.
Introduction
In Ingress MySQL, a feature named ‘Database Initialization’ can initialize the Attendance module whereby the system will remove all relevant tables data, including clocking schedule and group duty roster. And this will lead to the error of ‘Insert user ID and username’ when you try to add a new user even though you have inserted the required fields.
Process
To fix this error, you just need to re-add the default clocking schedule and group duty roster as guided below:
1) Go to Attendance module > Click on Clocking Schedule > Add Clocking Schedule > OK

2) Click on Group Duty Roster > Add Duty Roster > OK
3) Finally, you can add a new user!
Note: If some of the screenshots or steps viewed here are different from the ones in the current system, this is due to our continuous effort to improve our system from time to time. Please notify us at info@timeteccloud.com, we will update it as soon as possible.