Step-By-Step Guide for Admin On How to Manage The Defect Reports From the Unit


Introduction
This article is a guide for an Admin to configure and manage the Defect Report module. The Defect Report module centralizes all the defect reports lodged by the Unit Owners, and it manages the report tickets efficiently for the management team. .
Note: All Defect Report settings are available in the i-Neighbour web platform, and it is not available in the App.

How To Configure the Defect Report Settings in the Web:
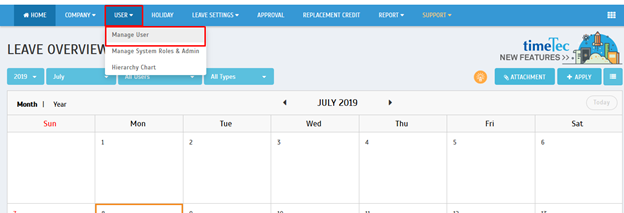
Step 1: Go to Defect Report and navigate to Settings (the Cog icon is next to the Ticket Closed button).


Step 2: At the ‘Defect Type’ tab, the Admin can add different types of defects/items. Once you select all items, click the Save button. All added defect types are available in the unit owner’s Defect Report form.

Example: 
1) Select type: Door
2) Enter item type: Frame
3) Code: E2

Step 3: At the Auto Mailer tab, customize your mailer by editing the email subject and text message. Click on the Edit button to amend the Auto Mailer. When a unit owner submits a defect report, he receives a mailer as a proof or a copy of their submission.


Step 4: Next, under the Setting tab, configure the settings for Defect Report module such as Alert Message, Joint Inspection, Person-in-charge, Ticket Prefix, etc.
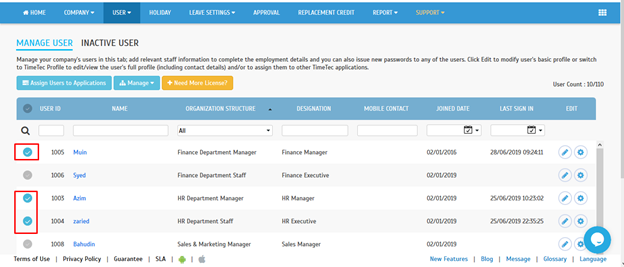
Step 5: Go to the Defect Eligibility tab to view or edit the defect report eligibility status of each of the unit owner. Click on any of the Edit icons for which the user wants to edit or view the eligibility status of the selected unit owner.


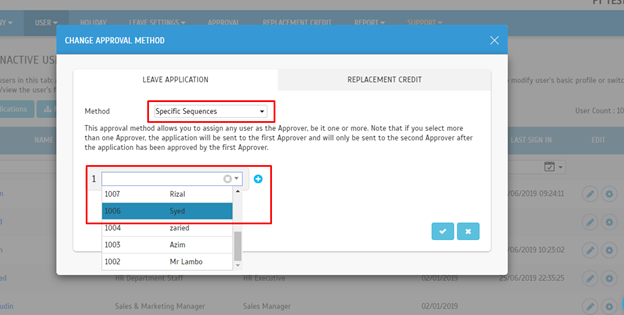
Step 6: Choose the Start and End date of the validity period for the unit owner to lodge any of the defect reports.

Step 7: Enable the Defect Report Eligibility button. The user may disable this button if necessary. Once disabled, the unit owner cannot submit a defect report — Click Submit button to save the changes.


How to View and Update A Defect Report on the Web:
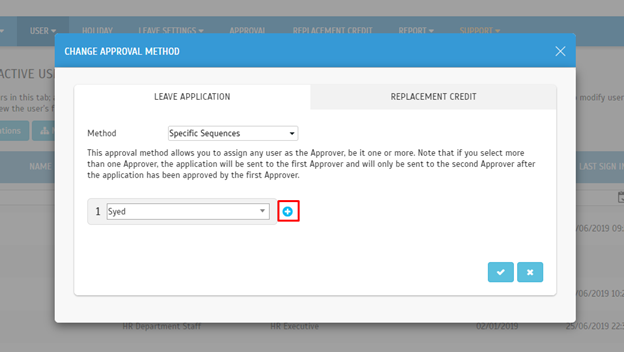
Step 1: Go to Defect Report, and you can view all lodged defect tickets. The number of days the tickets submitted determines the category of the defect tickets; 1 - 10 days, 11 - 20 day and more. Find the particular defect ticket and click on “View” to view the defect details.


Step 2: Click on the Checked button next to each of the defect item to update the ticket status to “In-Progress” and click on “Repairs Completed,” if the issue resolved.


Step 3: Continue by proposing a few Joint Inspection dates to the unit owner, and the unit owner needs to confirm on either one of the proposed dates or reschedule a new inspection date.


Step 4: Once the Unit Owner confirmed the schedule, the Admin can proceed for an inspection with the owner.


Note: If the Unit Owner did not choose a schedule or absent for 3 times, CRM could close the ticket by themselves.

Step 5: Once the inspection completes, the unit owner can close the ticket.


Note: If some of the screenshots or steps viewed here are different from the ones in the current system, this is due to our continuous effort to improve our system from time to time. Please notify us at info@i-neighbour.com, we will update it as soon as possible.

The solution to Issuance Date Error when Migrating Date from TCMS V2 to TCMS V3 and Ingress


Introduction
Recently, there are several issues related to database migration from TCMS V2 to TCMS V3 and Ingress software. First, user details migrated without the issuance date, wrong issuance date, or expiry date auto-configured to 1/1/2000.


Solutions
Make sure the backup database made with the latest version of TCMS V2 software. Please be informed that the final version of TCMS V2 software is version 2.2.027 with patch date 24-05-2017.

1. If you are using an old version of TCMS V2 software, please update the TCMS Vv2 software to version 2.2.027 by downloading the software installer at the following link.
https://www.fingertec.com/softwareupdate/software-tcmsv2_download_e.html

2. Also, if you are already using TCMS V2 version 2.2.027, please check the patch date version you are using. Go to System Settings > What’s new in this release? And check the patch date.


3. If the software patch date is older than 24-05-2017, please follow the steps below to update the software patch date.

1) Download the latest ft.exe file from this link: https://s3.amazonaws.com/files.fingertec.com/Faiz+Tools/TCMSv2+Software+FT+Setup/ft-75+22027+240517.exe

2) Rename the downloaded file to "ft.exe" (remove all the numbers in the file name, and leave it as ft.exe)

3) Copy the above file, and paste it in TCMS v2 folder (Local Disk C > Program Files (x86) >Fingertec Worldwide > TCMSv2) to replace the existing ft.exe file

4) Relaunch TCMSv2 software - Run as administrator [go to System Settings > What's new in the release > Make sure the version is updated: v2.2.027 24-05-2017

Secondly, please make sure you have installed the latest version of TCMS V3 and Ingress Software before proceeding with the migration process. You are also required to install minimum Microsoft .Net Framework 4.6.2 in your workstation PC. You may refer to the following link for Microsoft .Net Framework 4.6.2 installer.
https://dotnet.microsoft.com/download/dotnet-framework

Lastly, you also required to install Microsoft OLE DB Provider for Visual FoxPro 9.0 in your workstation. The TCMS V2 is using FoxPro database type so, this installer allows the OLE DB in the workstation to give access for Visual FoxPro database and tables for migration purpose. You may download the installer from the following link.
https://www.microsoft.com/en-my/download/details.aspx?id=14839

Note: If some of the screenshots or steps viewed here are different from the ones in the current system, this is due to our continuous effort to improve our system from time to time. Please notify us at info@timeteccloud.com, we update it as soon as possible.

TimeTec Leave - How to Set a User as a Leave Approver


Introduction
TimeTec Leave is a solution that provides convenient employee leave management for various types of companies. Using TimeTec Leave, you need to start by assigning approvers directly to every User and subsequently, determine the type of approval you need, i.e., immediate supervisor, specific sequences or random for each User, before everybody can start using the solution. There are two options for the approver to approve; leave application and replacement credit.

Process
1) Assign User as an approver for leave application
2) Assign User as an approver for a replacement credit application
3) Report to check the approvers for all users

ASSIGN USER AS APPROVER FOR LEAVE APPLICATION
Login into TimeTec Leave. At the homepage, choose User> click Manage User.


Tick or Select user/staff. You may have multiple selections of user/staff under one approver.

After done selecting user/staff, click Manage button > choose Change Approval Method


At the new window, you may choose an option of an approver which are  Any admin, Immediate supervisor, Specific sequence & Any (X) approver.


NOTE*

ANY ADMIN - This approval method assigns all Admin in the system as the approver, and only ONE Admin needs to approve the leave application. Note that all Admins receive the leave application notifications.

IMMEDIATE SUPERVISOR - This approval method automatically assigns Immediate Supervisors as Approvers according to the Hierarchy Chart. Therefore, set your Hierarchy Chart before you proceed. Any user not assigned to the Hierarchy Chart is an Approver. To assign all users under the same approver, please select Specific Sequence.

SPECIFIC SEQUENCE - This approval method allows you to assign any users as the approver, be it one or more.  If you select more than one approvers, the first approver gets the application, and only after he approves the application, the second approver gets to approve.

ANY (x) APPROVER - This approval method allows you to select multiple approvers for the User's application. Note that it requires [x] number of approvers for the approval.

If you select specific sequence > you may choose user/staff as an approver for the selected staff before.


If a leave application needs more than one approver, you may click '+' button and select user/staff to become an approver.


After done configuring, click save/submit button.


To verify the settings, click User> Manage User > tick/select User you want to check > click 'gear icon' Leave setting


 At a new window, click Approval Method


These are the settings that we configured before.


ASSIGN USER AS APPROVER FOR REPLACEMENT CREDIT
Login into TimeTec Leave > at the homepage, click User> choose Manage User
Tick or select user/staff. You may have multiple selections of user/staff under one approver.


Tick or select user/staff. You may have multiple selections of user/staff under one approver.


After done selecting user/staff, click Manage button > choose Change approval method


At a new window, click Replacement credit


After done configuring, click save/submit button.


To verify the settings, click User> Manage user > tick/select User you want to check > click 'gear icon' Leave settings


At a new window, click Approval Method


Click Replacement credit. These are the settings that we configured before.


REPORT TO CHECK APPROVER FOR ALL USERS
Login into TimeTec Leave > at the homepage, click Report > choose User approval method


Tick / Select User or you can select multiple users. You can filter by organization structure.


After done configuring the settings, click Generate.


This is an example report for User Approval Method.


Note: If some of the screenshots or steps viewed here are different from the ones in the current system, this is due to our continuous effort to improve our system from time to time. Please notify us at info@timeteccloud.com, we update it as soon as possible.

External Buzzer or Siren Connections for Door Open Notification


Introduction
For the safety or requirement of an industry, door always needs to be closed or else, it will risk intrusion, damage or loss of a product or an environment. For example, the storehouse storing valuable things, a server room where the temperature needs to be maintained, the dust-free rooms and etc. Hence, the clarity of knowing that the room is always need to be closed neatly is mandatory. By adding a buzzer or an alarm on the door, this purpose can be achieved.
 
Process
1- The buzzer or siren can be installed next to the person who is in charge for the room or space where maybe the person desk or office far from that.
2- A loud buzzer or siren can be used for large or noisy environment

Components
 
Wiring Diagrams
Below is the example of connection using the AdapTec Plus when using 12VDC buzzer/siren


Below is the example connection using the AdapTec Plus using 240VDC buzzer/siren


Installation Example


Note: If some of the screenshots or steps viewed here are different from the ones in the current system, this is due to our continuous effort to improve our system from time to time. Please notify us at info@timeteccloud.com, we will update it as soon as possible. 

Event Push Notification to Ingress Mobile


Introduction
To have more convenient and efficient monitoring process, Ingress software provides push notification to mobile for admins/supervisors. With this feature, the users will be able to get notification via the mobile application when there are specific events happening at the devices.

Process
1. Setting in Ingress software
You will need to select the types of incident which will trigger the push notification. Go to System Settings > Alarm > Edit > Add.


** Please be reminded that Standalone Device and Ingressus controller have different events. 
Please choose according to the device models.

Next, proceed to tick the option ‘Send Push Notification to Mobile’ and select the recipients (Ingress users). Lastly, save the settings.


2. Setting in Ingress Mobile
Next, please download and install the latest Ingress Mobile application from the Play Store or the App Store according to your mobile operating system.

Open the Ingress Mobile apps, enter the server IP address and port accordingly to connect to your Ingress server.

                                  
Upon login,  please make sure the push notification is allowed for this Ingress Mobile App.
                                         
Example:
If all the above is setup correctly, the notification should be able to be sent to recipients via this Ingress Mobile App.

For example, an event ‘Invalid ID’ and ‘Disconnected’ have been triggered. Hence, the Ingress mobile being logged in with a specific Ingress user account will receive the notification.

3. Event Triggered in Ingress software


4. Ingress Mobile Notification

                                       
Note: If some of the screenshots or steps viewed here are different from the ones in the current system, this is due to our continuous effort to improve our system from time to time. Please notify us at info@timeteccloud.com, we will update it as soon as possible.