How to Utilize Deduction No. of Hours and Late In/ Early Out Setting In Clocking Schedule


Introduction
This feature is allowing you to deduct the number of hours from work hour and predefined the Late In or Early Out to be considered as Half Day Leave. 

Benefit
The system will deduct the number of hour automatically and identify the Late In and Early Out cumulative hours as a Half Day Leave instantly

Process 
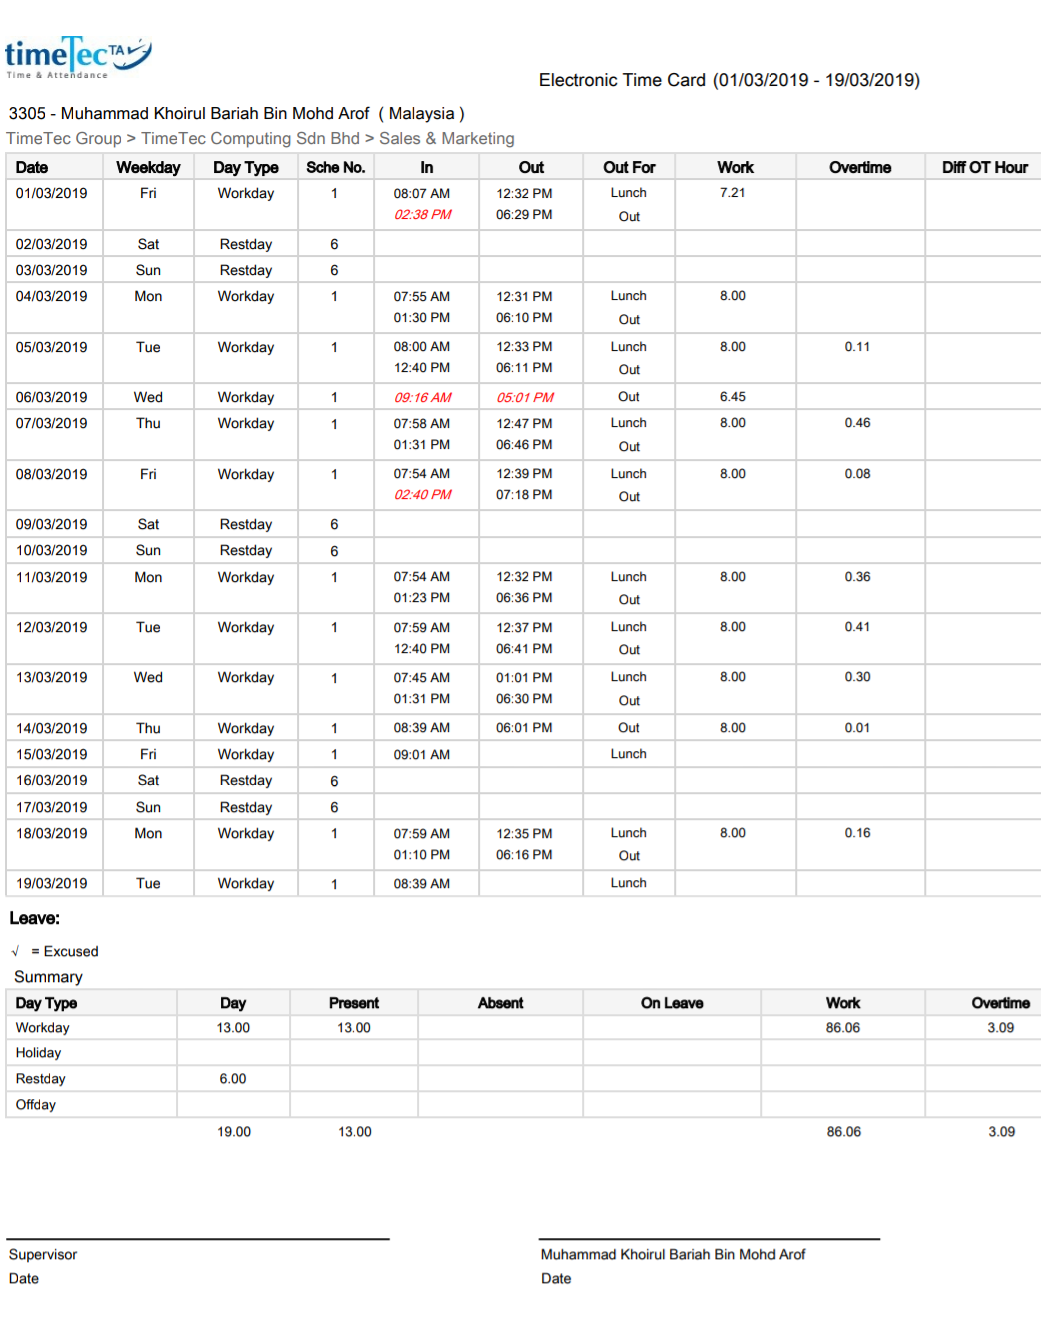
This is an example of the Clocking Time set in Clocking schedule.


A. Half Day Setting using Late In and Early Out hours
1. To set the Half Day setting, you need to make sure that Half Day Leave has been added into the Leave type.  If you haven’t done this step, you need to go to Leave Type and add Half Day as one of the leave types in the system.


2. Once added and saved, go to the general tab of clocking schedule and set the Half day settings as per the below screenshot. Generally, total work time is 8 hours, hence half day 4 hours. 


3. Check the attendance sheet and the data should be displayed for Late In and Early Out as Half Day. Please note that the clocking time of the user must fall in the IN column for Late In and the OUT column for Early Out for the system to automatically sort the data.

For Late In


For Early Out


B.Deduction for Late In and Early Out
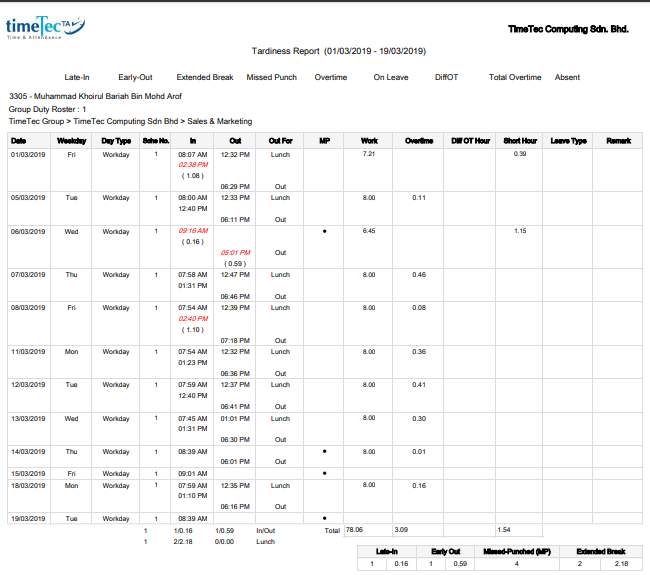
Below is an example of the attendance sheet for Late In and Early Out.
For Late IN


For Early Out


For example, if a company policy states that the system needs to deduct 30 minutes from total working time if an employee is Late IN or Early Out for 15 minutes, at the general tab of the clocking schedule, you may set it as the below screenshot.


By setting this, the Attendance Sheet will deduct 30 minutes if any of the users came in late more than 15 minutes. The sample of result on the attendance sheets after applying the setting above is shown below.

For Late In

For Early Out


Note: If any of the screenshots or steps in this manual are different from the current system, it is due to our continuous effort to improve our system from time to time. Please notify us at info@timeteccloud.com. We will update it as soon as possible.

How To Setup BLE-2 In i-Neighbour Web


Introduction
TimeTec BLE-2 Control Board functions as an intermediary device between a user’s Mobile App and the barrier gate controller, whereby a user can tap on his/her Mobile Ap or send a voice command to TimeTec BLE-2 via Bluetooth connection. TimeTec BLE-2 will then translate the command into  digital pulse and instructs the opening of the barrier gate. Hence, we have prepared a short guide on how to setup BLE-2 in i-Neighbour web.

Steps required:
Login to i-Neighbour admin web portal, select IOT > Smart Barrier > Barrier Gate Setting.

2. To add BLE-2 in system tab on Add at top right.

3. Choose hardware type TimeTec BLE-2

4. Enter BLE-2 serial number. Mac address will automatically fill after you enter serial number.

5. Choose Controller name for example Entrance. Then select access type to control BLE-2 that have be install in barrier gate.

6. Choose your purchased BLE-2 date at calendar in red box, then submit.

7. You can see BLE-2 after you added in Barrier Gate Setting. 

8. To setup barrier gate for resident, select IOT > Smart Barrier > Vehicle Access Pass.

9. Go to setting at bottom right to set BLE-2

10. Choose TimeTec Smart Phone Access (BLE-2) and choose how many car park to setup for resident.

11. Choose pencil icon at right screen to enter resident detail for parking lot.

12. Enter resident detail and choose  BLE-2.

13. Once done, you can see resident parking lot has been successful.

14. Resident can see Smart Access in i-Neighbour Apps.
If you are still having problems after completing all of the steps stated above, please contact us via: support@i-neighbour.com

Note: If some of the screenshots or steps viewed here are different from the ones in the current system, this is due to our continuous effort to improve our system from time to time. Please notify us at info@i-neighbour.com, we will update it as soon as possible.

Get Your Own Attendance Reports Straight from TimeTec TA App


Introduction
On top of 31 reports offered by TimeTec TA to the admin of the System, each user is also offered three personalized attendance reports which can be generated via TimeTec TA mobile app. The first report is Electronic Time Card that summarizes all the clocking activities of a user, the second is Tardiness Report that presents the details of late and early clocking data, and the third is Mobile Location Tracking that details out the list of GPS clocking for that particular user. These reports can be generated according to custom timeline and it will be presented in a pdf form.

Benefit
These reports are useful for users to countercheck the information recorded by the system and to rectify with admin if any discrepancies are found. 

Process
Step 1 – Login to TimeTec TA mobile application.
Step 2 – At the main menu, tap on “Report”.

Step 3 – Choose a report type, select the preset time range or you can customize the date using calendar. Tap on the Download button on top of the page to generate the report.

Step 4 – When the process is complete, you will see “Click to open report” button, tap on it and view your report. 
Step 5 – The report will be viewed.

a) This is a sample of Electronic Time Card Report.


b) This is a sample of Tardiness Report.

c) This is a sample of Mobile Location Tracking Report.

The PDF file of the report can be shared and printed for your own purposes. 

Note: If any of the screenshots or steps in this manual are different from the current system, it is due to our continuous effort to improve our system from time to time. Please notify us at info@timeteccloud.com. We will update it as soon as possible.

TimeTec Patrol - Offline Mode


Introduction
TimeTec Patrol mobile app is designed to collect security guards’ patrolling records in real time. During patrolling, security guards can capture photos, report incidents in text or voice notes and so on. The data reported will be logged into the server immediately, thus connection to the Internet is required for the system to work properly. 

However, some patrolling sites might not have proper mobile data Internet or poor Internet connection. To handle this situation, security guard can enable the Offline mode in TimeTec Patrol mobile app. Below are the steps to use TimeTec Patrol Offline mode.

Steps
1. When guard is ready to perform his patrolling task, enable the Offline mode button to start. 
2. The mobile app will start downloading patrol routes and rules into the smartphone. Make sure the Internet connection is stable for the download process to complete. 
3. When download process is completed, security guard can start patrolling using Offline mode. All patrolling records, photos, text and voice incident reports will be saved in the smartphone storage. Please note that Panic Button feature is not available during Offline mode. 
4. When the security guard finished patrolling and got back to his office, the security guard can resume back to Online mode. Tap at the Upload Data button to push all patrolling records, photos, and incident reports to the server. Tap Offline mode toggle button to resume back to Online mode. 

Note: If any of the screenshots or steps in this manual are different from the current system, it is due to our continuous effort to improve our system from time to time. Please notify us at info@timeteccloud.com. We will update it as soon as possible.

Importing Leave Records From Excel/Text File In TimeTec Leave


Introduction:
TimeTec Leave is a cloud-based solution that facilitates all leave proceedings online for a company regardless of its size. One of the handy features  included in TimeTec Leave is the capability to import previous leave records from an Excel or a Text file. This particular feature is especially useful for companies that are upgrading to TimeTec Leave since all leave records taken previously will be safely stored within the system for a clear audit trail throughout. Below is a quick guide on how to carry out this process.

Process:
1. To start importing the Leave Taken records, first go to TIMETEC LEAVE > SUPPORT > Wizard > Leave Wizard.
 

2. Once in the Leave Wizard page, please click on (1) Import Leave Taken.
3. Proceed to download the samples (2) for Excel format and (3) for Text format.


4. After downloading the respective files (e.g. Excel file as shown in the screenshot below), proceed to fill in the leave record details inside the column given. Note that each leave taken record must be separated.
5. The Start Time and End Time must be followed by the working hours (8 working hours for full day leave and 4 working hours for partial day leave).
6. It's also important that you match the leave names before starting with the Import process.
 

7. After filling the data in the file, proceed to choose the Implementation Date. (Implementation Date must be LATER than the Leave Record Dates added in the file).


8. Moving on, click on Browse and select leave record file. Once done, click on SAVE & NEXT  to begin importing the leave record file.


9. After the file is successfully imported, only the Leave Taken data will be updated without affecting the user leave balance. Note that the leave balance update needs to be done separately.
10. Below are the possible errors that a user might face during the import process:

No.
Error
Solution
1
User already has leave taken
Change to correct date.
2
Invalid User or Invalid Leave Type
Please make sure that the user name/leave type matches
the user account.
3
Invalid Implement date
Please make sure that the leave record date is NOT later
than the implementation date.
4
User is on holiday/rest day
Please make sure that the user’s leave record date is not
on a holiday/rest day.

11. That’s it, you should now be able to view the users' previous Leave Taken records within TimeTec Leave.


Note: If some of the screenshots or steps viewed here are different from the ones in the current system, this is due to our continuous effort to improve our system from time to time. Please notify us at info@timeteccloud.com, we will update it as soon as possible.

i-Neighbour App: How To Enable GPS and Notification Features


Global Positioning System or GPS is a satellite-based radio navigation system. It basically uses radio waves between satellites and a receiver in your phone to provide information about time and location and time to any software. Your phone's GPS receiver uses the data from these signals to triangulate your location and time. 

Notification is a feature that updates users on new messages, updates, bonuses, reminders and etc.  It usually comes with an alert notification sound. 

When you are using i-Neighbour App and you disable the notification feature and/or the GPS settings, the i-Neighbour and your security guards won’t be able to receive your location when you triggered the panic button. 

Hence, if you are intend to use the panic button in the future, these are the steps to enable the notification and GPS feature for i-Neighbour on your phone. 

GPS - Steps Required: 
Settings > Installed apps > i-Neighbour > App permissions > Enable location

GPS Setting for Android                                                 
1. Go to Settings.
2. Find Installed apps.
3. Select i-Neighbour.
4. Find and select App permissions

5. Enable the Location to activate the GPS function for i-Neighbour.

GPS Settings for iOS
1. Click on Settings.
2. Select i-Neighbour.

3. Tap on Location to open the location settings.
4. Choose Always for Location Access

Notifications - Steps Required: 
Settings > Notifications & status bar > App notifications > i-Neighbour > Enable all

Notifications Setting for Android
1. Go to Setting.
2. Find Notifications & status bar.

3. Tap on the App notifications to see the apps list.
4. Search and select i-Neighbour.

5. Enable all functions to receive all notifications related to i-Neighbour.

Notifications Settings for iOS
1. Go to Settings.
2. Select Notifications.
3. Choose i-Neighbour.
4. Turn on all functions to receive all notifications from i-Neighbour.

Note: Every Android smartphone has a different user interface, hence the screenshots presented above might be different from your smartphone UI.

If you are still having problems after following the given instructions, please contact us via: support@i-neighbour.com 

Note: If some of the screenshots or steps viewed here are different from the ones in the current system, this is due to our continuous effort to improve our system from time to time. Please notify us at info@i-neighbour.com. We will update it as soon as possible.